Some of you might remember my post about Switching to Capture One from Aperture. Since then, Capture One Pro 10 has been launched, which I’ve beta tested for a couple of months (more on that below). I would like to share some of my favorite features and tips with you. There are many, and each have proven to be useful controls I’m not sure how I previously did without. The image quality has never been greater!
Tethering Improvements with Focus Control
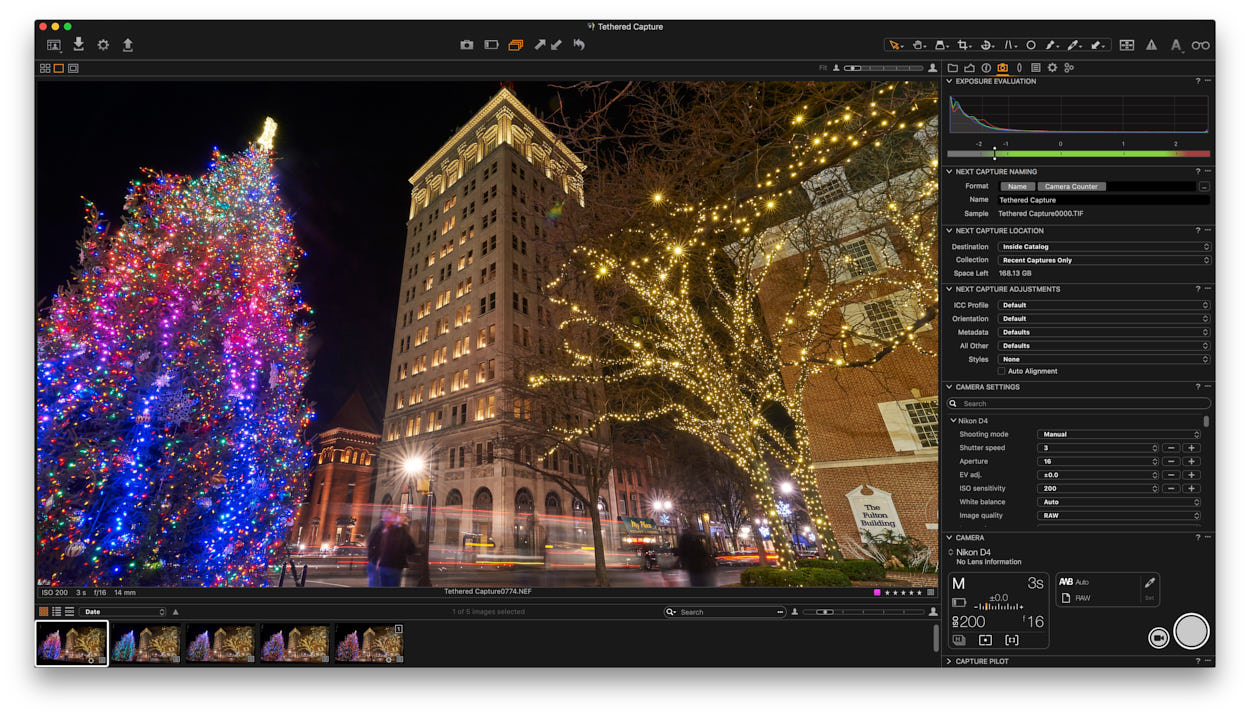
Capture One 10 precisely controls the camera focus when tethering, and this feature is simply incredible. I wanted to put it through the paces in a lower light situation, having less contrast for the camera to focus on. I often capture nightscapes to create dramatic images for clients, and tethered capture improves that process.
Tethering empowers photographers to more easily monitor sharpness, view the exposure on the histogram, check for composition changes, and now to also adjust focus.
You can automatically copy and apply adjustments to each new subsequent capture, which is particularly beneficial when a client observes. I’ve had as many as ten excited people gathered around a tethered computer watching an image come together. It helps observers instantly visualize the creative process, which often leads to great feedback, help with staging, and collectively achieving better results.
To test out focus control I used the following gear:
- Nikon D4 with 24-70 mm f/2.8 lens
- 13” MacBook Pro with Capture One 10
- USB 3 Cable (this will vary by camera)
- Manfrotto Tripod & Head
- Tether Tools Aero Table and Rock Solid Tether T setup. Be sure to tighten the grub screws to secure both arms
- Optional weight for tripod – a sandbag or backpack with a carabiner will do
Setting Exposure Variables
The tethering panel in Capture One 10 enables control of all exposure settings, focus, and shutter release, with incredible simplicity. Adjusting one setting or variable at a time is often easier than trying to dial in the entire scene all at once, and the interface is straight forward.
For a nightscape that involves a tripod I set the ISO 200 as a baseline starting point, once the composition is framed. That’s the lowest ISO on a Nikon DSLR within the standard range, which keeps digital noise at a minimum (ISO 100 for Canon, ISO 50 for Phase One). If you drop lower into expanded ISO territory it can diminish the dynamic range and increase digital noise. If you use a tripod (a hiking boot or tree stump will do in a pinch), start with the lowest ISO within the camera’s normal range.
Next, I set the aperture. To keep most of the scene in focus, start around f/8, which is where many lenses offer the sharpest quality. For this scene, I eventually set the aperture to f/16 to balance the exposure in achieving a longer/slower shutter speed to blur moving traffic.
Combining long exposures and narrow apertures (f/8, f/11, f/16) emphasizes sensor dirt on each image, so keep your sensor clean to avoid heavy retouching. If i’s too late, it can diminish the appearance of sensor dirt if you stop up to f/5.6, f/4 (or faster/wider). From there, you can shorten or lengthen shutter speed based on ambient light, and if there are any moving objects in the frame to emphasize or minimize, such as traffic. While the camera is steady, motion becomes blurred in longer exposures, and repetitive movements eventually smooth out in ambient light.
Focus Tweaking Using Live View
To find and adjust focus, Live View in Capture One 10 enables focus control on a tethered camera. Focusing is quite simple, with the preview exposure momentarily brightening as it searches for contrast in the frame. You can make near or far focus adjustments incrementally in three different amounts in either direction. I kept the focus about 1/3 into the frame to maximize the already large depth of field.
I’m amazed at how well Capture One finds focus at night and how much control I have even with a narrow depth of field. Focus control is quite useful to avoid disturbing the camera anytime the camera needs to be still, including commercial settings, product work, and focus stacking without using a slider. For portraits, tethering coupled with focus control helps create a more casual interaction, while it offers refinements to nail exposure using a larger monitor.
With a Phase One camera, especially the astounding XF 100MP Camera System with razor sharp focus, the most beneficial feature of Capture One 10 might be focus control.
Sharpening with Halo Suppression
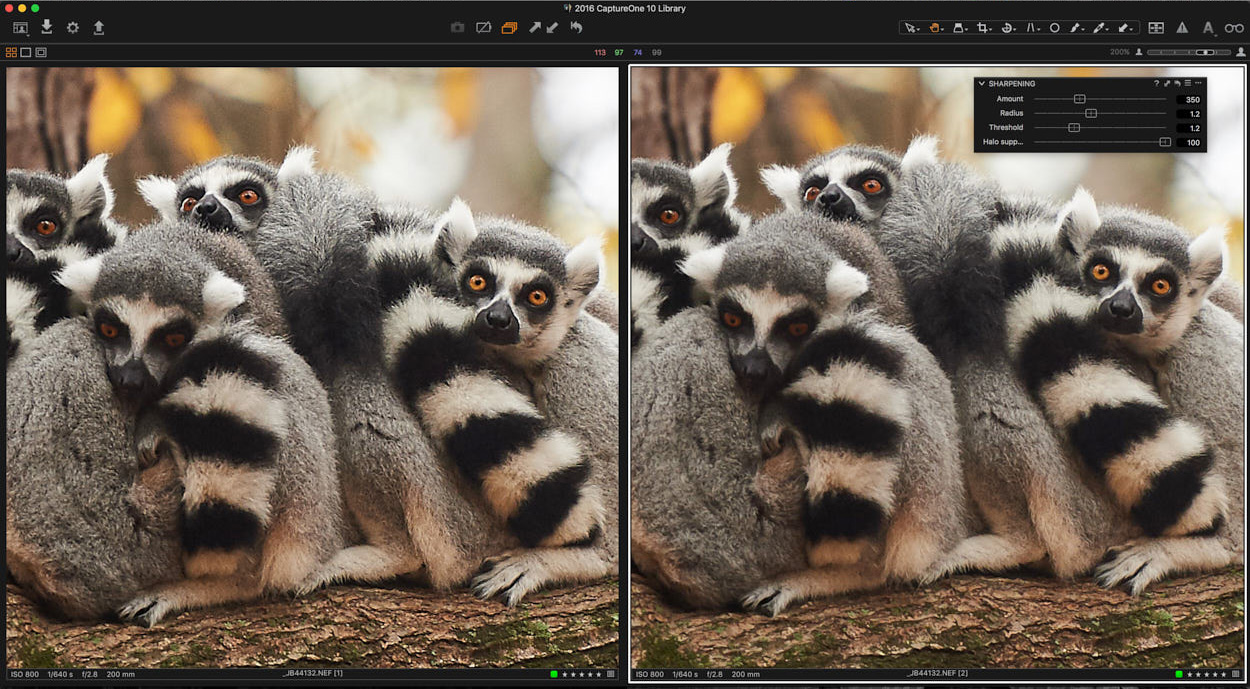
Halo suppression is yet another fantastic measure to improve image quality. When heavily applying sharpening to an image, glowing halos might show up along lines of high contrast. The new Halo Suppression Tool smooths those halos over effortlessly to diminish the appearance that a photograph was sharpened.
As an experiment, I took an image slightly out of focus to sharpen it in post, using the more concise sharpening adjustments in Capture One 10. The difference was remarkable and halos were dramatically reduced while I made the photograph noticeably sharper.
Always try to get it right in camera, but if you can’t, halo suppression can really help save the day.
Workspaces
There’s a new default workspace in Capture One 10, along with some streamlining for making faster adjustments. One change eliminated the Crop Tab through reorganization, which had the same icon and close proximity as the Crop Tool.
Keeping the browser on the screen’s right side makes great use of real estate – especially for wide aspect ratio.
You can create your own customized workspaces for specific tasks, which I highly recommend. This can completely transform your Capture One experience in the best possible ways.
Hardware Tools as Time Saving Shortcuts
If you use an Intuos tablet with custom configurations specific to an earlier version of Capture One, keep in mind that you need to configure those for Capture One 10. However, this is quite simple.
I’m new to using an Intuos Pro tablet, but love it with Capture One.
I finally got to meet David Grover in person at PhotoPlus Expo in NYC and he has a literally jaw dropping workflow where he uses Tangent Element video editing controllers, which are now enabled in Capture One 10. With this, you can customize physical shortcuts and image adjustments on the controller for tangible precision and incomprehensible speed.
Also, if you’ve never been to PhotoPlus Expo, check it out next October and say hi to everyone at Capture One.
Output Proofing
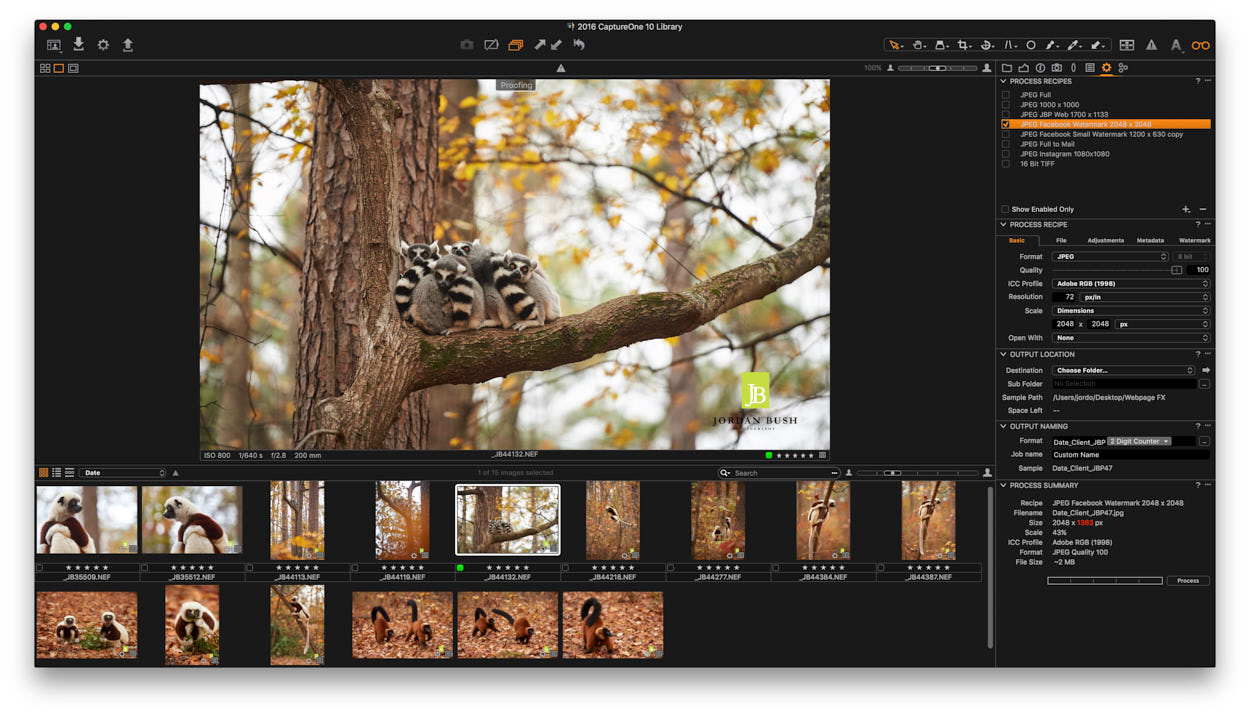
A great feature to quickly review web resolution files before exporting one or many photographs in a recipe. This works quite well to see if sharpening gets affected when you resize a photograph. Output proofing helps balance quality with resolution to optimize webpage speed instantly, saving the time it would take to export a sample.
Folder Merging in Catalogs
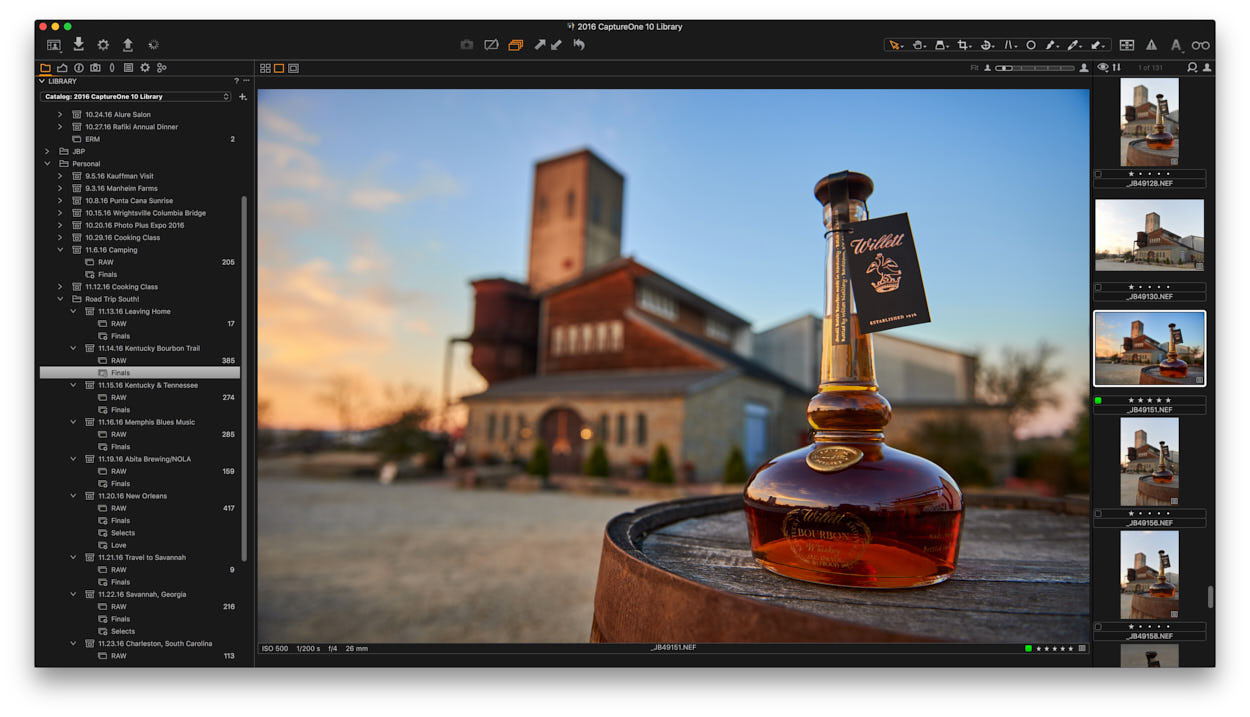
The User Collection in Capture One 10 is one of its greatest strengths and it just got easier. I recently finished a two-week working road trip that included photographing multiple subjects on a daily basis. Capture One helped keep my work organized so when I later imported the trip catalog into my main 2016 Catalog at my desk, reorganizing was a cinch.
Beta Testing Capture One
It’s really awesome having access to new features ahead of schedule to bring your image quality to another level. If you’re already a registered Capture One Pro user, you can sign up to beta test here. You’ll have periodic downloads of beta software with release notes describing each new feature.
When the official release comes out, you’ll be fully in the know and your feedback helps improve the user experience. Capture One 10 is packed with exciting and useful features so there was much try out.
When beta testing, it’s best to create a separate test catalog for that version of Capture One. That will protect your primary catalog from any potential issues that may arise by maintaining those images when using the official release. If you back up each Capture One catalog regularly, your adjustments and image organization will be saved, should a problem arise. So, be sure to keep on top of that simple procedure. During long color correction sessions, I recommend that you back up periodically to save your work.
I’ve beta tested for a few great companies and it amazes me how frequently Capture One’s software is updated. They always update release notes correspondingly and highlight changes as well as the logic behind the improvements. It’s clear that much care goes into the development of Capture One – that it’s made by photographers, for photographers.
Tips for upgrading to Capture One 10
- Backup
Upgrading from Capture One 9 to 10, for me, was a breeze. A 450 GB Capture One catalog updated almost instantly after the prompt.
It’s always a wise idea to back up your catalog AND image files, but you need to complete it any time there’s a software change. Carbon Copy Cloner 4 makes the job increasingly simple for you this and every subsequent time. I maintain one backup on a dedicated hard drive at my desk and a second, which is off site.
To keep CCC from automatically overwriting a healthy backup, I have scheduled backups disabled.
- Styles
If you have any User Styles installed, Capture One automatically finds them, which is nice (Adjustments – Styles – User Styles).
- Intuos Tablet Shortcuts
This is quite simple. However, be aware that Intuos Tablet settings in System Preferences need to be configured if you have specific shortcuts enabled in Capture One 9 or earlier. I’m relatively new to using an Intuos Pro tablet, but love it with Capture One.
That was all from me, for now. I’ll be back in an up-coming webinar with David Grover, in which we’re going to talk about Maximizing Catalogue Organization. Feel free to join in! You can read more and sign up here.
If you have any questions, please don’t hesitate to leave a comment. You’re also more than welcome to visit my website.

Jordan Bush
Jordan Bush is a photographer and writer based in the countryside just outside of Philadelphia, PA. Always adapting, he focuses on commercial photography and photojournalism. From snipers to social issues, his photojournalism work has taken him to five continents and counting.



Hi Jordan
Nice and interesting article. You used a 13” MacBook Pro for your testing. Does CO10 work fine with this computer? Can you tell us your hardware configuration?
Thanks
Although I’m not Jordan:
I installed the Trial version of CO v10 on my MacBook (early 2016) and it works (as far as I tried) but rendering seems to ‘behave’ better when OpenCL is disabled (doesn’t disturb me as I don’t think that the graphics would fulfill the OpenCL req. anyway).
HW:
CPU: Intel Core m5 @ 1,2 GHz
RAM: 8 GB
Graphics: Intel HD Graphics 515 w 1536MB (shared?)
Hey Jesus,
Thanks for your question. My MacBook Pro Retina is a mid-2014 2.8 GHz Intel Core i5, 512 SSD, 8 GB of RAM, Intel Iris 1536 MB graphics.
COP10 runs great for me but I know my limits. When at my desk, I have a 20″ Apple Cinema Display and 27″ Dell 4k display connected with just only Capture One window open at a time which limits its capabilities for sure. RAW images (24.1 down to 12.1 megapixel 14 bit NEF files) are stored locally on the internal SSD and then moved to a Thunderbolt RAID array.
I recommend using a workstation with 16+ GB of RAM if you have a choice. An iMac would be ideally suited for day to day production, or even a Mac Pro, which is eventually my plan.