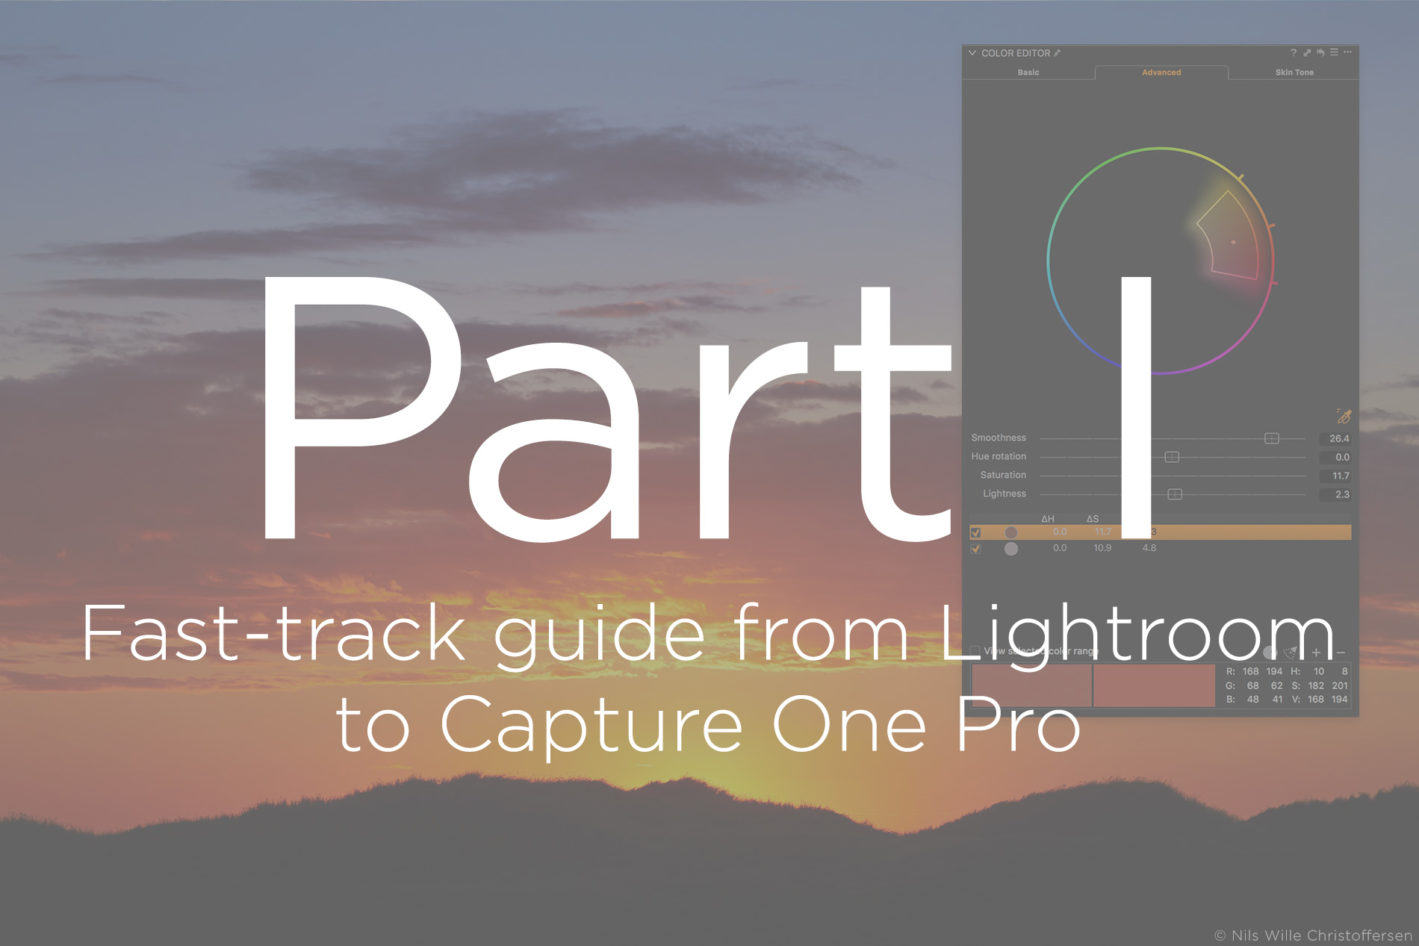
There are numerous great reasons to make the switch from Adobe Lightroom to Capture One Pro, like the powerful tethering and session workflow or the superior color editing features. Luckily, there is no reason to worry about it being a time-consuming transition, because many key concepts are very familiar. With this two-part fast-track guide, you will learn about the most important differences and be ready to enjoy Capture One Pro from day one.
In the grand scheme of things, Capture One Pro and Lightroom work the same. All changes to your images are done non-destructively by saving the edits in a database and keeping track of where your original photos are stored. This familiarity makes it easy to import your existing Lightroom catalog into a new Capture One Pro-native catalog so that you can continue to work on your image collection right away.
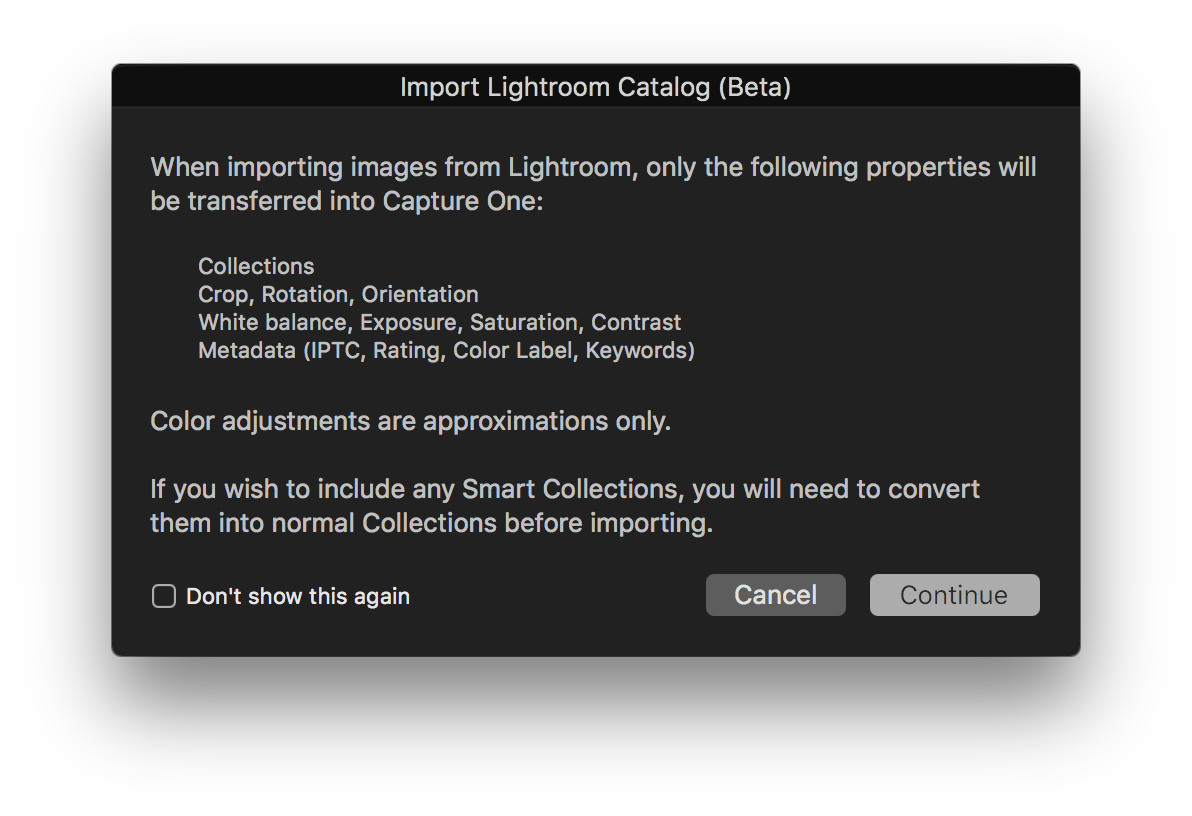
Importing your Lightroom catalog is easy.
Just select File > Import Catalog > Lightroom Catalog…. Capture One Pro will import key metadata like Rating, Color Label, Keywords and IPTC data and some basic image editing like White Balance, Exposure and Saturation.
Working with a Session instead of a Catalog.
Unlike Lightroom, you also have the option of working with a Session instead of a Catalog. Sessions is the preferred workflow for a lot of photographers when working on a project, because a Session by default comes with a portable and autonomous folder structure.
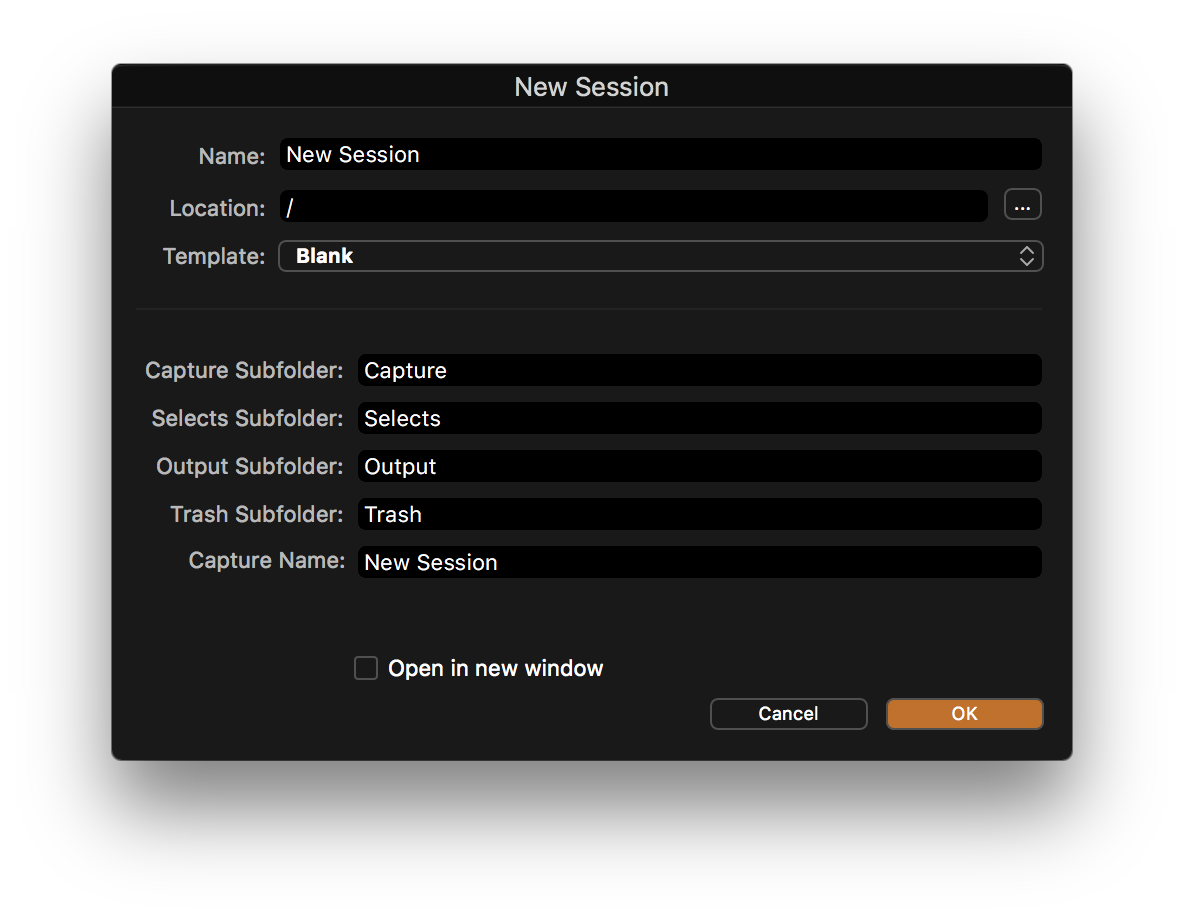
The key advantage is that everything from captured images to exported files are kept within the same main folder, and since all edits are stored in a database, you can import a Session into your main Catalog. That way you get the best of the fast Session workflow and the grand portfolio overview of the Catalog. It is also worth mentioning that you can have more than just one Catalog or Session open at any given time, giving you full flexibility.
Customize to your heart’s content
The biggest change that you will experience as a former Lightroom user is arguably the user interface. Gone are the different modules like Library and Develop where you can only do specific things. In Capture One Pro you have the freedom to do everything you want to do on the selected images because all Tools can be used at any given time.
Think of the way Photoshop is handling things with a toolbar and several selectable panels, and you get the idea. In Capture One Pro, panels are called Tools, and they are grouped in several Tabs to keep them organized.
If you want to get a quick and smooth transition, Phase One has built a Workplace that will make you feel right at home as a former Lightroom user. Just select Window > Workspace > Migration.
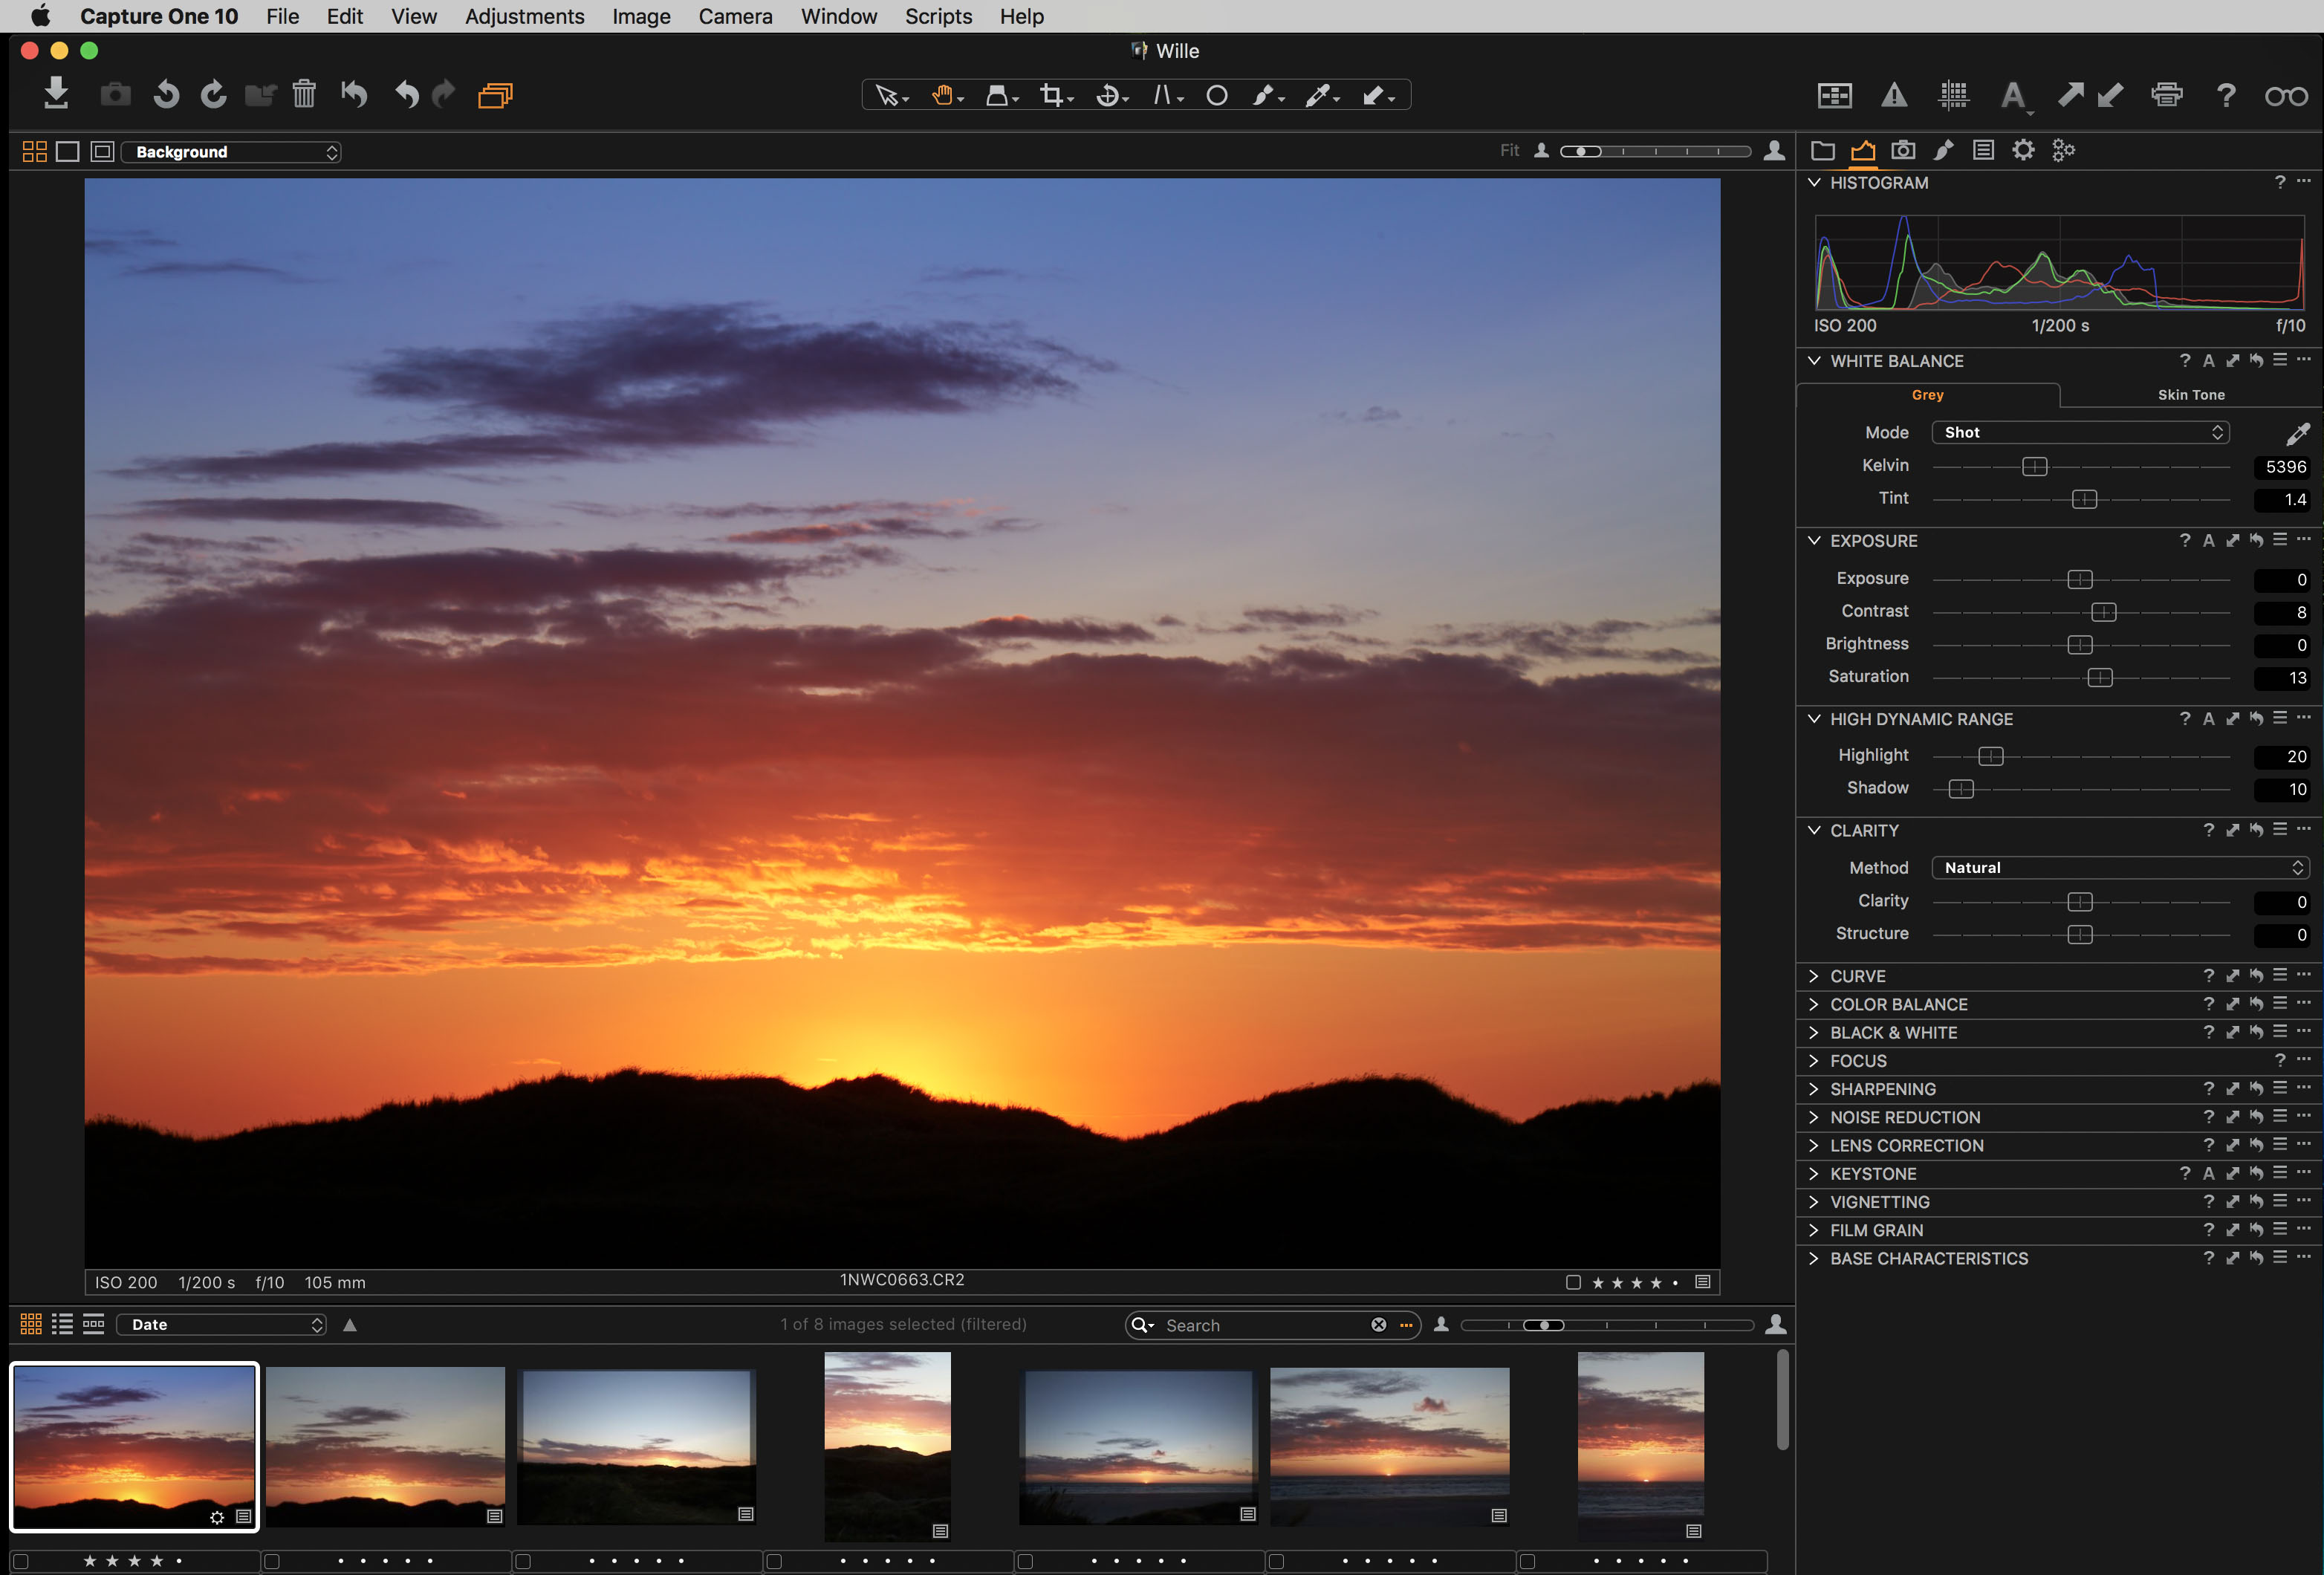
Feeling right at home with the Migration Workspace
The cool thing to keep in mind about Capture One Pro is that all the Tools can be moved around as you wish. This gives you the possibility to set up a Tab with only those Tools you use the most. For example, you might want to move the White Balance Tool to the top of the Exposure Tab to mimic the way Lightroom is setup. Just right-click within a given Tab to add or remove Tools. It gets even better than that, because you can open any Tool as a floating palette, just go to Window and Create Floating Tool – or simply drag any Tool out from the Tool Tab.

A floating Tool gives you precise control over subtle adjustments.
This can be an extremely useful feature, because any Tool can be sized larger. Just imagine working with the precise control a bigger Curve Tool or Color Editor Tool will grant you. The flexibility also gives you the option to have more than one version of the same Tool open, so you can, for example, have access to the Red, Green and Blue channels on the Curve Tool or Levels Tool simultaneously. As a nice little bonus, you can choose to place the Tabs with Tools in either the left or right side of the screen. You find that option in the View Menu, which will also show you the shortcut keys to show and hide the Browser and the Viewer amongst other commands.
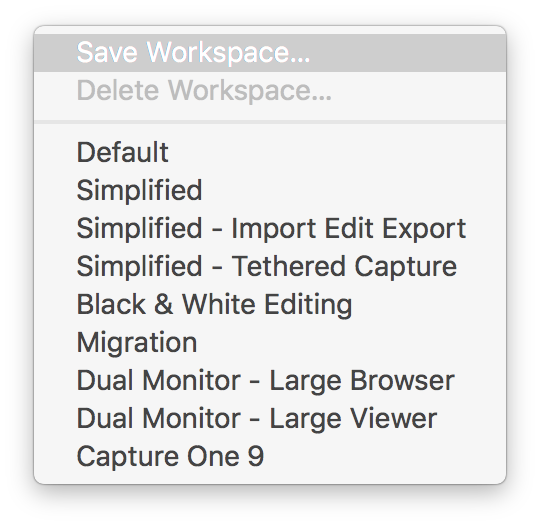
Save the Workspace that suits you.
Once you can have customized Capture One Pro to your liking, you should take advantage of the ability to save your personal workspace under Window > Workspace.
One last, but very nice feature, is the ability to customize keyboard shortcuts. So, if you have trouble giving up on certain shortcuts from the Lightroom days, you might want to check whether those can be applied to an equivalent command in Capture One Pro.
Organize and sorting
By default, Capture One Pro always has the Viewer window open, so if you want to have the equivalent to the grid of thumbnails in the Library module from Lightroom, just hide it by pressing Alt + Command + V on the Mac or Alt + Control + V on Windows.
You need to be aware that Capture One Pro does not use the Pick or Reject commands, so it is recommended to use Color Tags instead. Most use Green for Pick and Red for Reject.
Another minor difference that might confuse people coming from Lightroom is that Capture One Pro doesn’t differentiate between an original imported file and a Virtual Copy of it – all images are called a Variant. They are the same, the wording is just different. When you want to create a virtual copy in Capture One Pro, you can either create a New Variant (without any adjustments) or a Clone Variant that copies all the adjustments from the selected image.
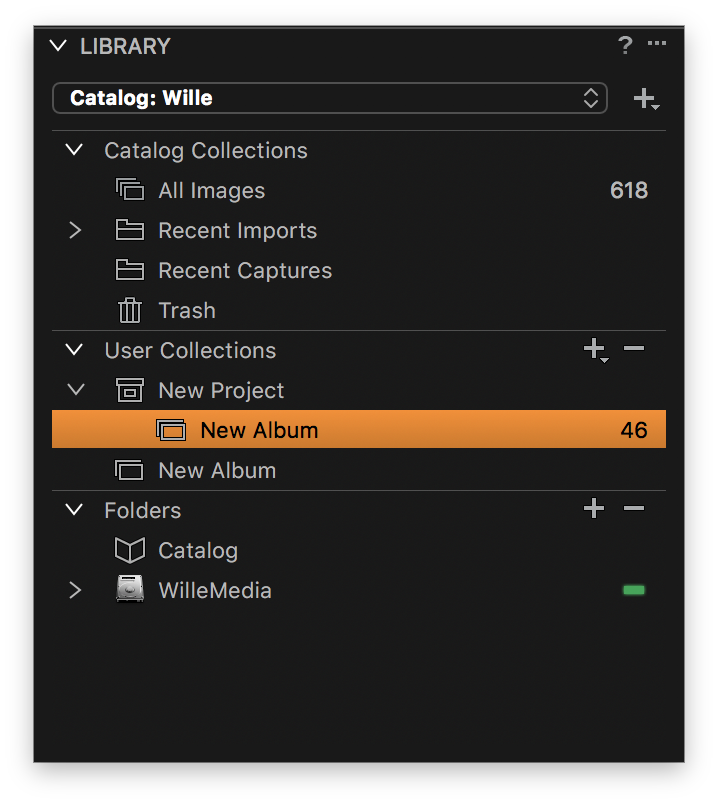
A Project needs an Album to contain images.
You have the same ability to organize your images in Album and Smart Album under User Collections in the Library Tab. The Project feature needs a bit of an explanation, however. It is a sort of a container that you create when you want to limit any search and filtering to images that are contained within that specific Project. Note that it cannot hold any images itself, you must create an Album or Smart Album first it put your collection into. Otherwise you can use a Group if you just want to organize many Albums.
There is one cool feature that you don’t want to miss out on when you are doing your initial assessment of your images. If you select View > Show Focus Mask, Capture One Pro will analyze the images and mark the areas in focus with a color. This will make it a breeze to reject those photos that are out of focus.
At first glance, the ability to filter through your collection of images based on metadata might seem a bit limited with the Filters Tool. Don’t despair, as there actually are a long list of filter options to choose from.
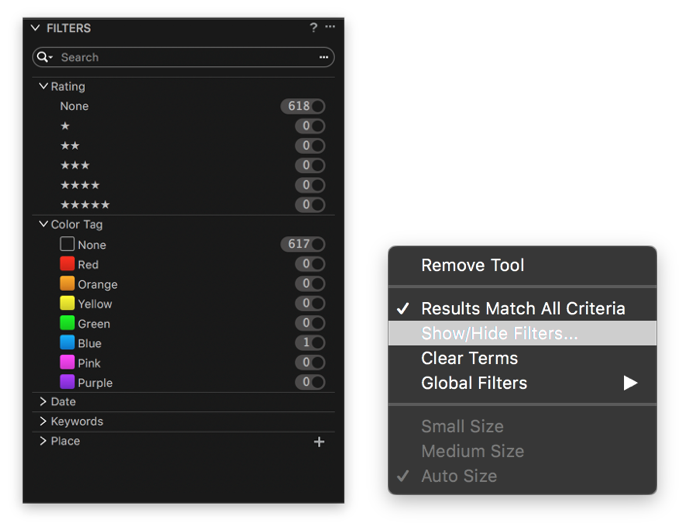
Adding additional Filters.
Just click on the three dots, select Show/Hide Filters… and mark any criteria that you want to add to the Filters tool. If you want to select more than one criteria in the Filters Tool – like a certain star rating from a certain date – just hold down Command (Mac) or Control (Windows) to enable several simultaneously.
Likewise, the Advanced Search dialogue box has a very large list of search criteria that makes it easy to narrow down exactly what you’re looking for. A very convenient feature that you should know about is the ability to create a Smart Album based on the chosen search criteria, or an Album based on the selected images right from the dialogue box.
The Compare View and Survey View from Lightroom are straightforward to enable. If you select more than one image, they will all be displayed in the Viewer. It can display up to eleven photos at once.
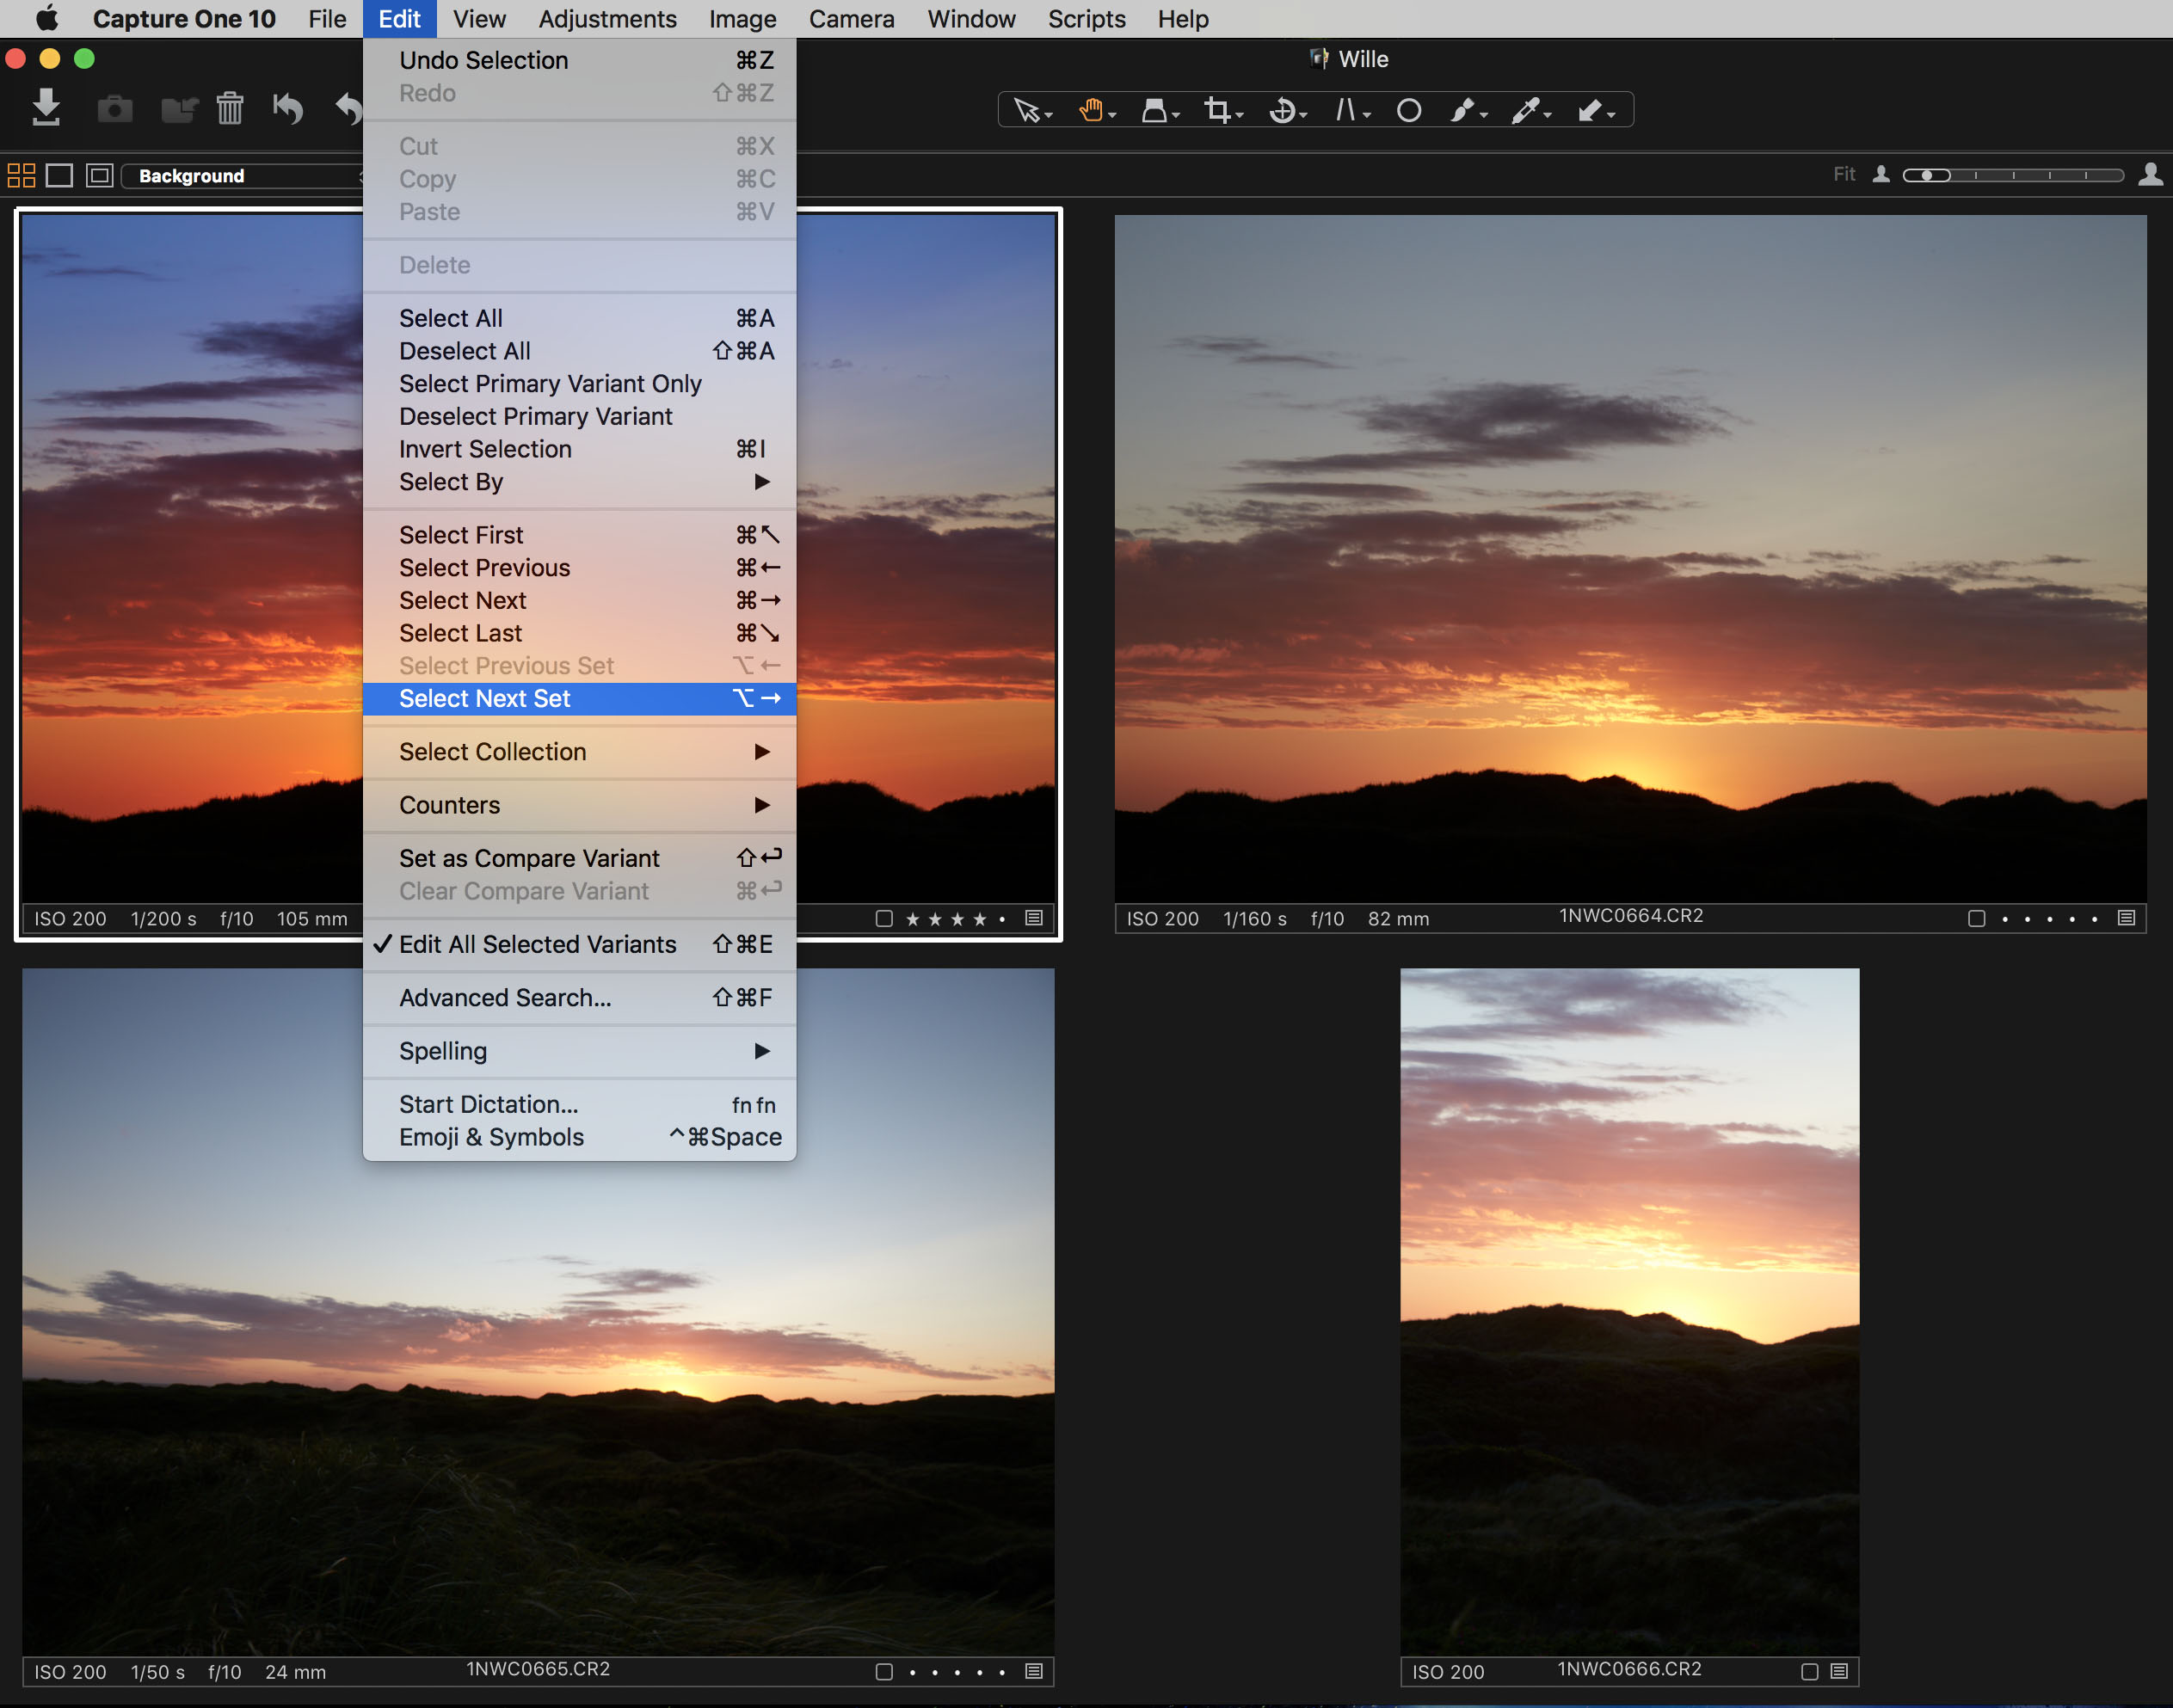
Taking advantage of the Next Set feature.
A nice little feature is that you can select, for example, four images and move to the next set of four images by selecting Edit > Select Next set. That is very handy way of assessing many images. If you instead want to select one favorite image to compare other candidates against, you simply select Edit > Set as Compare Variant.
Adjustments, Presets and Styles
Capture One Pro has the same expansive ability as Lightroom to copy metadata and image adjustments from one image to several other images. But there are a couple of subtle differences you need to know. The most important one is that you need to enable the option Edit All Selected Variants in order to make adjustments to all of the selected images and not only the primary selected image. You do this by either selecting Edit > Edit All Selected Variants, or by clicking on the Edit Selected variants icon so it turns orange.

Need to know: The Edit Selected Variants Toggle.
If you want to copy the Adjustments from a certain Tool, you click on small double arrow on top row. You then click Apply to copy the selected adjustments to the other images.
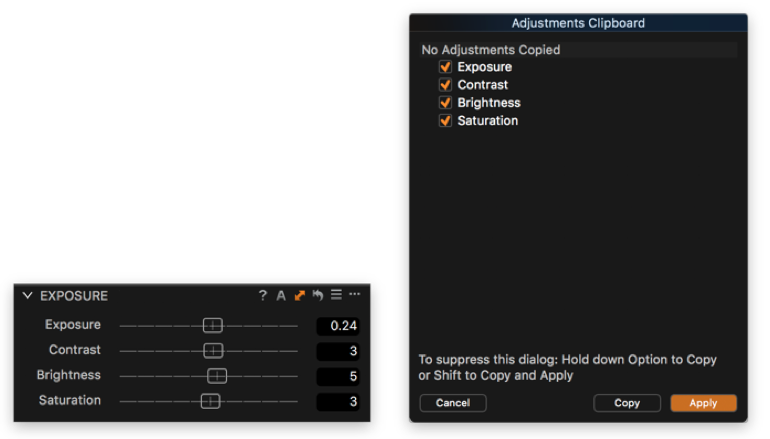
Copying specific Adjustments.
If you instead want to copy adjustments from several Tools, then click on Copy and they will be transferred to the Adjustment Clipboard which is probably more familiar to you as a Lightroom user. Under the Adjustments Tab you can select which Adjustments you want to copy, and then hit Apply to copy them all to the selected images.
You also have the option to save certain adjustments for later use, but it’s important to note that Capture One Pro distinguishes between Presets and Styles. A Preset is saved per Tool, while you can think of a Style as a collection of several Presets.
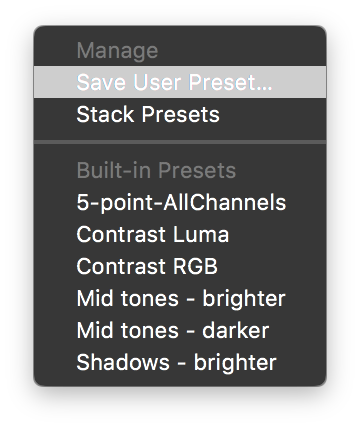
If you want to save the adjustments from a Tool, just click on the three lines icon and choose Save User Preset…. In the same sub-menu, you will also find built-in Presets depending on the Tool in question.
In Part II of the Fast track guide from Lightroom to Capture One Pro, we will look at all the key differences there are regarding image editing. You’ll also get a few tips on how to get the best out of some of the most interesting Tools on Capture One Pro.

Nils Wille Christoffersen
Nils Wille Christoffersen is a freelance journalist and technical writer based in Copenhagen. He worked for several years at the largest Nordic photo magazine, Digital Foto, and photography and image editing has been his personal and professional passion since 2004. He has vast experience with raw image editing and made the transition from being an Adobe Lightroom expert to fully embracing Capture One Pro as his preferred choice for processing high quality raw files more than a year ago. You can follow Nils on Twitter on @nilswille.


I going to switch when import catalog can import more adjustments, curves at least
Don’t get me wrong at all. I’m a long term CP1 user since V 6. But if PhaseOne would listen to all the forums, they would know, that there are huge pain points with CP1 regarding Asset management. As Raw Converter it’s First Class – no doubt at all!! Regarding edit performance it’s fast as well. The UI and output – I just love it – really love it!! Never found a better piece of Software!
But sorry to say, for asset management absolute useless:
– Catalogs are more than slow, just useless (or do you plan to wait minutes by every click within big catalogs?)
– You cannot tag movies (just with stars or color labels)
– You cannot add GPS information to certain file types
– You cannot copy GPS data to other files
– By the import there is no duplication validation (hello mobiles)
– No GSP, no Faces, no Objects or Colors support (even MediaPro supports the Search for Similar Photos which comes from 2000)
– As soon you activate full sync, you get the results next day, ok perhaps thats a good attitude to get more time with the children 🙂
Regarding MediaPro, it’s blazing fast, but outdated
– No Retina support
– Import only supports mounted Cards
– Painful slow Preview (why not just using the rendered CP Preview)
– No Virtual Collections of Edits
My hope is still, they would take the catalog speed, easiness and functionality of Media Pro together with the Raw Converter of CP1, that would be THE KILLER SOLUTION FOR THE PHOTO MARKED – independent if someone is a pro or not.
In the meantime I use Apple Photos for Asset Management and the “External Editors” Extension and others to use there and where dedicated RAW Processors such as CP1 or others.
Hi Manual,
Thanks for your comments. I personally don’t have an issue with super slow catalogs in Capture One Pro, but then yours might be much bigger than mine. That might make a big difference. Regarding your feature requests for better asset management, you might want to consider logging into My Pages and then choosing Support Cases > Contact Customer Support and use the “Feedback / Future development” category to make sure that Phase One reads your suggestions.
Best regards, Nils
Hi Nils
Thanks for the feedback. Will do again :-). However what I really do not understand whats wrong here, I’m using a MacPro with super Fast SSD and it looks there are a lot of users out with the same issue. Even Lightroom is way faster regarding asset management. I did a lot of tests and seems, that above of 10k the speed gets dramatically down. Otherwise, it’s a pleasure to work with it and would love to this software, it would be THE Aperture replacement. Btw. many thanks for your great article!
Br, Manu
Hi Manuel,
My largest catalog has some 10.000+ images, and I don’t have any issues with opening it. I have noticed that if you select All Images, Capture One Pro will start going through them all and building the previews which certainly takes some time. One solution to having a big, slowish catalog can be to split it up in a few smaller ones. Since you can have more than one catalog open at a time, that solution might not have much drawback, depending on your workflow.
If it takes a long time to open a catalog, then try to select a subset of images by choosing one of your Album or folder before closing Capture One Pro the next time. That way the program won’t start by looking through all images on the next startup.
Best regards, Nils
Very helpful article. I purchased C1pro with the intention of switching from Lightroom but was disappointed to learn that C1 won’t support the Fujifilm GFX 50, which I just acquired. Until that policy changes, I won’t be able to make the switch.
Hi Christopher,
I’m pleased to hear that my article was helpful. I don’t know anything regarding the support of the Fujifilm GFX 50, but historically Capture One Pro hasn’t supported medium format cameras outside those from Phase One and Mamiya Leaf.
Best regards, Nils
Christopher,
the non-support of new Fuji medium format camera is surprising me as well. I would understand if this camera can compete with what PhaseOne manufacturing… but it very far… on the different side… As I heard during a presentation this camera, Fuji said they in process of discussion with PhaseOne as many of potential users has been asking about Capture One Pro support… and Fuji, ta make any support easy designed this camera with CMOS sensor…instead of X-Trans… And Adobe is launching support in coming update
Irritating that Phase One prefers a walled garden when it comes to tethering. I shoot Leica as well as Canon and they don’t support Leica due to the S. They need to realize that opening up their tethering support to other medium format shooters would “increase their marketshare”. Phase One, the manufacturers of the best MF backs/bodies/lenses in the industry should not feel threatened by other manufacturers by throttling their software. Childish.
Great article, but I do wonder what happens when you load images and XMPT’s into C1…can a user continue to access the image in BOTH programs? If I have images I want to keep in LR, but also wish to create a second set with C1, must I duplicate it all, first and then import? I don’t want to lose lightroom data in case I end up choosing to go back to LR, for certain groups of images.
Hi Deborah,
Yes, you can definitely use both Capture One Pro and Lightroom on your images without duplicating them. It is as simple as keeping all of your images in the folder structure they are in now, and then import those you want into Capture One Pro. Capture One Pro cannot affect the edits you do in Lightroom – or vice versa – because the two programs maintain their own, separate databases to keep track of things.
In other words, any image adjustment you apply in Capture One Pro will never mess with your edits in Lightroom. However, if you update metadata like star ratings and keywords in Lightroom after you have imported the images in Capture One Pro, you can transfer them easily by the XMP-file. Just select Save Metadata to File in Lightroom, and then right-click on the image in Capture One Pro and select Load Metadata. I hope that this answer your question.
Best regards, Nils
Thank you so much. This information is clear and the last piece of the processing puzzle. I will be ordering C1. Great support, here.
One feature that is still missing from CO10 is that I need to use TIF images as input. I have many old scanned negatives and positives that I am still using. They are in my Lightroom catalog, merged with my newer raw digital images. In Lightroom I have the same adjustment capabilities with both my digital images and my scanned film images. That is what I need before I can switch over completely to CO10.
Hi Warren,
Regarding the ability to do image adjustments on TIF files, you need those to be saved in the RGB format in order to adjust exposure, contrast, colors and the like. If your old scanned negatives and positives are saved in CMYK or Greyscale format, then it is correct that Capture One Pro 10 cannot currently edit those.
Best regards, Nils
What I would like to know is the best workflow for using external editors such as Photoshop and the MacPhun suite and then have my edited images show up in the sessions or catalogue folder. I mostly do landscapes and rarely complete an image without giving it that extra oomph.
Hi Paul,
That shouldn’t be a problem to do at all. In Capture One Pro you just right-click on an image, select Edit With… and choose the program you want to do your further adjustments in. Once you save it in the program – for example from Photoshop in the tiff format – the new file will appear as a copy in the session or catalog you are working in. It is saved right next to the original file in the Capture One Pro browser and in the same folder as the original file. I would recommend using the tiff format so that you are sure to get the best compatibility with Capture One Pro.
Best regards, Nils
Really useful article, Nils: thanks! I am just coming to the end of my C1 trial period, and am happily about to purchase! Having been a longterm Lightroom user I found your Migration workspace tip so useful and the advice re switching on the focus mask function when previewing images really helpful. I predict there is going to be a huge outflow of users from Lightroom to C1 .
Hi Simon,
I’m pleased to hear that my article was helpful to you, and I hope the upcoming Part Two about image adjustments is going to be at least as good. Capture One Pro version 9 and 10 has been big upgrades in my opinion so hopefully more Lightroom users will download the trial and get a taste of it. Chances are they are not going back. 🙂
Best regards, Nils
The one thing I noticed that seems to be an odd feature ommission is the lack of local adjustment presets in the same manner that LR has. For instance I have teeth whitening or Iris enhancing brush presets that help me make quick repeatable touch-ups.. Especially when editing 2-3k photo weddings, this becomes an invaluable time saving ability. Strange that you can’t do this in C1…
Hi Nick,
You bring up a good point about Local Adjustments and Presets, but luckily there is a way to get almost the same functionality in Capture One Pro. The solution is to copy the Local Adjustments from one image to several others, but you need to be a bit clever about it. The thing is that Capture One Pro copies the masks too, and you might not want to do that.
So here is how you could do it: Create the different Adjustments Layers you need to repeat, like one for teeth whitening and for Iris enhancing. Do NOT brush any mask in, just make the adjustments you want like Contrast, Brightness, Clarity and such for each specific layer.
Then copy the Adjustments and make sure that Local Adjustments are selected in the Adjustments Clipboard. Next step is select all the other images and apply those adjustments. Make sure that ONLY Local Adjustments are selected in the Adjustments Clipboard. Now the layers with their appropriate adjustments are applied to all in the images, and you just need to brush the masks in where they need to.
You can obviously also choose to create a mask in the first step and copy that too if several images are very similar with regards to the eyes, for example. You can move the mask in Capture One Pro which not all know about.
It might not be the perfect solution, but it is a solution.
Best regards, Nils
Thanks for responding! Still odd that it’s not a standard feature but the work around seems doable… Is there any way to save that local adjustment for use in other sessions or even within a catalogue without trying to remember which photos might have the adjustment layer?
This is great.
I was so happy when I finally swallowed my pride and switched to Capture One from Lightroom, but there definitely a few things I didn’t know which this article has helped with.
-I will say though, one major (minor) annoyance is that you can’t view all photos in sub-folders if you select their parent folder, at least not in 9 using a Session workflow.
Hi Kurt,
I’m happy to hear that my article was helpful to you. I agree that it would be nice if we could select a folder and view all images in the sub-folders. Capture One Pro apparently has the ability, because if you right-click on a folder and select Synchronize…, it can actually check for files in the sub-folders.
Best regards, Nils
Useful article! I am a recent convert(two weeks ago) and I did use the same method of import but I tried importing my entire catalog(my Bad). Unfortunately, the software and catalog crashed. This was a 6 hour import. So I broke up my catalogs by year. I have an additional catalog of processed image combined from all years.
Hi Jon,
I haven’t personally had the issue with a crashed catalog after import from Lightroom, but the one I have tried only had some 10.000+ raw files in it. I think that Phase One recommend that you split a large Lightroom catalog into smaller ones, if you want to use the import from Lightroom catalog feature. I guess they have label that feature beta for some reason after all. 😉
Best regards, Nils
Thanks for this helpful article. I have been using lightroom on my Windows computer since version 1. My catalog has over 21,000 photos. I would like to get Adobe out of my life and CaptureOne seems like a good alternative.
The problem is the 21,000 photo catalog does not work well with CaptureOne. I can easily break the catalog down into manageable chunks, and that will work well most of the time. Occasionally, I need to do a metadata search on all 21,000 photos. How can I do that easily if I have now had say 10 catalogs comprising all those photos? Having to do 10 separate searches and then combine the results into Session seems like a dealbreaker.
Hi Lowell,
“Does not work well” is a comment which is a bit hard to respond too? 🙂 21,000 is not a large catalog so I would not forsee any difficulties.
Have you tried?
Does not work well means my computer crashes frequently or crashes while attempting to load the large catalog. I have had no problems when trying smaller catalogs.
I see advantages to working with smaller catalogs or Sessions. I just want to know how one would go about doing a metadata search on all 21,000 photos and then putting the results into a Session.
Have you made a support case and sent crash logs for us to look at?
Hi Lowell,
I’m with David on this. 21.000 is not a huge catalog, so your computer shouldn’t crash like that. I would also suggest that you contact support, hopefully they can get it solved for you.
Alt the best, Nils
Thank you for your concern. Since the problem only happened with the large database I decided to reimport my entire lightroom catalog into a new CaptureOne catalog. Problem solved. The original large CaptureOne catalog must have become corrupted.
Hi Lowell,
Great hearing that you got it sorted! I hope that you can start fully enjoying Capture One Pro now.
All the best, Nils
One of the main advantages of the Survey View in Lightroom is the ability to eliminate the photos. I use that feature a lot when using Lightroom. So far, I haven’t found an easy way to do that, using the method described in this article. Anyone found a workaround? An easy way to de-select the images would be helpful.
Hi JWC,
Yes, you can deselect a given image (when several are selected in the Viewer) by going to the menu and choosing Edit > Deselect Primary Variant. The selected image will then be removed from the section. It doesn’t have a keyboard shortcut by default, but you can assign one. I can see how that could be very handy.
All the best, Nils
Great article on the differences between Lightroom and Capture One Nils!
I’m considering leaving Lightroom for an alternative primarily because I don’t like Adobe’s new subscription licensing model.
Can you tell if Capture One will stay on a perpetual licensing model or if there’s a chance that this will be changed to a subscription model as well in the future? Just want to be sure I don’t experience the same surprise..
Capture One seems to be the best Lightroom alternative now anyway but keen to hear about the above..
Cheers, Marcel
I’m 2 weeks into my 30 day trial and I’m struggling to find a real solid reason, especially from a cost-benefit standpoint, why I should add Capture One to my editing suite. I have been using LR & PS CC versions and I’m not giving up PS so I’ll still be paying adobe it’s pound of flesh. Also, if I import my LR catalogue in CO, not all the adjustments will come with it so I’ll have to review and re-edit many photos. That influences me to not important my LR catalogue into CO but possibly use CO for future photos. I don’t do much tethering so that’s not a strong reason to add CO but I do find LR’s tethering to be weak. Two arguments for CO I see is that using layers all adjustments can be included as local adjustments and the color tools in CO are awesome. I guess what I’d like to see from you for my consideration is a concise point list of what CO does better than LR or that LR doesn’t do. Also, can you please tell me what the upgrade policy is if I choose to buy CO outright or sign up for the annual subscription. Will I have to pay for upgrades and how often do you imagine that might be? Thanks a bunch.