
Without this, the normal flow would be to correct to an overall skin-tone, using a combination of White Balance, Levels/Curves and Color Balance. The challenge a photographer faces after this general color correction step, is how to quickly but precisely correct local skin tones, where the skin has another tint. This could be caused by issues like lighting fall-off, off-tint foundation applied by a make-up artist, pigmentation difference etc.
To correct this using Photoshop the photographer would create a Selective Color (or Hue Saturation) adjustment layer with a mask covering the off-tint skin tone and correct the color. Then for each area where the tone is off, this flow will be repeated. As you can imagine, this flow is very time-consuming, requires detailed masking, and is very repetitive.
So how can Capture One help you? In the Color Editor Tool there is a tab called “Skin tone”. This tool is available from both the “Color” Tab and the “Local Adjustments” tab. If you are using it from the “Color” tab, the tool will act on the entire picture, the so-called Background layer.
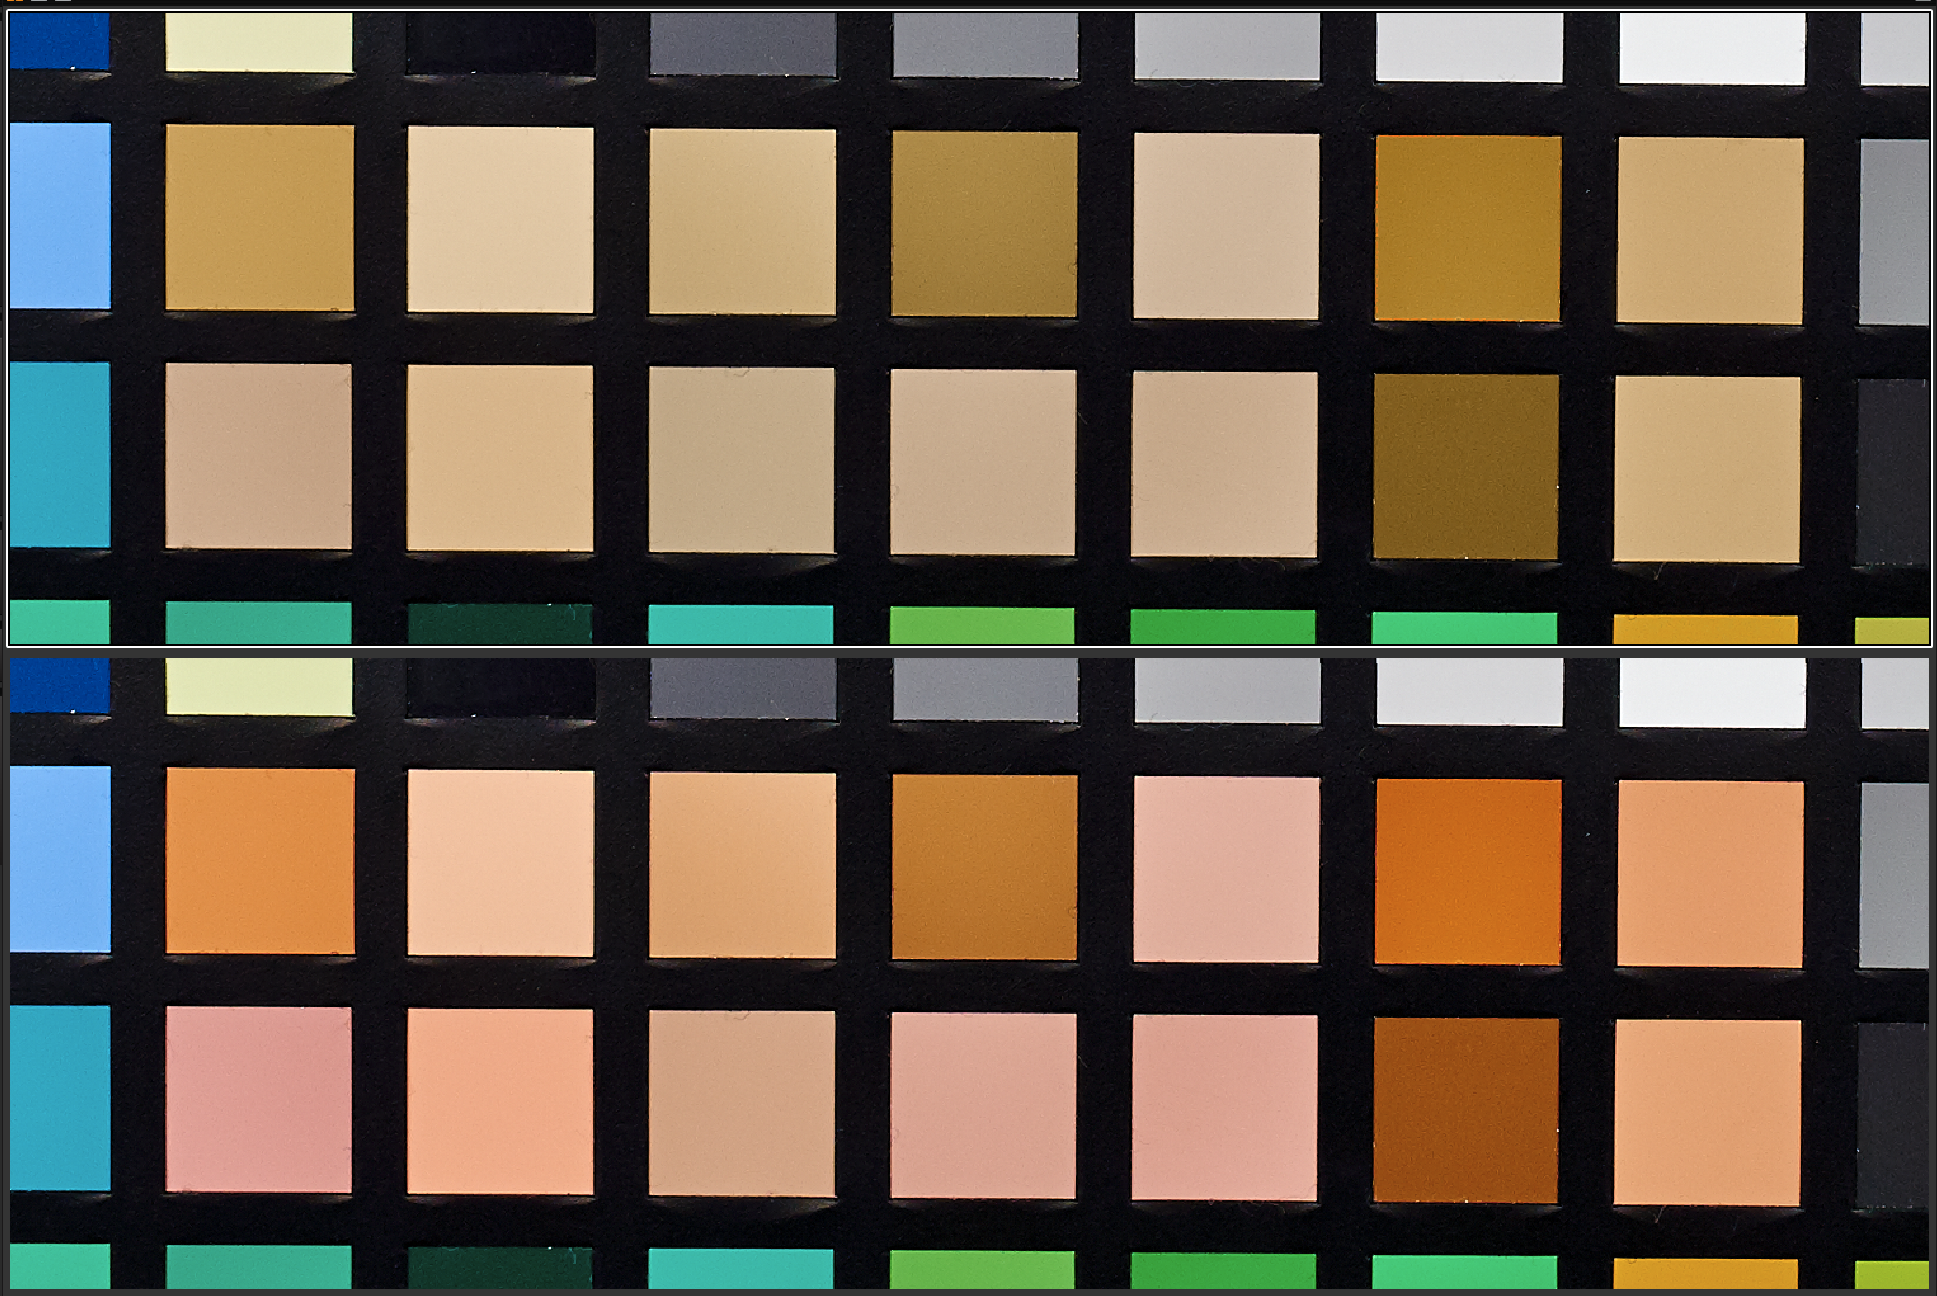 The Skin Tone Tool being applied as a background layer on an X-rite ColorChecker SG
If used from the Local Adjustments tab, you have to draw a mask on the area where you want the tool to have effect. I find using the tool with Local Adjustments gives me the most control, but using it on the Background layer can speed-up up the workflow a bit, but at the cost of effect precision. The risk here is that red and yellow colors can be unintentionally affected by the Skin Tone Tool.
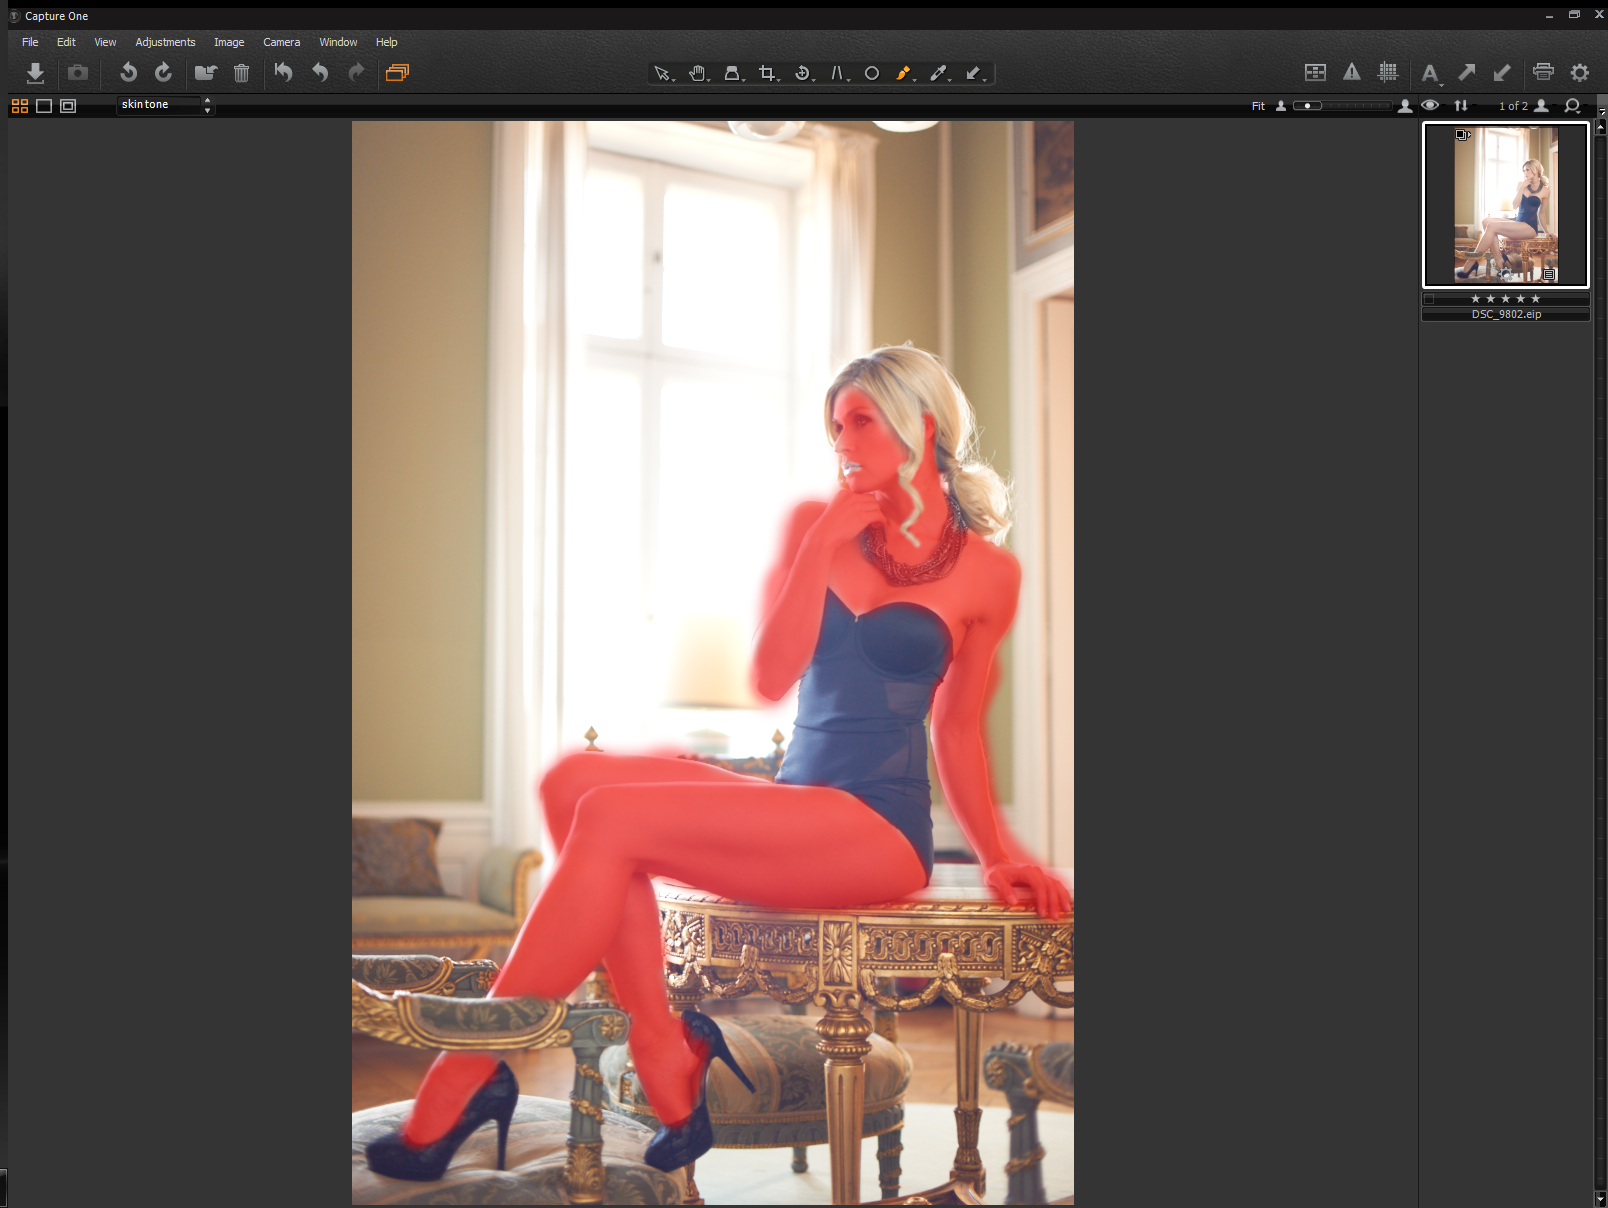
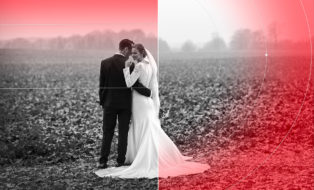
Let’s see how all this act on a real-life image. On the image below the skin-tones are pleasing in the face and on her shoulders, but her legs and the fingers on her left hand have a noticeable magenta tint and do not match the upper body perfectly.
 Legs and hand need skin tone tweaking to match the upper part of the body, which already has a pleasing skin tone
Preparing for using the Skin Tone Tool
To correct this tint, I start by creating a layer, and then masking the skin. When drawing the masks, there are a few pitfalls to avoid:
- Avoid being very precise around green/blue/cyan/deep magenta hues, as these normally won’t be affected when dealing with skin tones.
- Avoid masking into the hair. Especially blonde hair is quickly affected.
- Avoid masking into the lips, unless the “naked” foundation look is needed. Bright red lips will suffer greatly.
- Avoid masking into greens or light brown eyes. They can be affected by the tool.
On this particular image I have to be careful not to include the golden parts in my mask, as a golden color is close to a warm skin tone.
 Masking in the layer containing the skin tone layer, avoiding hair and golden areas
Once I am done masking, I select a skin tone using the Color Picker from the Skin Tone Tool. The color I pick will be the tone that Capture One Pro 7 applies to the leg and hand we have masked in.
Hue and saturation range
Next step is to widen the color range in 2 dimensions. First, press the “Span full saturation range” icon in the tool, then broaden the affected hue by dragging the endpoints in the color circle in each direction. If the image is highly saturated, it can be advantageous to also drag the “Smoothness” slider to the maximum value. This makes for a smoother hue falloff.
 Widening the hue and saturation and increasing
the smoothness of the fall-off
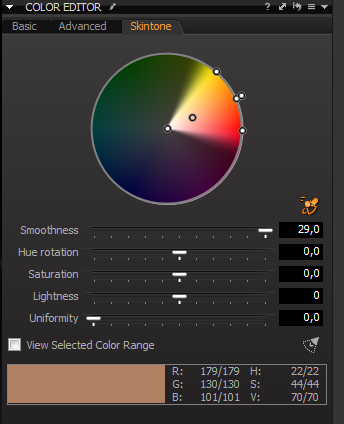
Using the uniformity slider
Now move the “Uniformity” slider to its maximum value of 1.0. This is where the magic happens. The skin tone I previously selected is now applied to the area I have masked, if the colors are within the defined range. Sometimes setting the Uniformity value to 1.0 can prove to be a little too much. On those rare occasions turn down the value, or, better, erase the mask with a low opacity Eraser Brush until reaching the desired amount of uniformity in the image. The rouge make-up on a model’s cheeks is a good example of when it would be a good idea to lower the opacity locally by using the Eraser brush.
![]() The Uniformity slider set to Max
The Uniformity slider set to Max
Tweaking the skin tone
Once we are happy with the color range and the uniformity, we can start tweaking our skin tone. It can be difficult at first to hit the right skin tone with the picker, but this is easily modified with the slider controls. A rough hue and saturation selection can be obtained by moving the color selection point in the color wheel. Fine-tuning this selection is then done by adjusting the Hue Rotation, Saturation and Lightness sliders. As I am using the Uniformity feature, making these adjustments will affect the entire selected color range.
Getting a uniform look across multiple pictures
Most times I have to deliver a series of pictures, which have to have the same overall look. Here the Skin Tone Tool is very useful as the settings can be copy/pasted to the remaining pictures. A workflow tip is not to have any mask drawn when the settings are copied. As a mask is very specific to a certain picture, it would have to be manually erased in order for a new mask to be drawn on a second image.
Here is the final result as a comparison, showing the legs with and without the skin tone correction:
 With and without the skin-tone correction using the Skin Tone tool in Capture One Pro 7
More than just skin
Even though named “Skin Tone”, this tool can be used for a lot more than just skin. It can also be used on other colors.
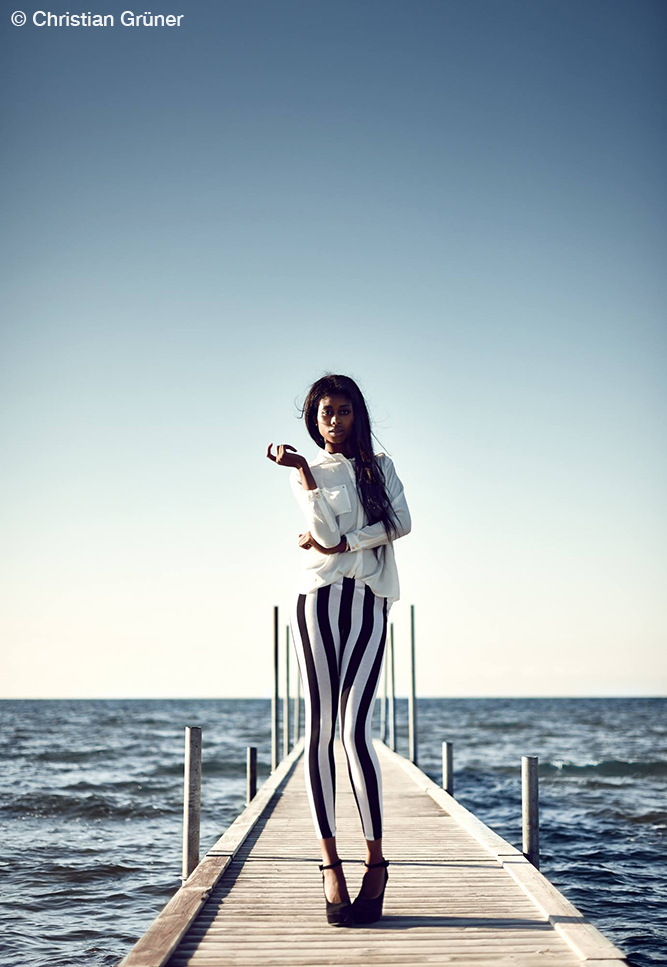 The Skintone Tool can correct much more than just skin tones. Here the color of the water have been uniformed to allow for further corrections using the Advanced Color Editor.
In this picture I have combined the use of the Advanced Color Editor Tool and the Skin Tone Tool, to make the water a blue tone instead of the typical Danish green water color. In a layer I have used the Skin Tone Tool to make yellow, green and blue/cyan tones look more similar. In the Advanced Color Editor I have then adjusted to the hue to make the water look bluer. A layer mask sees to that the sky is not affected by the adjustments on the water.
Best regards,
Christian Grüner

Christian Grüner
Christian is Test Manager with the QA/Test department in Phase One. In the very little spare time a job in Phase One gives Christian, you’ll find him shooting pictures, recording aerial imagery with pro-grade drones or trying not to crash on the mountainbike in the woods.

Very useful info thanks.
I’m glad you liked it!
BR
Christian Grüner
Thanks much for this brief tutorial. I’ve poked around with the skin tone tool but never figured out how it’s used; I end up doing all skin corrections in Photoshop. If a more extensive video showing the use of this tool could be made, I’m sure it would help users like me learn to use the full potential of the tool. As it is now, it’s mostly a lack of understanding how the skin tone tool works, especially in different situations.
Also, how does one copy the settings used in a mask and apply it to numerous other photos without copying the mask itself onto the other photos and having to erase/re-draw each one?
Cheers,
Matt
Matt,
I agree with your comments. I did figure out the layer question I had but, all I was successful in doing was changing the color hue of the face. It seemed that the other adjustments did nothing. No smoothing occurred.
I do much better with a video anyway. Id like to see it happening rather than reading a step by step instruction. That said, I appreciate Christians offering…Just wish it was a video instead.
The general usage (including what to do with copy/apply actions) is covered in the tip.
I’d be happy to help, if you can provide a more specific usecase?
Christian,
I enjoyed your article on skin tone. Unfortunately, I have never made a layer in C1pro. You passed over that. I know others probably have done this before but it stopped me from going further with your tutorial. Any help?
thanks
tony
Your comment is awaiting moderation.
Tony, layers in C1 Pro as follows:
Please note C1 Pro layers are very similar to Photoshop layers. Although they lack the level of sophistication of PS layers they are nonetheless powerful, and like PS are non-destructive. I believe you can create up to 10 layers but I am not positive of that.
In addition, the following assumes you have not customized your C1 Pro screen to any degree. Here goes:
1) Have an image present in the Viewer (center of screen)
2) Left-click the Brush icon found towards the upper right-hand corner of C1 Pro. This will open the Local Adjustments tab.
3) You should see an Adjustments Layers menu present. If not, here is how you add that particular tool to the Local Adjustments tab: Left-click “View” in the horizontal menu found at the very top of your screen – Next, left-click “Add Tool to Local Adjustments Tab” – Next, left-click “Local Adjustments” – This will insert the Adjustments Layers capability.
4) Left-click the “+” symbol to add a layer
5) Left-click the “-” symbol to remove a layer
6) Right-clicking while inside the Viewer will bring up the “Brush Settings” tool
7) In addition, make sure you left-click the Brush icon located in the middle of the screen towards the top in order to create masks. This Brush needs to be active (an orange color) in order to make use of the tool.
8) As in PS you can name the layers if desired.
9) At this point you can make use of a variety of sliders as enabled within the Local Adjustments tab.
I hope this helps you to get underway with C1 Pro Layers.
As for skin tone corrections I found this tutorial to be very helpful. Given the frequent difficulty in getting skin tones dialed in correctly I think it would be extremely beneficial to many of us if an extended training session including sample images was put together for proper use of this tool.
I see Tony already explained the Layers in great detail.
I’m glad you enjoyed the tip!
BR
Christian Grüner
Tony, layers in C1 Pro as follows:
Please note C1 Pro layers are very similar to Photoshop layers. Although they lack the level of sophistication of PS layers they are nonetheless powerful, and like PS are non-destructive. I believe you can create up to 10 layers but I am not positive of that.
In addition, the following assumes you have not customized your C1 Pro screen to any degree. Here goes:
1) Have an image present in the Viewer (center of screen)
2) Left-click the Brush icon found towards the upper right-hand corner of C1 Pro. This will open the Local Adjustments tab.
3) You should see an Adjustments Layers menu present. If not, here is how you add that particular tool to the Local Adjustments tab: Left-click “View” in the horizontal menu found at the very top of your screen – Next, left-click “Add Tool to Local Adjustments Tab” – Next, left-click “Local Adjustments” – This will insert the Adjustments Layers capability.
4) Left-click the “+” symbol to add a layer
5) Left-click the “-” symbol to remove a layer
6) Right-clicking while inside the Viewer will bring up the “Brush Settings” tool
7) In addition, make sure you left-click the Brush icon located in the middle of the screen towards the top in order to create masks. This Brush needs to be active (an orange color) in order to make use of the tool.
8) As in PS you can name the layers if desired.
9) At this point you can make use of a variety of sliders as enabled within the Local Adjustments tab.
I hope this helps you to get underway with C1 Pro Layers.
As for skin tone corrections I found this tutorial to be very helpful. Given the frequent difficulty in getting skin tones dialed in correctly I think it would be extremely beneficial to many of us if an extended training session including sample images was put together for proper use of this tool.
Hi Billy and others,
Perhaps you should sign up to this webinar on June 18th?
It will deal with Colour Control and I will be sure to include skin tone adjustment.
https://attendee.gotowebinar.com/rt/5541176123440133634
David
David, thank you for the heads up on this webinar. I just signed up for it. Even if it does start at 5am on the east coast of the United States. I guess that beats 4am by a bit as other Capture One webinars I’ve attended 🙂 .
Done
thanks David
Webinar… I forgot to keep checking for them. I found older webinars stored here: http://www.phaseone.com/en/Imaging-Software/Capture-One-Pro-7/Tutorials.aspx
I couldn’t find a list of upcoming webinars, though…
Also, if it is relevant to your planned webinar:
I know how to create a new layer and copy the mask from one layer to the new one.
I am not sure how to copy settings from a previous layer to the new one… For example, the double headed arrow in the Color Editor tool for adjustment layers is grayed out for me on Windows…
If there is a way to do this and it is appropriate to include with your other information, I would like to see in June.. I admit, this is more of a ‘how to use layers’ question than color tool Q.
I read the comment that webinars are filed on the Events page but had trouble finding that page. There is a link to it on the Workshops page.
Webinars: http://www.phaseone.com/en/Workshops/Events/Capture-One-webinars.aspx
I see there is a webinar for using local adjustments on JUN 4. I will take a look at that one.
Excuse the many posts to the thread/article…
Thanks for the info Billy. Ive done a screen shot of it and will follow your advice.
thanks again.
t
Amazing tool. I think the Tweaking the Skin Tone section needs fleshing out a bit. You don’t say what the colour selection tool is. A bit more detail here would be helpful. Thanks!
It is indeed an amazing tool, that can save the photographer a great deal of work .
Do you mean what tool makes the initial color pick?
BR
Christian Grüner
Die genannten Arbeitsschritte sind sicher sehr wertvoll, ……. aber leider ist alles in englischer Sprache. Es werden die Tools auch in englisch gezeichnet, und es ist fast nicht möglich (wenn man nicht gutes Englisch spricht) in der deutschen Version C one zu erkennen was gemeint ist.
Eine Übersetzung wäre wünschenwert und hilfreich.
Thank you!
You are most welcome.
BR
Christian Grüner
I think this could be very helpful, but agree that more detail on doing it and/or a video would help. Especially the part of applying it to other images from the shoot as the masks would be different.
Now off to play with some images to try to learn this trick and see if I can apply it to future job workflows.
Bryan,
Great post. Yes I did the exact same thing. Copy and paste the adjustment and the mask was in the totally different place. Id like to see a video of this in action.
C1Pro is an amazing program. Doing so much more than I usually do in it. Id love to learn more about it.
Right now I am experiencing a problem processing to DNGs. The image goes about 80 green and max contrast. Tech says they are aware of this. Anyone else experiencing it? Converts to proper color in PS5.
You did see the section regarding masks/copy/apply in this tip ?
The best thing is not have any masks drawn when applying.
BR
Christian Grüner
I think a mask may be necessary when I am using the tool to make things look the way I like. The mask may be needed to protect lips or etc. as mentioned in the article.
If I want to copy the settings of the first image to other images without the mask, I could first delete the mask. Of course, my mask is gone from my first image…
I know how to copy a drawn mask to a new, fresh layer in the same image. But I don’t know how to copy settings of that layer (for me, the typical double headed arrow for copy adjustments is grayed out in the Adjustment Tab color tool..) so that I have two skintone layers in my first image: 1 with mask & 1 without.
So, to retain my mask in the first image but have a maskless layer to copy to other images… I could create a variant of the first image, quickly delete that mask with a large brush, copy my maskless adjustments to multiple images, and then delete the variant… A way I can think of to do it, but maybe not the best way. ?
If my images need the settings but no mask, I might do this. If all the other images will need a mask to protect lips or what-not, I will be drawing a mask anyway and it doesn’t take long delete masking from the first image with a large, hard brush.
This is a chore I like. After sweating the drawing of a mask, wiping away a mask carelessly, not because I made a mistake but because I will start on a new image, is pleasing. Like erasing a chalkboard. Granted, I work as a hobby with not many images…
The last couple articles about color correction caused something to click. Now, I think color and contrast are, maybe, the most important things.
I have a few pictures of northern seas. One has the green.. I see it could be distracting for some pictures, but I kinda liked it. Perhaps because it is different from my gray southeast American water. :^)
After getting the shot itself right, colors and contrast are what makes the image get personality and expression.
I’m glad our articles have helped you!
Best Regards
Christian Grüner
What would you think about using a tool like this as well
http://www.liftgammagain.com/forum/index.php?threads/saturation-of-natural-skin.2151/#post-22352
That is indeed a solution as well. However I would always like to make the last decision using my eyes, and not numbers.
I can’t get the skin tone tab to work as a local adjustment after drawing a mask with the brush. I’m in the local adjustments tool, I’ve drawn a mask on my daughter’s face with the brush, I have the Color Editor added to local adjustments. Any adjustments made in the Skin Tone tab are still made globally. I’m confused. Am I doing something wrong? Thanks.
I can’t say exactly what is going in your case. There are no known bugs with regards to the masking.
But if you continue to see the problem, do not hesitate to contact our Supporters.
Now appears to be working. I notice a lot of these little niggles with C1. Sometimes certain functions don’t work as they’re supposed to and I have to switch between tabs or close down C1 to fix it.
I just tried to correct skin tones in the way it is described. But there seems to be a software bug. It is not possible to mask a layer and to selectively correct colors. Instead corrections are applied to the whole layer.
So, to everyone who read this tutorial and face the same problem, it’s seems to be a software problem. I just opened a ticket on the website. Hopefully there will be an update soon.
It sounds like you have been adding the correction to the Background layer instead of the adjustment layer.
Be aware that, by default, only the Color Editor in the Layers Tool Tab will work layers (as well as the Background layer), while the Color Editor in the Color Tool Tab, by default, will only work on the Background Layer.
You can change this behavior by clicking on the small triangle in the upper right corner of each tool and tick “Adjust selected layer”. This enable the tool to work on layers as well.
Really outstanding some photograph with decent tutorial. I’m using PS6. Now it is time to gain well another. Very helpful at all.
Hi Christian,
Great tutorial! I’ve found that when playing around with the skin tones tabs it also changes the color of the background, (which I liked for this particular image) The checkbox is selected as “view selected color range” and I applied the adjustments, but when I processed the image out there was no difference in the background? What could I be doing wrong?
Best,
Alexis
Looks great! Those photos are absolute bombs! It’s not an easy task for me to fix photos though. If I have difficulties, I use photo editing services at editouch, lavalu or even fixthephoto.com. Otherwise, you make it all look easy. You help me a lot, I should say. I do photo retouching for some of the pics myself (if I have such a desire of course) using your techniques and tips. Always wait for some info from you.
This is wonderful tutorial as well as I like that.
Thanks for sharing this good color presentation with us. Really nice post.
Very helpful tutorial that helps me and my designers to bring out the best result in uniform skin tone service. The techniques and mechanism really impressed me.
Really outstanding some photograph with decent tutorial.
Thanks from Clipping Path Expert Team
I am really glad to see this your post. Amazing tips.
Thanks
Fantastic one. I am going to suggest this post to my friends. And please don’t forget to visit my blog also. Thanks
https://www.clippingsolutions.com/
Realy amazing….i want to use this tools….combined the use of the advanced color editor tool and the skin tone Tool are more useful ….thank you for sharing….
Realy fantastic….i feel like to use this tools in my own workshop.
Really important topic with a great importance to us.
Beautiful pictures you have got captured. I am impressed when seeing this post. Keep continuing guy.
The post is very clear and focuses on the main points.
I am waiting for your next post
Lots of photoshop tutorials I have read on skin tones. I am really impressed with this tutorial. All step is very easy to understand. Thanks for sharing.
That’s hell of an information. All those apps are going to be a great help for me. The way you have explained each app and how they work, is a masterpiece.