
Recently, I was lucky enough to borrow a new Wacom Mobile Studio Pro for a few weeks, as I was keen to try this as a tethering solution in the field.
This product basically combines all the elements of a Wacom Graphics Tablet, 4k Display and a pretty powerful tablet computer to boot. As a self confessed Mac fan and Windows-phobe it was also going to be a good test if I could cope with Windows 10 as an OS as well.
The model I had on loan was the larger of the two, at 16 inches with an i7 processor. More info on the Wacom Mobile Studio Pro here
I was keen to try this in conjunction with my 2016 MacBook Pro as the Mobile Studio Pro can also act as a secondary display to this, with just a simple USB-C to USB-C connection. No adapters required!
Therefore, I thought I could a) capture in the field with the Wacom and b) transfer the data to my MacBook Pro back at home and use the Wacom’s graphics tablet abilities there.
This eventually worked out really well, when I discovered a pretty useful additional feature. More on that later!
Working in the Field
I was lucky enough to be invited on a recent workshop run by one of our American partners, Capture Integration. This workshop was based in Bluff, Utah, which is an ideal base for exploring such sites as Monument Valley and the Valley of the Gods. So I decided this would be a good excuse to test the Wacom, as I figured there would be lots of standing around waiting for the sun to come up… or go down.
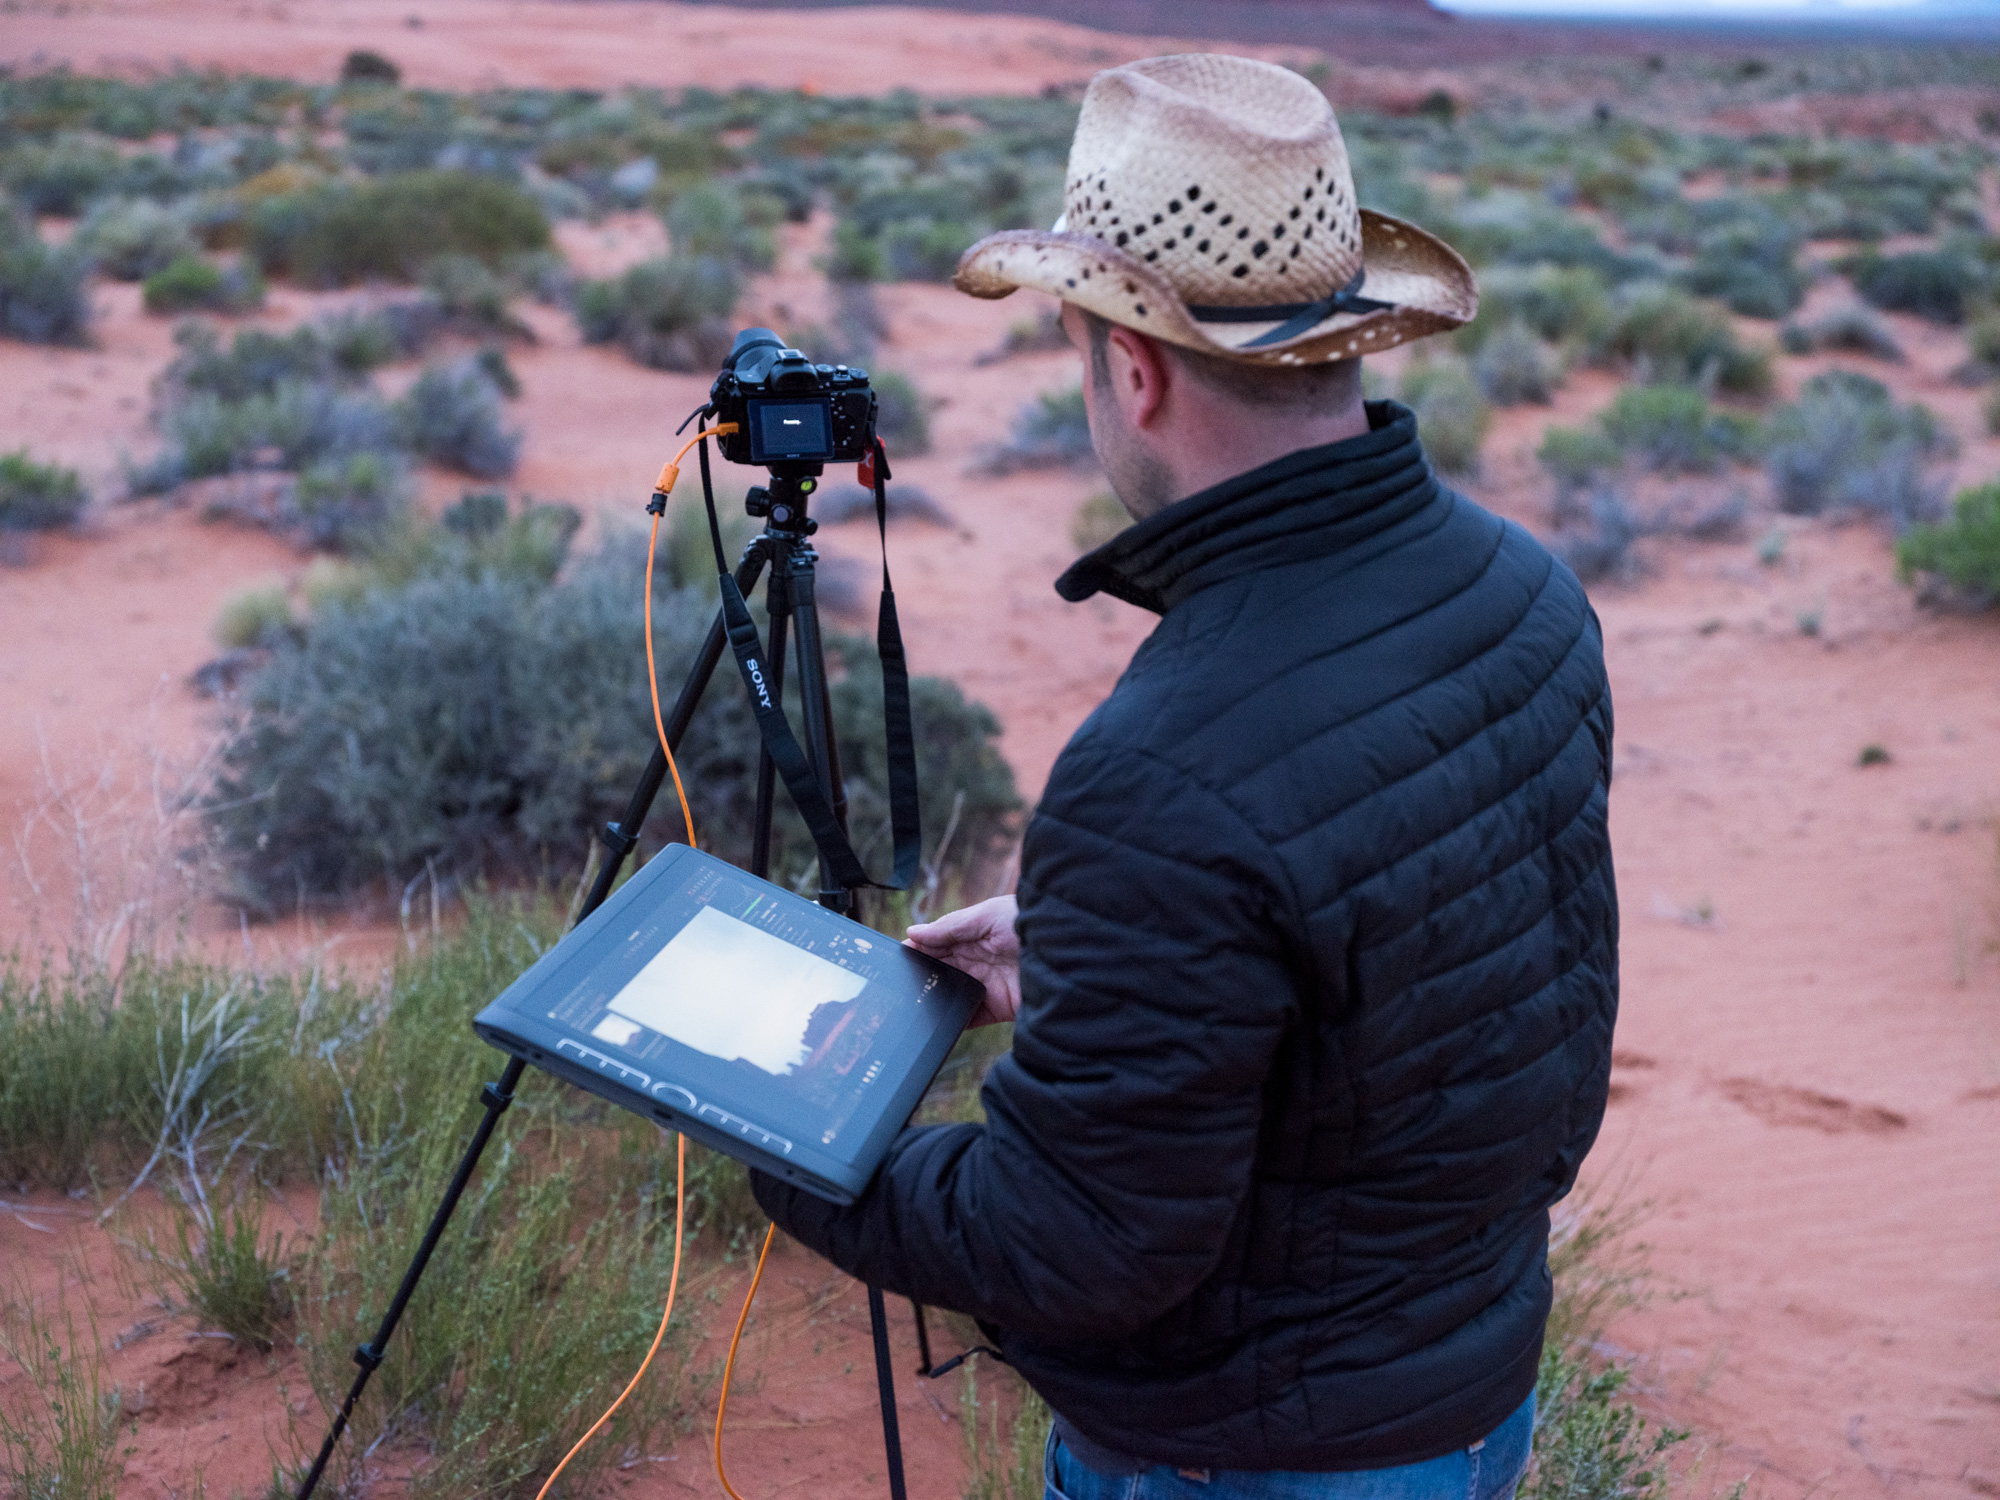
As you can see in this image, I have my Sony A7 connected directly to the Mobile Studio Pro, running (at this time) a beta release Capture One 10.1.
By the way, the hat is optional, but its the full desert look.
The Wacom only has USB-C connections, so to tether a camera, you simply need a USB-C to USB cable or a simple adapter. I already have an adapter I use for my MacBook Pro and that worked just fine on the Wacom too.
I used a Tether Tools cable as you can see as well, in their distinctive orange!
Capturing tethered was simple and fast. No break downs in connection and its nice to be able to connect quickly with the universal USB-C connection.
The Mobile Studio Pro really showed its power and did not struggle with tethered capture, or working with images in Capture One (more on that later).
We also connected a Phase One XF100MP camera to really push it, and it didn’t complain at that either.
For longer periods of use, it would make sense to have some kind of mount so you could attach it to your tripod. Again Tether Tools (for example) have solutions for this. I had a rather skinny tripod with me, so didn’t trust the weight of the Wacom (it is well built and solid) on one of the spindly legs.
When I was waiting for sun-up, I simply sat on my camping chair, or a nearby rock and waited! The nice thing about having a tablet on your lap, is that you can shoot regularly as the light changes, and have a very high quality instant preview of the scene in front of you.
I also have full remote camera control, so I don’t have to move off my perch.
If you don’t want to carry a Wacom pen with you in the field (I didn’t as was pretty sure it was an easy thing to lose for me) then the screen can simply be enabled as a touch interface. Capture One worked well with this for all the basic operations. If you intended to do a lot of editing whilst out in the field, then having the pen would make sense for certain adjustments, like Local Adjustments.
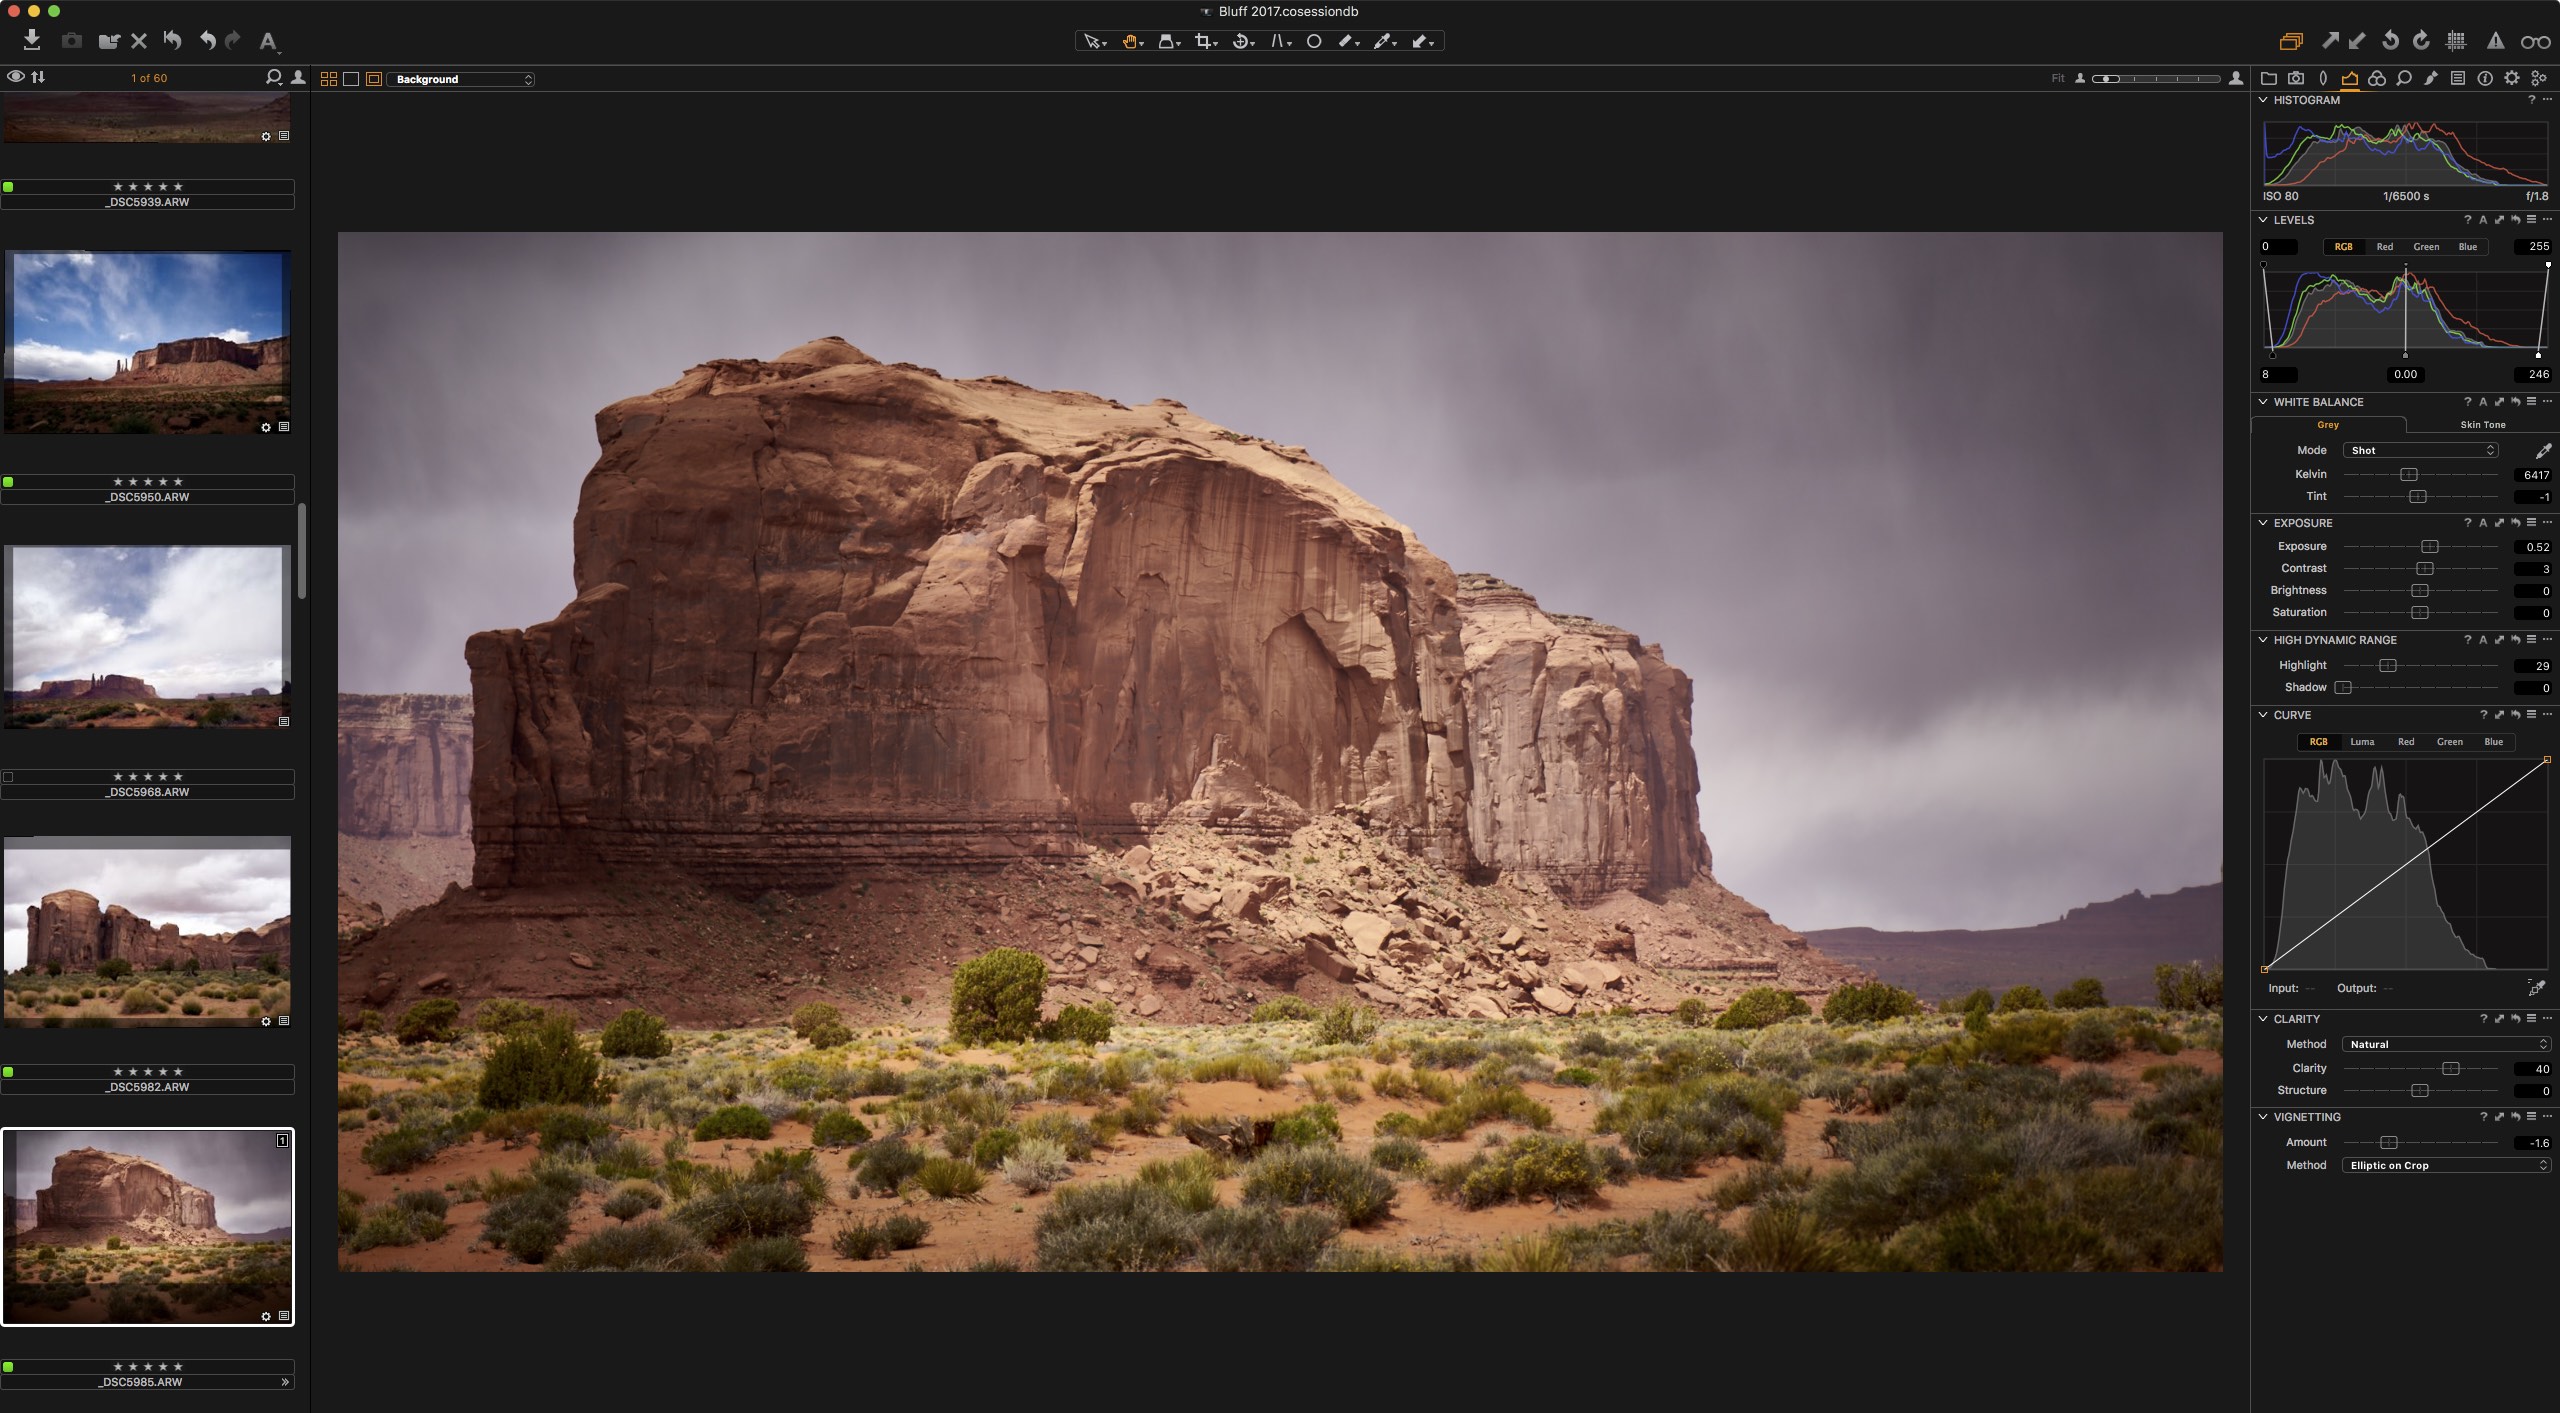
Here’s one of the images I shot tethered.

Optimising the Workspace
One very small change I made to the workspace can really help working with the Wacom, both out in the field and back at base. This does depend if you are right or left handed though, so this comes from a right hander.
Traditionally Capture One tools are placed on the left, like this…

But this presents a problem if you are using a pen as a right-hander, as your arm will be covering up the image as you try and adjust it!
So a simple solution is to simply go to View>Place Tools Right, and then your image will be unobstructed as you adjust. Furthermore, you can use your left hand to scroll up and down the thumbnails and select too. Yes, touch input and pen input can be combined.
I showed this to a workshop participant who was using Capture One on a Dell computer / tablet. “ohhhhhhh – well that helps”. Often is the simple things that have the most gains.
Back at Base
So the real test, was to see if I could get the Windows 10 and OSX chatting happily to each other to get the images I shot from the Wacom over to the Mac. Of course, I could simply have left the Mac at home and used nothing but the Wacom for the workshop duration, but knowing that this was a loaner, I didn’t want to get too deep into customising it.
I thought of the following options for file transfer…
- Network them together
- Use a cloud storage service like dropbox
- Format a hard drive that can be read by the MacBook Pro and the Wacom
I figured as the internet service was next to nothing at our location, and I didn’t feel like researching the intricacies of networking Windows 10 and OSX together, the simplest solution was option 3, which is what I did.
But…. I did discover a really neat feature for the Mac User once I had connected to my MacBook Pro to use as a secondary display and tablet….
Graphics Tablet / Display Use
Fortunately, to use the Mobile Studio Pro as a graphics tablet on a 2016 MacBook Pro, you just need a USB-C to USB-C cable. For non, USB-C enabled hosts, then Wacom sell a converter that splits the signal from USB-C to a standard USB port and an HDMI port.
There is a couple of things to bare in mind :
- You must use the middle port on the Mobile Studio Pro
- The USB-C cable must be capable of supporting video. For example, your white Mac charger cable will not work! I know a few people who have been tripped up by this.
- To trigger the connection, flick the On/Off switch on the left hand side of the Mobile Studio Pro.
After a couple of seconds, the mode changes, and it is now acting as a secondary display, and tablet! Great!
All the usual rules apply then for working with any Wacom tablet, except (if you wish) you can be working directly on the image. This can be great for intense Photoshop work or Local Adjustments in Capture One.
Personally, I am so used to working with a ‘normal’ Wacom that I am mostly happy to just see the Image on my MacBook Pro and not take advantage of the display properties of the Wacom. But for reasons mentioned above, it can be nice to use this mode from time to time.
If you don’t want to use the display on the Mobile Studio Pro, then its important to set in the Wacom preferences to just ‘map’ the tablet to the one display, not divide it between both.
So what’s the neat feature I found that I mentioned above? Well, the Mobile Studio Pro has a built in SD card reader, which also makes it handy for use in the field. But, when connected in the manner described above, as well as acting as a secondary display, additionally you have the worlds largest SD reader attached to your Mac! Now, I use a blank SD card to act as the go-between for file transfer.
Even a windows-phobe can cope with that.
Conclusion
I very much enjoyed my short time with the Mobile Studio Pro. I didn’t have a stand for it, which I think would be essential for stand alone desk work, otherwise you will end up simply hunching over it. Also I would add a small bluetooth keyboard.
Learn more about the workflows used in this blog post by visiting our User Guide:


Awesome tool and setup, David. But it is the hat that sold it!
Best, Paul
I agree Paul!
David, I just don’t know about you! First the amazing Logic keyboard, then the Tangent Element control and now this. I am going to come out of retirement if I am going to be able to keep up with you. Seriously, glad Capture One is making good use of new technology. It rocks!
Hi, There is an issue using CaptureOne11 with the wacom mobile pro… It doesn’t allow for pen pressure when using brushes.
I found this article on the P.O> blog about using wacom tablet with CPO7 talking about some options to change but it means switch from wacom pen gestures to windows ink gesture. Thing I don-t want.
Is there a way to fix it?
This is the old article>
https://blog.captureone.com/work-faster-by-customizing-your-wacom-tablet-in-capture-one-pro-7/
Hi Marco,
You can relate pen pressure to Brush Size. With the brush cursor tool selected, right click and check the box, use Pen Pressure.