Nearly everyone has their own take on the “perfect” workspace and so far, I am sure this blog series has demonstrated that.
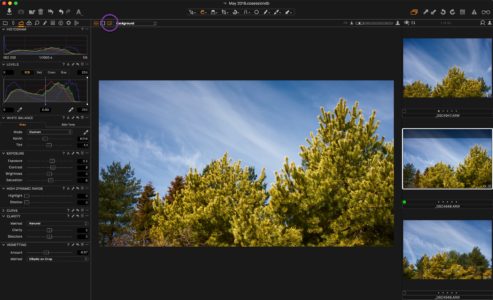
My changes to the default workspace are simple, but enough for me to be able to navigate in a way that I think is more logical.
Here are my recommended steps:
- Remove the Capture tool tab as I rarely shoot tethered (simply right-click on the Tab and choose Remove XXX tab)
- I always adjust Exposure and White balance first, so I move the Exposure tool tab in before the Color tool tab. If you hover over the Tool Tabs, a tool tip shows you need to press the modifier key to move them. For the Mac, it’s a Cmd and drag.
- In the Exposure tool tab, I add the White Balance tool by right-clicking on the tab and choosing Add Tool.
- Next, I rearrange the order of tools in the Exposure tool tab to what you see in the screen grab.
Other than that, I am pretty much on the default. I quite often hide the Viewer Labels (View>Hide Viewer Labels) as I find them distracting. The Labels are the metadata indicators at the bottom of the image in the viewer.
Finally, I tend to have Proof View turned on (circled in the screen shot) as I like a little more space around the image for viewing.
Download my Workspace
Mac:
Download my workspace for Mac here.
To install it, follow these simple steps:
- Close Capture One Pro (if open)
- Open Finder
- Open the ‘Go to Folder…’ dialog (CMD + Shift + G)
- Insert path: ~/Library/Application Support/Capture One/
- Click ‘Go’
- If you previously have created a custom workspace, go to ‘Workspaces’ folder.
- If not, create a new folder and name it ‘Workspaces’.
- Copy workspace file (.plist) to this folder
- Start Capture One Pro
- Select the new workspace from Window -> Workspace…
Windows:
Download my workspace for Windows here.
To install it, follow these simple steps:
- Close Capture One Pro (if open)
- Open Explorer
- Go to /*user*/AppData/Local/CaptureOne/
- If you previously have created a custom workspace, go to ‘Workspaces’ folder.
- If not, create a new folder and name it ‘Workspaces’.
- Copy workspace file (.xml) to this folder
- Start Capture One Pro
- Select the new workspace from Window -> Workspace…


This process doesn’t make this a default workspace. I would like to open capture one and have my custom workspace be there without having to go to menus to get there.
Hi Greg,
If your workspace is not saving automatically, something is not as it should be. Which version of Capture One are you using?
Alex
My personalised workspace does not load by default either. I have to reselect it every time. Capture on 20.
Is it possible to convert a Mac plist workspace file to a Windows XML workspace file automatically? Thank you.