NOTE: This article discusses an outdated version of Capture One. To learn more about our latest version, click here.
We’ve all heard it said, and we know it to be true; No two workflows are alike.
Photography is a craft and, like every craftsman (or craftswoman), it’s essential for continued success and continued growth to find an efficient way of working that suites your specific needs. Luckily, Capture One Pro offers seemingly endless possibilities to mold its tools to fit your needs.
Now, it should go without saying that I’m absolutely 100% biased. I work with Capture One every day and Phase One puts food on my table. But, if you knew me, I think it would be fair to say that I’m a rather straight to the point kind of guy. So, with that said, you can take my personal approach to Capture One with a grain of salt. I’m no way saying that I use it the best way, but over the years I’ve certainly found a workflow that fits best for me and my needs. I would hope only that in sharing that workflow you can find a tip or two that will help you to make Capture One uniquely your own and, to use an obscure parlance, fit better in your hand.
Fit to purpose workflow
With my position at Phase One, I find myself traveling quite a bit. Therefore, I need a workflow and workspace that accommodates remote operation. It needs to be efficient and rather complete as when I get back from traveling, there’s little (if any) time for me to properly sit down and continue editing my images. Capture One offers the complete package and allows the flexibility I need. To the uninitiated, I’ve heard it said that Capture One can seem rather intimidating at first glance. This intimidation needs to be neutralized so you can go on with being a creative photographer.
Simplifying
My workflow requirements are simple. Capture One needs to efficiently fit on a laptop, primarily use left hand shortcuts, and have a workspace that flows logically from left to right. My workspace and workflow are just that.
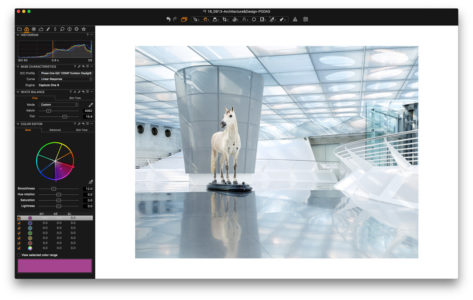
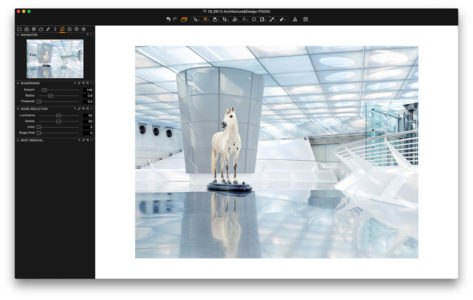
I start by removing plenty, leaving only the tools I need. Then, I’m retrofitting existing, or building new, Tool Tabs to reflect the tools I use most. I do away with all the tethered workflow Tools and Tabs as well as some of the supporting peripherals for professional on-set photo techs (See screenshot below). This is all I need, since it’s just me out there in the brave bold world.
I use Catalogs, which a keen-eyed observer notices. This is certainly not the norm with Capture One’s quick and simplified Session workflow. However, they’re a perfect solution for my needs of organization and constant backup/sync requirements when I return from traveling. I simply do a backup of the RAW files along with the catalog after every trip, and I’m all set. This also helps me to edit on the road, whether I do it from a cramped coach seat on my return flight or a crowded airport waiting area. There’s no need to have a mess of external cables and hard drives, or a few hundred GB’s of RAW files choking up my limited laptop space. Just one small catalog affords me the ability to edit nearly all aspects of the image, no matter where I am. Whenever I arrive home, I can easily backup those edits.
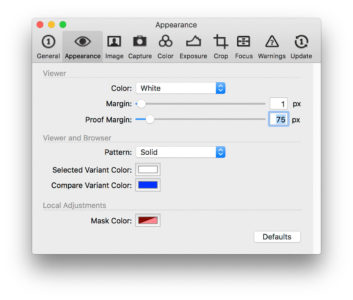
So, the setup is quite simple but not too simple. I have a large Viewer on white with none of the labeling or crowded tool bars. Immediately, I do away with everything I don’t need. A large proof margin surrounds my image, which ensures me that a tool or menus proximity doesn’t inhibit my cropping and composition. Moreover, I use a white background to ensure I don’t fall victim to images that are too dark and contrast-y. This is rather common when working only on a laptop.
Fast and simple Importing and Browsing
You may also notice a few things missing which you assume as necessary.
The Browser and Import Icon, just to explain a few, are not part of my primary workflow. Sure, I use the Browser, but that’s only to initially find and rate the images I wish to edit. That takes me 10 minutes and then I quickly hide it, which gives me sufficient space to edit the images (CMD+B).
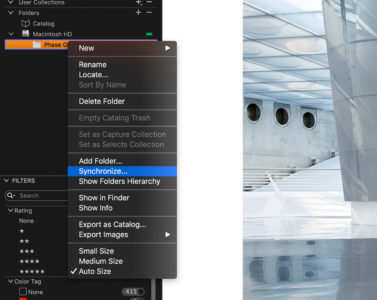
When I import images too, I don’t need an icon to help me do that. In fact, I don’t use any Import command. Instead, I transfer my images from the CF card to the desired folder with Finder or Windows Explorer (yes I use both Mac and PC). Then I use the Right Click option to Sync a folder within the Catalog. It’s faster, it’s simpler and it requires far less clicking about with the Mouse I often don’t have with me.
Left to Right Workflow
So, the initial steps of my workflow post capture are simple; Transfer images from CF card to local HD folder via Finder, Add and Synchronize the folder in Capture One. Next, I browse the images and star rate those I wish to edit, hide the browser and get to work.
I never leave Capture One’s main Viewer window and I never have to slow down my workflow with the tedious clicking of small dropdown menus and “OK” buttons. Just to reiterate, my workflow requirements centralize around a single laptop with the use of a mouse rather infrequently. So, the more I can keep the actions based on Left Hand keyboard shortcuts (Copy, Paste, Right Click, etc.) the more efficient I’ll be.
With my images synchronized to the catalog and a few selects ready to go, I start by working Left to Right across my tool tab. First, I Filter by Star Rating to limit access only the images I wish to edit. With my Browser hidden however, to get from one image to the next, or previous, I’ve edited my Keyboard shortcuts to fit my Left hand. Now, Select Next and Select Previous helps you to respectively archive with CMD+1 and CMD+2. Why my left hand? Well, with that hand stationary on the Keyboard, and my right hand on the trackpad, I want to ensure every action I need to make can be achieved without moving or swapping those hand positions.
This philosophy is also reflected in how I copy and paste adjustments from one image to the next. Why do I use something different from Capture One? Well, the typical CMD+C and CMD+V is not possible in Capture One. However, another simple shortcut is: If you add SHIFT into the mix you easily have the ability to SHIFT+CMD+C to copy adjustments from one image and SHIFT+CMD+V to paste onto the next. Once again I don’t move or use my trackpad, I just click a few times on the keyboard.
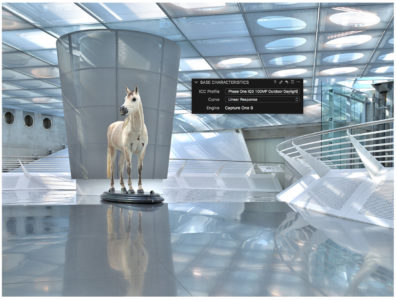
Once I find an image I want to begin with, my very first step is to ensure Base Characteristics is properly set for the content. What is Base Characteristics? It’s crucial. It’s the primary settings in which all other tools will reference.
Set the base
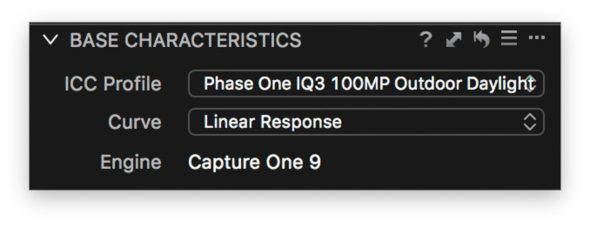
When I shoot, I always expose to the right to ensure I get the most out of my Dynamic Range. With the IQ3’s Highlight Clip Warning tool I get consistent, accurate, and exquisite results. The resulting file is quite rich in highlights and you often see it as “High Key”, depending on the subject. That’s why proper control of the Base Characteristics is so important. First, using the correct ICC profile for the subject, in my case it’s almost always Outdoor Daylight, and then selecting the responsible curve of that ICC profile for the subject. As I’m often shooting with substantial Highlight information, selecting something like the Linear Response Curve is the difference between uniform/boring highlights across the board and dynamic subtle highlights where they belong.
It’s worth noting that if you select this, it requires more fine-tuning on your end. But, let’s face it, you didn’t start using Capture One so it could do all the work like an Instagram filter. You want to be in creative control and rest assured you certainly are. It’s also important to note that if you don’t expose ALL the way to the right when you capture the image, something like Linear Response isn’t likely to do you any favors. It flattens the image and can result in under exposed images if you’re not prepared for it.
White Balance and Exposure Tab
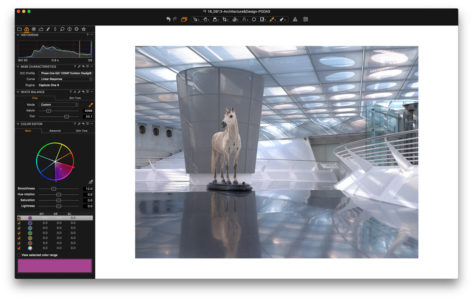
Now it’s onto White Balance. A perfect White Balance isn’t something you’re going to get first try – at least I don’t. But before you move forward with proper reference for the rest of the edits, it’s important to get a starting point. Again, using just my left hand on the Keyboard, a quick press of the W key and I have my white balance eye dropper. Click a neutral point in the image and you’re good to go.
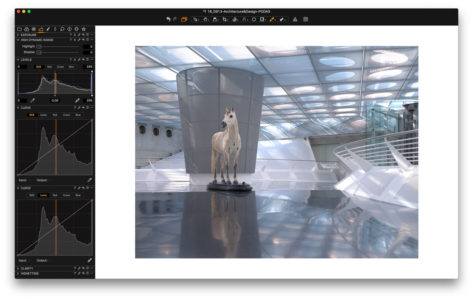
From there, it’s onto Exposure Tab. I’ve skipped over one my custom tabs but we’ll get back to that in a moment. This tool tab is where the magic happens. With the result of my previous Base Characteristic adjustments, we can now bring a dull image to life with just a few simple tools.
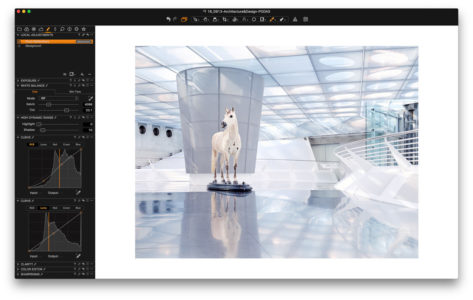
You might notice that my standard Exposure Tool is collapsed and I have two Curves present. This is due to three reasons:
- I avoid the Exposure Tool at all costs and only need it if I exposed incorrectly on capture.
- Having a curve dedicated to RBG and another to Luma provides a quick and easy mix of the two. No need for tedious clicking, collapsing, switching, etc.
- Having two curves just looks sexy.
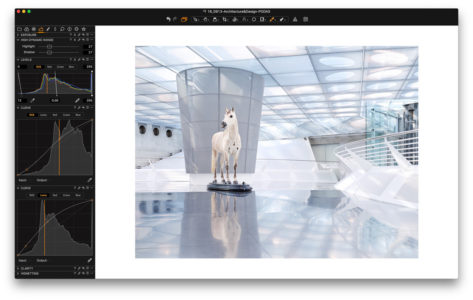
I first adjust my High Dynamic Range sliders to ensure all the detail is well within the histogram. (Pro tip, if the highlight and shadow are approximately the same value, things tend to look more natural). I adjust my Levels tool to make my input values (on the bottom) the most efficient, and then I get to work with a contrast curve on my RGB Curve tool and a bit of “exposure” control on my Luma Curve tool.
Making Color Balance sexy
So far, we’ve made five adjustments and the bulk of the image is more/less done.
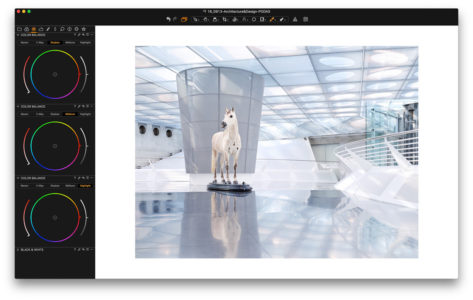
It’s at this point that I go back to that customized tool tab we skipped earlier. Yes, this goes against my ‘working Left to Right preaching’s’. However, as it’s a more detail oriented color control, I often toggle between the previous White Balance adjustment, this customized Color Balance tool and then some fine tuning of the curves once again. The back and forth isn’t efficient, sure, but the delicate control of the results is worth the tradeoff.
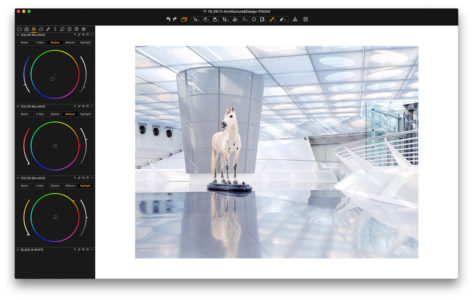
This custom tool tab is for the Color Balance. I’ve added the tool three times, with each of the independent options for Highlight, Shadow and Midtone dedicated to their own tool. Again, this eliminates the tedious back and forth clicking with my trackpad. Instead, I have a big target to select and can fine tune with ease between the three. The color gets a boost if I need to separate them ever so slightly, and I can even add contrast into the image in these tools as well. Once again, it’s pretty sexy.
A small sum-up
Just to summarize up until now…
First of all, I have limited my shortcuts to show/hide the browser or select an image. Second of all, i have made my tool use minimal but controlled. Third of all, I have set the contrast, luminance and color to use the most dynamic tools, in favor of the simplified sliders that would achieve a similar, yet less controllable, end result.
The only other tools I’ve used, but not explicitly mentioned, is the cursor options. For example, the Hand Cursor that allows me to quickly double-click to 100% on the image and check how I’m effecting the details. Again, a simple keyboard shortcut with H and you’ve got it.
From here, my workflow basically just repeats itself with the use of Local Adjustments. You’ll notice that the Local Adjustment tool has been simplified to mirror the setup of the other tool tabs. I’ve collapsed the tools I might use but rarely do, and featured two curves to easily access and control the contrast and luminosity of the local adjustment. In this case, I’ve adjusted the floor through a gradient mask using only curves. This gave me more contrast and cleared up some of the dull finish of the floor. This is certainly something that the Clarity tool could accomplish, but again, with less precision that I’m able to attain from curves.
Working with details
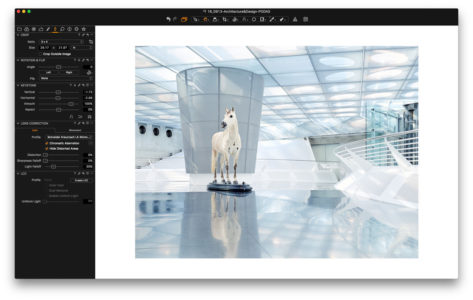
After my bulk adjustments and fine tuning with Local Adjustments, I get into the detail work, which is found in my modified Lens Tool Tab and Detail Tool Tab. In my Workspace I’ve combined the Crop Tool and Lens tool as I find them to be completely related.
Making adjustments to the rotation, crop, keystone, sharpening, etc., are really my final touches. If there was a glaring need for those adjustments in the beginning, I may start with them. But, if I’ve done my due diligence in the field, they’re more of a polish adjustment than a primary one. As an example, now that I’m fortunate enough to shoot with the XF IQ3 100MP system, I often find myself fine tuning and turning down the default sharpening. The amount of details that are being captured sometimes needs a bit less emphasis.
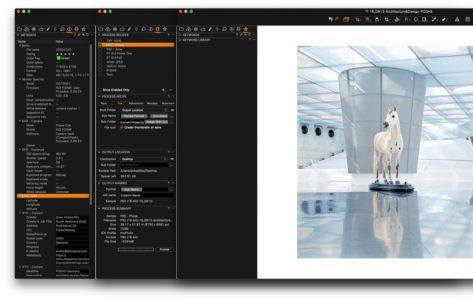
And that’s the whole Image Editing process in those tools. The remaining Tools and Tool Tabs are those which process, identify or sort the images. I have limited my Metadata Tool Tab to only metadata. This provides me access to enter the metadata I save in various user presets. My Output Tool Tab is essentially the same with some rather specific and customized Recipes. Also, I’ve finally built a custom tool tab to house my Keywords and Keyword Library tools. This is something I typically do after the thrill of editing an image is over with and I’m stuck with the pedantic task of organization.
Simple, Efficient, Effective
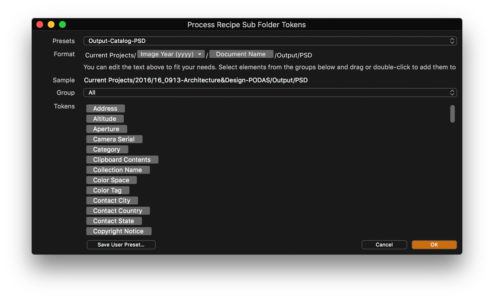
Backing up just a bit… When I mention the customized Recipes, it’s important for you to note just how customizable these are. As an example, each and every Recipe can have its own Sub Name and Sub Folder. This holds to the recipe itself and not the Catalog or Session. That being the case, each recipe in my workflow has its own specific destination for the processed file. Yet, I can direct the Catalog Output Location to a rather generic space, like the desktop. In this way, no matter what Catalog and recipe I’m using, the processed file will follow my customized and complex Sub Folder location, and always end up exactly where I expect it. Once this is done, it requires no tedious renaming, changing or setup for every processed file – it’s beautiful!
Notice, in the naming convention of the Sub Folder I can put actual folder names and separators in the location. If the folder exists, Capture One follows the path to save the processed file. If the folder doesn’t exist, it will be created. Simple. Efficient. Effective.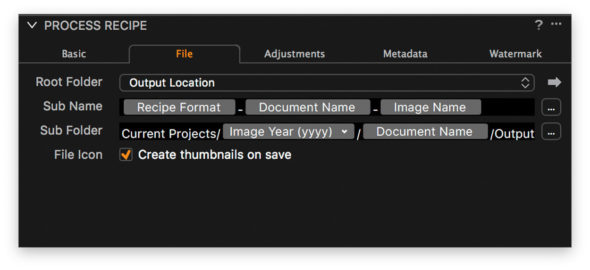
In summary, I concede whole heartedly that my workflow is not for everyone. There is an endless supply of tools and workflows in Capture One, many of which I rarely take advantage of. However, that’s the key to a successful workflow. Once you find the tools that you need to edit efficiently and effectively, the quality and consistency of your images increases drastically. Once you find a workflow that fits your needs and get comfortable with it, you can add or remove steps to improve your final image results.
Yes, I’m biased and it’s fair to say I’m a fanboy of Phase One. But, I’m also a photographer in what little free time the higher-ups at Phase One allow me to have, and I take tremendous pleasure in my love of photography. Any tool or workflow that allows you to spend more time on what you love and makes you proud of the results is priceless in today’s fast paced world. With a bit of time spent exploring the possibilities, I’m sure Capture One can fit comfortably into your workflow, providing you the opportunity to grow and improve in the craft you love.
Download my Mac Workspace
You can download the Mac workspace I’ve used to demonstrate my workflow here
It only works on Mac, as workspace files are platform dependent. To install it, follow these simple steps:
- Close Capture One Pro (if open)
- Open Finder
- Open the ‘Go to Folder…’ dialog (CMD + Shift + G)
- Insert path: ~/Library/Application Support/Capture One/
- Click ‘Go’
- If you previously have created a custom workspace, go to ‘Workspaces’ folder.
- If not, create a new folder and name it ‘Workspaces’.
- Copy workspace file (.plist) to this folder
- Start Capture One Pro
- Select the new workspace from Window -> Workspace…
That’s it for now. Please let me know if you have any questions or comments.
Best regards,
Drew Altdoerffer

Drew Altdoerffer
Drew is a Product Manager and Marketing Specialist for Phase One as well as a previous member of the Technical Supporter team. He works directly with customers in addition to assisting partners and sales associates alike to better understand the features of all of Phase One’s products. His role in the company extends to the PODAS photographic workshops, training seminars and sales events.
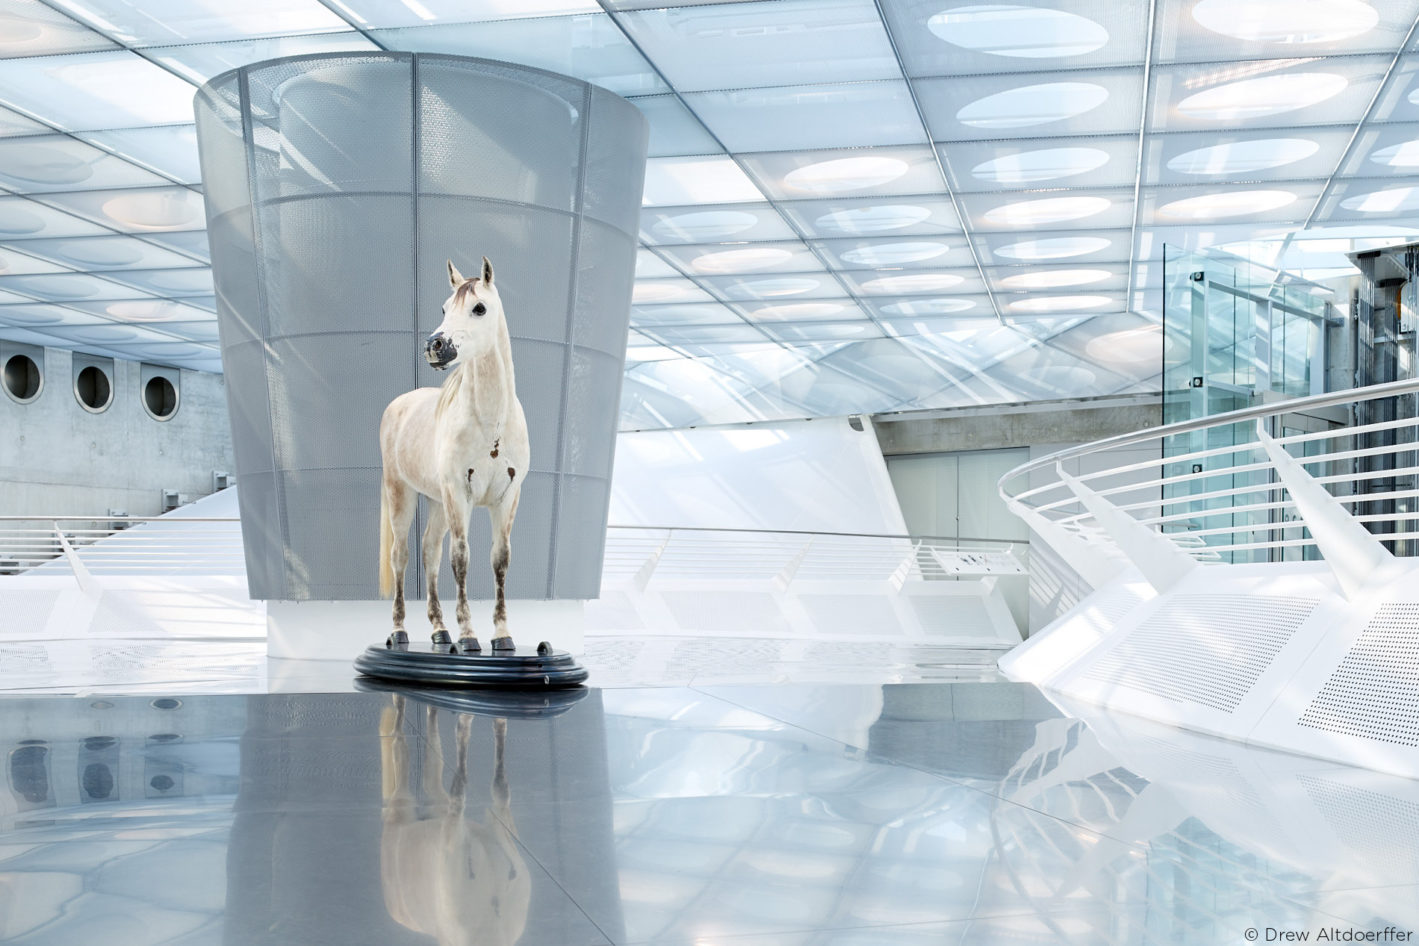


Drew, what a beautiful image. I love it. Also thanks for the download of your workspace and your detailed description.
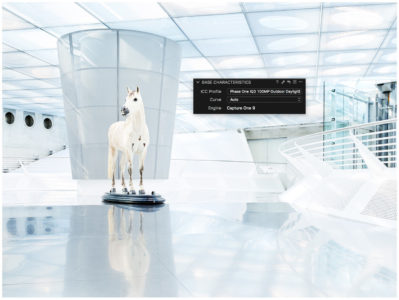
I’m wondering, please, can you tell a little bit more about the image? Is it a scale model or a big space? And what about the horse? I’m just curious, because I love it. Thanks!
Well, the image has been taken in Stuttgart, Germany. It shows the entrance room to Mercedes-Benz museum exhibition.
https://www.raumzeitfalle.de/albums/mercedes-benz-museum-in-stuttgart/content/20150915-igp9693-1/lightbox/
Dear Hans, the image has most likely been taken in Mercedes-Benz museum Stuttgart (Germany). It is the entrance hall toward the exhibition about development of transportation.
I try trial and I love Capture One. one thing keep me with Lightroom. I bought many creative presets and I can’t transfer them to new program.
You can’t directly transfer your presets to Capture One. Sadly but not yet – engine differences or something. I Phase One work on it at least to give us 3dlut/cube compatibility.
Hi Daniel,
You could create a catalog in Lightroom and apply your presets to some images. Import that Lightroom catalog into Capture One (Import Catalog>Lightroom Catalog) and the adjustments will come too.
It might not be identical but could give you the building blocks to save those as styles in Capture One.
D
No, It only import white balance and contrast adjustment. Nothing from curves, hue-saturation-luminance, split toning.
Hmm It should indeed do. I suggest to make a support case. http://www.phaseone.com/support
Great post Drew. Could you elaborate why you avoid exposure at all costs ? Starting from lineair myself, as you do, I – in contrast – do a exposure setting as a first measure. Granted, indeed, that is a shot is well exposed, not much fiddling is required on this part..
Will download your workspace ( am very very new to C1P, so learimg w/ each and every of these posts.. One more question. Can I do a feature request ( or 2 ;)… Bes regards, Marc
Hey Marc,
I avoid the Exposure tool when I can as it’s less controllable and, if you exposed correctly with no flare, it’s not necessary. As you’ve pointed out, if I exposed incorrectly using the Exposure correction in that tool is perfectly acceptable, but if you expose to the right KNOWING you’ll use Linear Response then it’s not a tool you need at all. Brightness, Contrast and even (realistic) saturation can be controlled with the Levels (RGB and LUMA).
Brilliant Drew – your tip to me re Linear Response a year or so back was a bit of a milestone in my workflow….and ‘separating’ the RGB from the Luma curves visually looks set to broaden the horizons further…..superb!
Many thanks for your walkthrough, the beauty of complex software such as C1 is in allowing users to customise and this has been most useful and informative.
I would like to “play”with your workspace but the zip file you have provided requires the now unsupported, and not included in Sierra, Java SE6 which has I am told security implications.
Is it possible to upload the workspace in another way that does not require downloading legacy software to open?
Hey Christopher,
You should grab a third party software that can unzip it. Something like the Unarchiver. Pretty useful tool to have on hand regardless.
This was so helpful Drew – thanks so much for sharing your workflow with us. One of the best posts on the blog since I started reading two years ago.
I have a dumb question: Why do you use both the RGB and the Luma curves?
Hey Brett,
Different tools for different needs.
The RGB curve will add contrast and effect saturation. The Luma curve will effect only luminance and leave saturation alone. That being the case, mixing the two gets me the results I need. I can add contrast and saturation with RGB and then lighten, darken or smooth out the contrast with a bit softer transition using Luma. Give it a shot.
Thanks for the article. The highly customisable user interface is certainly a strength of C1; I’ve exploited it quite heavily myself.
I noticed that we share another approach: Moving new images into the final destination with the OS and then using “Synchronize…” to update the catalogue. Sadly, this currently does not work when one adds a subfolder with new images.
Do you not agree that C1 should give one the option — in the synchronisation dialogue or in the preferences — to discover and import new subfolders?
That would be a really sweet addition to C1, AFAIC. Like you, I really, really would like to avoid the import dialogue at all times.
Hey Tom,
Hmmm… yes and no.
As long as the FOLDER is associated with the session, then the contents will be synchronized. If the option to import folders as well as files is in the sync option, it could cause all sorts of havoc so it’s best to require the folder be connected first via the + symbol and then the content within those folders can be synced, even by syncing the parent folder with the appropriate option selected.
Hello Sir,
I am using the trial version of Sony 11 Pro and loving it so far. I am coming from LR and the difference is quite vast.
I am having trouble locating the workspace file as my library folder does not contain a “capture one” subfolder. Can you shed some light here?…
Thank you for the amazing post. I truly enjoy reading your materials
Hi Lior,
The Library folder must be the one inside your folder and not at the Mac HD level. You should find the Capture One folder in there.
David