NOTE: This article discusses an outdated version of Capture One. To learn more about our latest version, click here.
Capture One Pro is a powerful RAW image processing converter that supports the digital workflow from importing to exporting images. In this post we will look at the many ways in which you can export your images from Capture One Pro, including printing.
Exporting Original Format Images

Export Originals to Finals Folder
If you need to export your original RAW files, or any other image format from your catalog, you can do this simple. I do it to make a copy of my final selects to my Finals folder, which is covered in details here.
To do so, select the images you want to export, and right click one of the thumbnails. From the shortcut menu, select Export, then select Originals. You can also get to this option from the File menu.
I don’t change the image name on export, since I changed it on import. After checking the destination etc., click the Export button, as you see in the screenshot to your right.
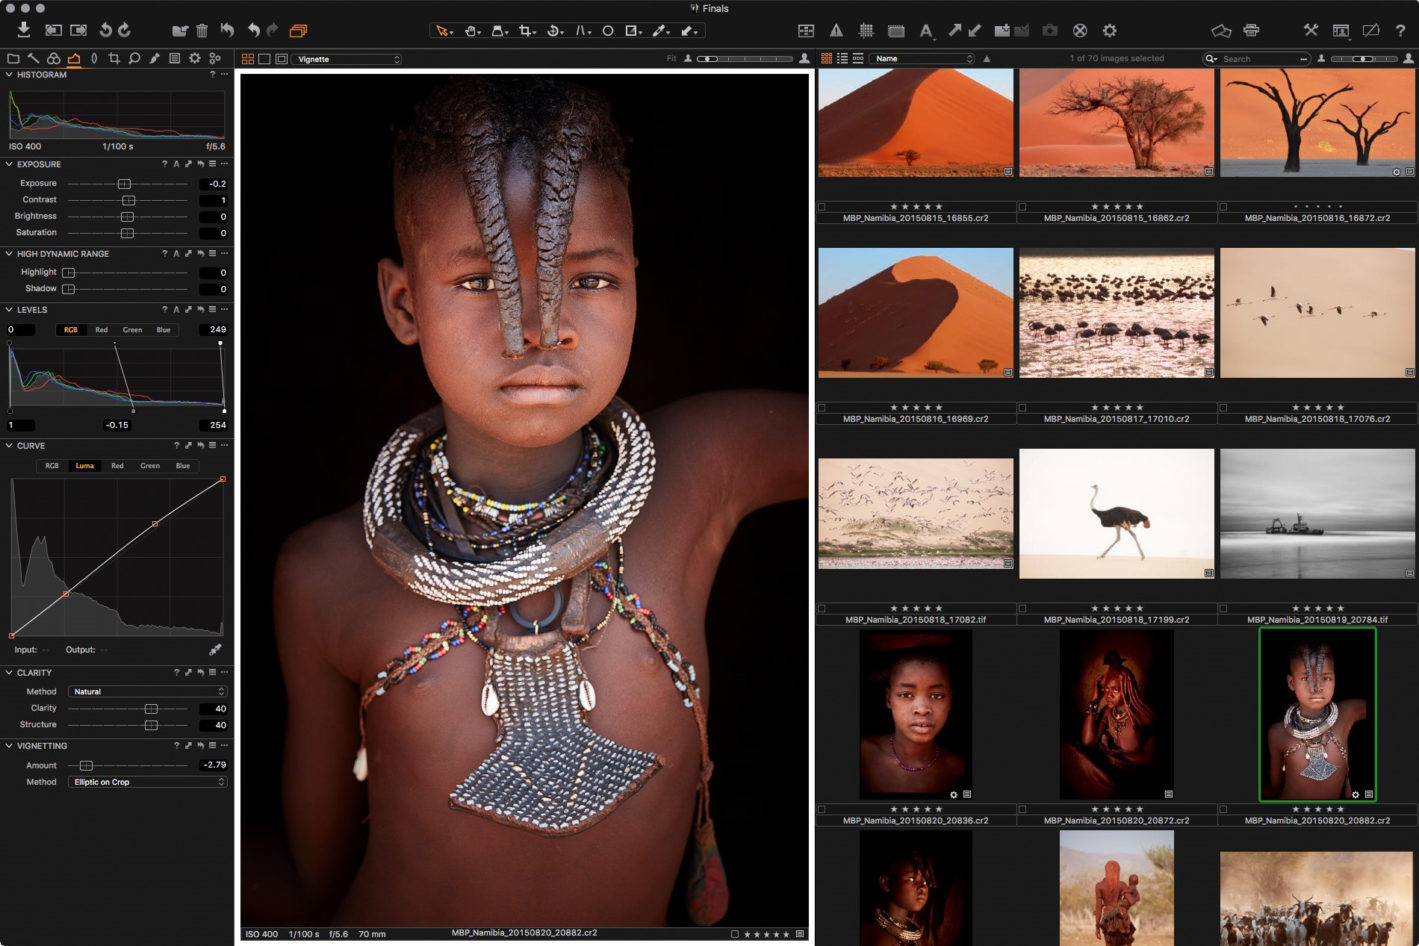
Output – Process Recipes
For most other file export operations, you’ll first jump to the Output tab in Capture One Pro. This is the single, orange cogwheel icon in the top left corner of the below screenshot. If you can’t see the details, try to click on the image to make it larger.
Capture One Pro Output Process Recipes
In the Output screen you can create and select Process Recipes, which are used to export your images into various formats and sizes. When you first install Capture One there are a number of Recipes, but I created most of the above.
Export Formats
Capture One Pro supports images in JPEG, JPEG QuickProof, JPEG XR, JPEG 2000, TIFF, DNG, PNG and PSD file formats. Therefore, if you intend to import your images back into Capture One, avoid Photoshop PSD files. I use TIFF format for all images that I bring back into Capture One if I, for example, went to Photoshop to do some extensive cloning.
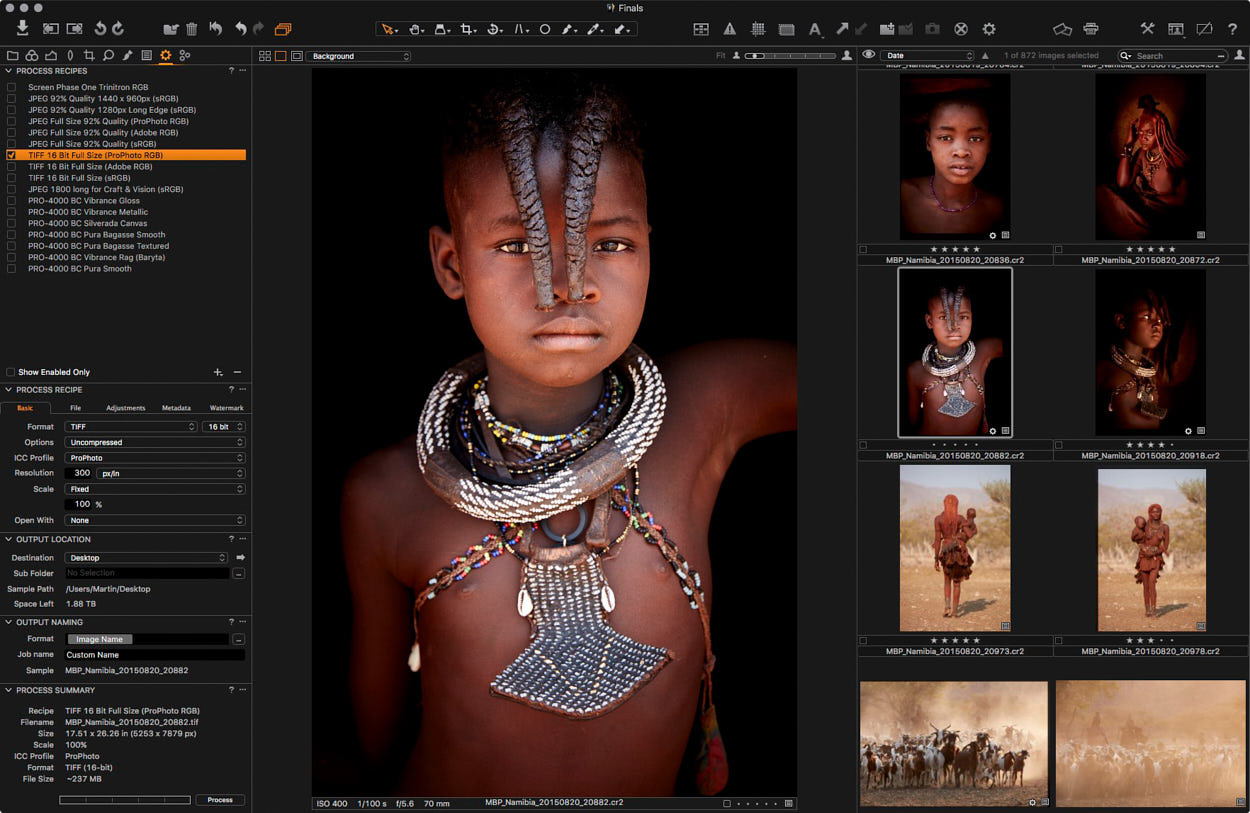
You can change the file format from the Format pulldown under the Process Recipe > Basic section. If you’re going to output that format more than once, save yourself some time by creating a Process Recipe preset.
Process Recipe Presets
To create a new Recipe, click the + button at the bottom of the Process Recipes panel. An Untitled Recipe will be added to the list, with the name ready for you to change it. You might enter something like “TIFF 16 Bit Full Size (ProPhoto RGB)”, which would be good for exporting images to Photoshop.
Export for Web
During export you can resize images and add watermarks. Let’s have a look at how you might create an Export for Web Process Recipe.
Note that if you start changing the settings under the Process Recipe section before creating a new Recipe, it’ll only change the currently selected Recipe. Let’s hit the + button at the bottom of the Process Recipes section first, and give our Recipe a name, fx “Export for Web”.
Although you can export as PNG, the JPEG format is more suitable for photographs for the Web. I usually select 92 for the Quality, because it halves the size of the file but leaves no visible artifacts.

Export for Web Process Recipe
Resolution is good at 72 pixels per inch for the Web, and I’m going to set the Height to 960 pixels. I like my landscape orientation images to be 1440 pixels wide and 960 pixels high. Though, to stop my portrait orientation images from getting too tall, I also resize those to 960 pixels high. Selecting 960 pixels high resizes both orientations correctly.
I’d like to be able to open my images in Finder after they’re all created. However, Finder isn’t actually listed as an Application on the Mac OS, so I leave Open With set to None.
Select an Output location, and if you want to change the file name, select a preset for that too. You can see a summary of your settings in the Process Summary area.
Before we click the Process button, let’s check a few other things.
As you generally want your resized images to be sharpened, uncheck Disable Sharpening under the Adjustments tab.
Under Metadata, select your required options. It’s best to keep your Copyright information in tact, but you may want to remove GPS coordinates, especially if you’re going to share images from your home. Camera Metadata is usually OK to include, and actually better if you’re sharing your images in an education centric environment. Keywords are usually a good idea too.
Watermarking Images

Add a Watermark
If you like to watermark your images, you can do that under the Watermark tab. This is illustrated in the screenshot to the right.
I just use my logo in black with a white drop shadow, and reduce the Opacity to 77%. This makes it somewhat transparent, but can be seen on most colored backgrounds. That way I don’t have to mess around selecting a different colored logo depending on the background.
The Horizontal and Vertical positions shown here will place the watermark in the bottom left hand corner. To adjust the position, click on the little hand icon at the top right corner of the Watermark panel.
Once this is set, click the Process button, and your selected images will be output to the specified Output folder. Resized, watermarked and ready for the Web.
Export to Multiple Formats simultaneously
One of the other great things about Capture One Pro’s Output tab is that you can turn on the checkbox for multiple Process Recipes. Once you press the Process button, you’ll get a copy in all of the selected file formats and sizes.
If you want to specify an output location for certain image types, you can select a different location under the File tab. This is saved in your Process Recipe, which is very useful.
Round Trip Editing
To send a selected photograph to another application for editing, you can right click a thumbnail and select Open With. Here you can select the third party application, such as Photoshop, from the submenu. Keep in mind that this method will open the original file without any of the changes from Capture One.
If you want to keep your changes, a better option is to send the image straight to the other program. To do so, right click the image and select Edit With. This opens a dialog for you to select the format and color space etc., as you can see in this screenshot. Note also that this will create a copy of the image that it sends to Photoshop.

Edit With Dialog
Moreover, note that under the Adjustments tab of this dialog, there is a Disable Sharpening option. Most of the time, RAW files need some sharpening to make them look normal again. Keep this option in mind, and uncheck it to enable sharpening when necessary.
The great thing about this Edit With method is that the copy is automatically added to your Catalog. So, when you’re done editing in the third party program, it’s right there waiting for you in Capture One Pro.
Always Soft Proofing
One of the coolest things about Capture One Pro is that you are pretty much always in soft proof mode. This means you get to see the selected Color Space or ICC Profile’s affect on your images as you edit and output them.
In the earlier screenshots with the Himba Girl, I had a 16 bit TIFF Process Recipe selected, which was using the ProPhoto RGB color space. This gives me the most wiggle room when editing my images. I also have an Adobe RGB and an sRGB color space TIFF Process Recipe, so I can easily compare all three color spaces.
Most of the time, as I switch between these various sized color spaces, the software correctly converts them. Therefore, it’s difficult to see any difference.
I have a few black and white images processed in Capture One Pro, that change slightly in the Capture One Pro interface. However, when I export them, they all look the same, so I actually think that’s a problem with the software rendition of the image on screen.
A very import application of this soft proofing feature is that you can choose to view your images using either a specific profile, or always use the profile that you have selected from the Process Recipes list, regardless of where you are in the user interface. To make Capture One always use the selected Process Recipe ICC profile, choose Selected Recipe from the Proof Profile submenu (Under the View menu).
Soft Proofing for Print
With Capture One set up to always use the Selected Recipe’s ICC profile for preview, you can create a Recipe and select one of your print ICC profiles. This is an advantage in order to get a soft proofing view of your images before printing them. I selected a 16 bit TIFF, and selected my printer ICC profile while creating a number of printer soft proofing profiles:

Soft Proofing for Print
Note that when soft proofing for print, it’s generally a good idea to change the background to white. This way you simulate the white borders or matte around your print. If you view the print with a dark background, it makes the paper simulation look too harsh, and it’s difficult to really gauge what your printed image will look like.
To change the background color, change the Color for the Viewer under the Appearance tab in your Capture One Preferences. Also, while you are in the preferences, set a widish Proof Margin, say of around 30 pixels. With that set you can easily turn on the Proof Margin with the button at the top left corner of the viewing area, next to where it says Background in this screenshot.
Finally, if you have Viewer Labels turned on, showing shooting information and the filename below the large preview of your photo, turn that off by selecting Hide Viewer Labels, under the View menu. By this point, you’ll have a photo totally surrounded by white.
Adjusting for Print
You can see in the above screenshot, selecting a matte media type, like Breathing Color’s Pura Bagasse Smooth, can make the image look pale and lack contrast. I find that the reality is better than this in print, but it’s a good guide, as matte prints are never as punchy as gloss prints.
If you want to change only your print image, it’s a good idea to make a Variant, which is a virtual copy of the original. When you right click a thumbnail and select New Variant, you get a copy of your image without any of the changes you’ve made to the image. Assuming you want to keep those changes and make further adjustments for your print, select Clone Variant from the shortcut menu.
Using Color Readouts
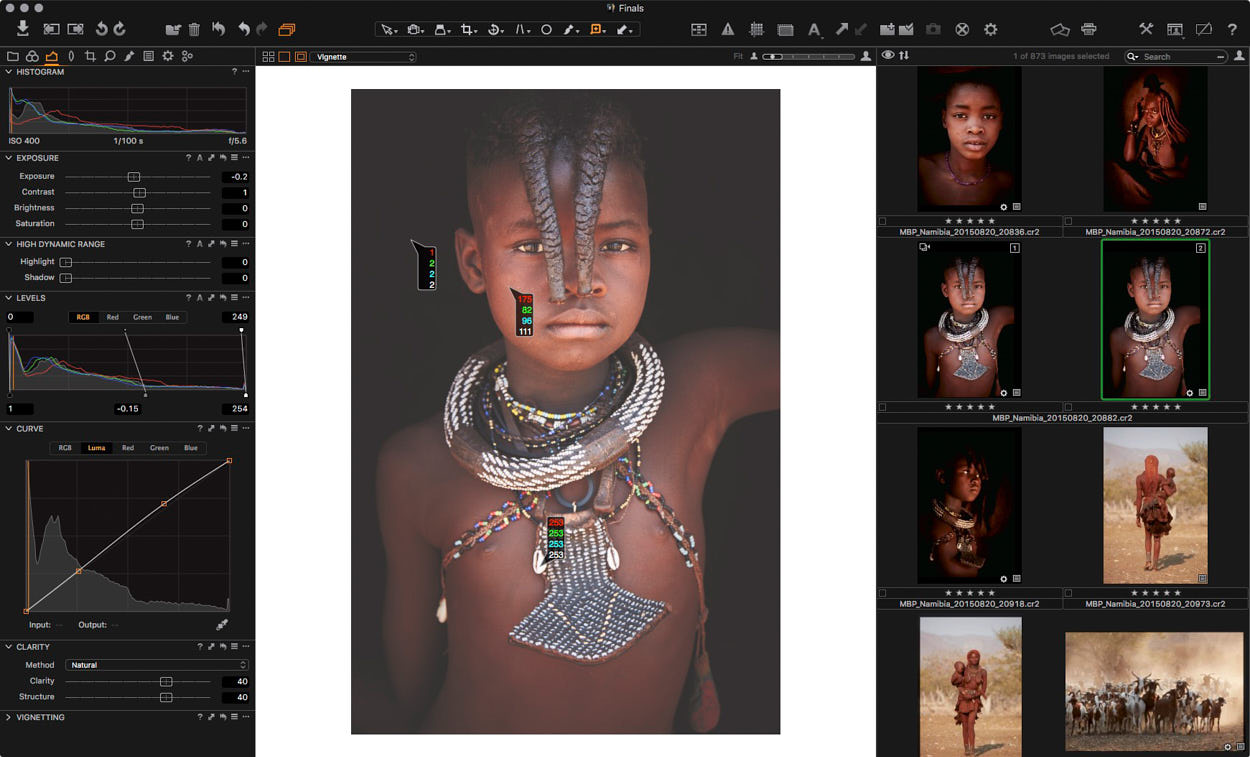
Another very useful feature in Capture One, especially when it comes to preparing to print, is the Color Readouts. Generally, when printing, you want to avoid total black and total white. I often don’t head this advice myself when it comes to blacks. I’ll go to 100% black and my printers usually handle it fine, but it’s worth understanding this theory, and generally worth trying to avoid pure white.
Select Add Color Readout from the bottom of the Picker tools, which is second from the right in the toolbar above the viewer in the below screenshot. Then, click on some of the key areas of your photograph. I like to check the darkest area, the brightest highlight, and a mid tone.
Using Color Readouts
When I placed these Color Readouts on my original, the background was 0, total black, and the shell was 255, which is pure white. So, I created a Clone Variant, and adjusted my Levels, to bring these values in just a little, which would be good printing practice. You can see that now, in my resulting image, my darkest background has a luminance of 2. My brightest highlight, the shells on this Himba Girls traditional necklace, is 253. Her face is 111.
Exposure Warnings
Another option for checking the darkest and brightest areas of your print image, are the Exposure Warnings. These can be turned on with the warning triangle icon. I set my highlight warnings at 253 and my shadow warning at 2. The background is mostly 2 or darker, but I intentionally darkened that, and I’m fine with printing this image with just a little tweak.

Exposure Warnings
If you want to make any other modifications for print, increasing contrast, changing the colors to stop them going out of gamut, now would be the time to do it. Unfortunately, I haven’t found a way to display gamut warnings in Capture One Pro, so unless it’s really well hidden, I don’t think it’s supported. I’m hoping this is something that will change at some point.
Printing
Just as I always printed from Lightroom, I love to be able to print right in my processing and workflow tool. Plus, I hate printing from Photoshop, so I’ve been printing quite happily from Capture One Pro for the last few weeks.
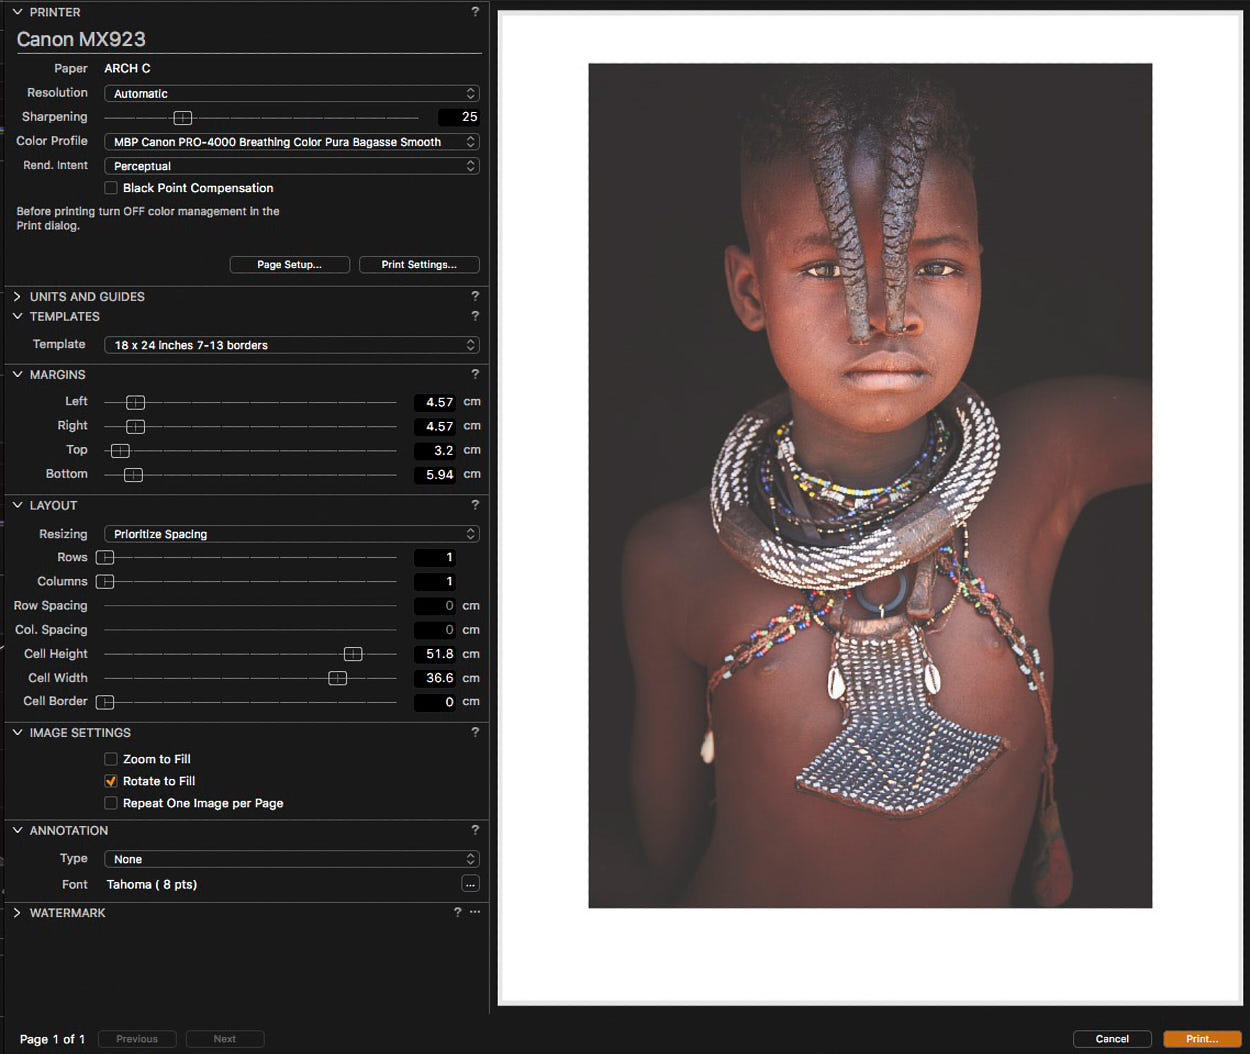
In Capture One Pro, you can hit the Print button from the top menu at any time, regardless of where you are in the program. The print window opens, and you get to select your settings. This is unlike Lightroom, where you go to the Print module to print.
We can create templates in Capture One Pro to save margin and layout information. However, it forgets about page size and ICC profiles whenever you close the program. Fortunately, these are quick settings to change, so select your paper size and the ICC profile for your printer and media combination from the Color Profile menu.
Printing from Capture One
From what I’ve seen so far, Capture One’s print Sharpening is enough for my images when set at 25. You may need to change this, depending on how sharp your original image is. Also, it may need to be increased for larger prints too.
You can set your margins depending on how much border you want. I use my 7:13% offset border to raise the image up slightly. You can see the dimensions I use in my Print Borders spreadsheet, which you can download here. Once you have entered your border dimensions, click the Templates pulldown, and select Save User Template. In the above screenshot you can see that I called this one 18 x 24 inches 7-13 borders.
So, now I can quickly recall my margin sizes and I’m ready to hit the Print button.
Another cool thing about Capture One is when you switch from Landscape to Portrait orientation, the borders automatically switches. Consequently, I no longer have to save a separate template for each orientation.
That was all for now. If you have any questions or advice for this topic, please let me know in the comments.
If you want to see or read more from me, feel free to visit my website: www.martinbaileyphotography.com
Best regards,
Martin Bailey

Martin Bailey
Martin Bailey is a nature and wildlife photographer based in Tokyo. He’s a pioneering Podcaster and blogger, Craft & Vision author, Capture One Brand Ambassador and X-Rite Coloratti member. Fueled by his passion for nature and travel, and a tireless desire to share his knowledge and artistic vision, Martin is a popular international tour and workshop leader, helping photographers from around the world to experience and capture the wonders of this awesome planet we call home.


The only format that saves my edits/adjustments is JPEG XR.. which no one else can open. I’m work on raw files then saving as normal 8 bit jpeg, all color, spot layers.. gone. Try any other format other than JPEG XR & edits are gone. It’s really frustrating.
How are you initiating this export process Mike?
Hi Martin,
Quote: ” Resolution is good at 72 pixels per inch for the Web … ”
When I was reading your excellent Explanation about many Features the above caught my attention.
At the end effect you can specify there whatever you want as that makes no difference in presenting an Image on the web.
You can choose there 1 dpi or 1000 dpi. You will always see the Image in the correct size in Pixels.
regards Rainer
Forgot to add.
Yes it is a pity that C1pro does not pass the Name to the cost Management Software of the Printers. I have the same issue with my Epson P7000 Printer. I just do not know what costs do correspond to what printed Image 🙁
regards Rainer
Hi Rainer,
Thanks for the comment.
You are correct, of course, but 72 ppi has been a standard for the web for many years, and when you have to select something, it’s better to remember 72 ppi. If I was to say, you can select 1 or 1000, it doesn’t matter, that’s confusing, right?
It’s better to give a number, because the field requires a number, and people work more efficiently with something specific to use.
Regards,
Martin.
Great article. While I’m sure it’s not high on their list, printing is one area where I wish Phase One would invest more development resources. While useable and capable of generating great quality, print layout is frustratingly quirky and lacks the multiple/mixed image and size options found in Lr. C1 is getting strong enough to replace almost all of my old Adobe workflow, but I’m still stuck with Lr for final output. Even if they could hit Lr5 capabilities, I’d be ecstatic.
Martin, and C1 staff:
Export of variants is fine. BUT: I tend to export one variant at a time (amateur, bird photographer). The insistence on putting up a dialogue box post-export, when I’m already working on another image, is really infuriating. Any way that can be an option or dumped in favour of discrete traffic light somewhere? Or make that particular dialogue modeless?
Yes! Easiest thing to do is simply create a Process Recipe with your desired output options, then whenever you want to export your 1 images, just hit CMD / CTRL – D to initiate. No completed warning will appear.
This is much more efficient than File>Export
I will definitely make a series of process recipes with TIFF plus the ICC profiles for different papers. Thanks a lot for that idea!
However, one thing I think CaptureOne needs is the ability to associate different proof profiles with individual image variants rather than having it as a global variable.
Why can’t CO9 include Color Profile, Rendering Intent, PAGE SETUP, & PRINT SETTINGS into the custom Template ? That way you could choose one custom template for certain type of photos without have to put page setup & print settings in each time you print. That way it would be as simple as printing from LR.
I can’t answer the why Bill, but I would like to throw my vote into the mix as well, in favor of having these settings saved along with the print Templates. 🙂
100% in agreement. Attention C1 development team: Please put these suggestions into the development pathway!
Hi Martin
thanks for the good and comprehensive article!
Which export settings would you recommend to export JPEG for generals purpose invl. later printing of (moderate) sized fotos like calendars?
Hi Urs,
For printing at home, I always print from my original raw or TIFF files.
To send to a third party company for printing calendars etc. I suggest you wait until you know what you are going to be printing, and where. The reason being, some companies require sRGB color space, and some will work with Adobe RGB JPEGs, which is better, because it’s a larger color space.
Some companies actually provide an ICC profile that you can use, which will help you to soft proof your work and ensure more accurate colors in the final product.
I always export a full sized JPEG of my final select images at 92% compression, sRGB color space, and import them into Apple Photos, so that I have a copy synched around all of my devices, including iPhone and iPad. This is handy for showing people and uploading to Instagram etc.
I hope that helps!
Regards,
Martin.
Thank you very much for this great article.
I’m also using an icc profile provided by a third party printing company. But as far as I understood this profile should only be used for proofing and not being attached to the picture in any case.
This means I have to create two output recipes containing the same setting except for the icc profile and to use on for proofing and the other one to create the output file.
It would make the work more comfortable, if it would be possible to select two profiles in one receipt, a proof profile and an output profile,
Second issue, in version 9 I could select a proof profile in the view menu which was overwritten when selecting an ouput receipt with another icc profile. In C1 10 I can use the proof Icon to switch between both profiles. So theoretically it would need only one output receipt e.g. with Adobe RGB and I have the ability to switch between this one and my printer profile. Unfortunately in this case the proofing of output sharpness is not supported.
Regards
Andreas
Thanks for your very useful article Martin.
Can you tell me if P1 adjusts the sharpening for size when exporting (as Lightroom does) or do i have to export and apply the sharpening at same size in Photosop?
Hi Steve,
You’re very welcome. I’m pleased you found this useful.
Capture One Pro does a great job of sharpening for print, including I believe some moderate upsizing, although I haven’t personally tested the upsizing yet.
Regards,
Martin.
Excellent article, thank you very much. I really learned a few useful things that I should try ASAP.
Regards,
Joachim
That’s great. You’re very welcome Joachim.
Hey Martin ,
I have a novice question for you.
I am printing a project on my clients Epson . I want to soft proof my work .How do I get the icc profile into capture one?
Cheers Adam.
Hi Adam,
On a Mac you just drop the profile into the Library/ColorSync/Profiles directory and on 7 and later they go into the Windows\system32\spool\drivers\color directory.
You’ll need to restart Capture One Pro, and if necessary, click the “Show All” link at the bottom of the ICC Profile pull-down under Process Recipe.
BTW, I did a tutorial on my take on soft-proofing in Capture One Pro here: http://mbp.ac/575
I hope this helps.
Regards,
Martin.
Thanks a lot for the great article! One question regarding resizing of images:
Which image size in output would you recommend for viewing on iPad with 2224 x 1668 resolution?
Many thanks!!!
3000 x 2000 px to make sure you can zoom a bit, but also restricting file size.
While I agree with Nadia as a general rule, it also depends on what iPad you are using, and how much you want to be able to zoom in.
Personally, I prefer to keep full-sized images on my iPad, both in the Apple Photos app, and Portfolio for iPad (although this requires turning off the 35MP limit in the Advanced settings if your images are larger than this).
Generally, for me, this means that I keep 50-megapixel images at full size, and my three-year-old iPad Air 2 and new 12.9 inch iPad Pro 2 both handle this fine.
Of course, this does also use up a lot more space on the iPad, so especially if you don’t have much free space, by all means, use Nadia’s suggested sizes.
Nadia and Martin, thank you very much for your help!
I’m having an issue if any can help. When printing from Capture One I’ve never been able to get the cut guides to print. Under “Units and Guides” I’ve selected show and print guides and no results. Also, under “Image Settings” I’ve checked include overlays and still the cut guides have not printed. Thanks in advance for the help.
Hi Brandon,
I’ve not yet tried to print the cut guides, so I’ll have to defer to the Phase One team to provide you with some help on that.
Regards,
Martin.
I’m curious about rendering intents and workspaces in Capture one. Have a few questions I was hoping you may be able to answer.
1. What is the default workspace for Capture One (I heard it’s not technically Prophoto RGB, but it’s similar in size?). Either way, does it contain the gamuts of most common RAW files?
2. What is the best rendering intent to be using in the preferences of Capture One? By default it seems to be perceptual, but in Photoshop it’s Relative Colormetric.
3. Most printing guides (and your own settings) seem to be perceptual when printing. So why would I not set all my intents across all software to perceptual at all times?
4. If I was shooting a still life, and everything was in gamut, and then, without changing anything else I added something that was out of gamut, if I was using perceptual as my rendering intent, would the two photos look different, so that the out of gamut colours could be accomodated?
Thanks!
Hi Ben,
The Phase One team may shed more light on what color space is used in Capture One Pro by default, but I read up on this when I first jumped ship and decided that I would just always select a Process Recipe with the format 16bit TIFF (Now PSD since it became supported) and ProPhoto RGB selected as the profile. Because Capture One Pro basically uses your camera profile for your images then displays them using whatever profile you have selected, I’ve never worried about this.
I do use sRGB or Adobe RGB for some of my JPEG Process Recipes when that’s what I’m going to export as, but for general editing, I stick with a ProPhoto RGB Recipe. ProPhoto RGB is a big enough color space to completely encapsulate DSLR raw files. See this post for a comparison: http://mbp.ac/577
On the rendering intent, for photography there are rarely any occasions when using Relative Colorimetric will give better results than Perceptual, including when editing images in Photoshop. I always just set it to Perceptual in all applications and forget about it.
On question 4, it’s highly unlikely that you could find a situation where colors would be out of gamut for a modern DSLR camera without aggressive post-processing, but theoretically, if you could do that, you may find that some colors similar to the out of gamut colors shift to maintain a pleasing visual relationship, but it’s unlikely that you’d be able to cause the entire image to change, IMHO.
I hope that helps some.
Regards,
Martin.
Because my prints use to be a bit to dark I could give in LR a percentage to lighten the picture during the printing process. As far as I understood in C1 this is only possible by cloning the variant and print that. Is there no other way to lighten the picture when printing? Because if I change something in the original variant I have to clone the variant again, which is an error-prone process.
Hi Kees,
If your prints are coming out a little dark, it might be worth checking on your monitor profile / printer profile.
What you could also do is add a quick Layer which an exposure or curve bump before printing, but it really won’t be as nice of a result compared to a colour managed workflow.
David
Hi Kees,
As David mentioned, the problem that leads to dark prints is a bright display, so you are much better off calibrating your display and during the process setting its brightness to match your ambient light brightness. Then, your images will look dark too, but that’s what they really look like. The trick is, that you can then brighten up your master copy and just keep it that way. It will print just like you see it on your screen.
As a reference, my MacBook Pro screen is generally set to around 50% brightness, and my iMac and desktop displays are generally around 30%. If your display is much brighter than this it’s definitely too bright.
I hope that helps!
Regards,
Martin.
Hi Martin
Is there an obvious way of enabling beardless printing with Capture One pro 11? I don’t seem to be able to get an image without some form of boarder?
Any suggestions?
Thanks
Adil
Can someone post the best way to get the same exact visual preview that I get in CO pro in Photoshop? If I put my CO image on screen in CO and the same exported TIFF image in photoshop side by side, the PS one look less saturated and has less contrast. I have seen some tutorials on you tube and many show guys opening from CO to photoshop and they look exactly the same? I have been using CO for 15 years and just kind of noticed this. It is small difference but different. Both CO and PSCC are in the Adobe 1998 profile. I would appreciate if anybody could help out in any way and what suggestion you guys might have!!
Thank you ver much,
Eric
Sorry for the late reply Adil!
First, you’ll need to turn on Borderless printing in your printer software. Depending on the printer, this is either an option, like a checkbox, or a media type. For example, you might see “A4” and “A4 Borderless” or something like that.
Then, in the Capture One printing dialog set the Margins to 0 (zero). You may also need to select Zoom to Fill in the Image settings section.
Now, to be completely honest with you, I never print borderless, and so I haven’t actually tried these settings myself. I fear that you might see a very thin borders on at least one edge, even with these settings, but usually, when a printer is told to print borderless, it actually sends the data to the printer a little larger than the paper, and allows a small amount of ink to spill over the edges. I don’t know if Capture One handles this “correctly” or not. I recommend you give these settings a try, and then reach out to the Capture One Support team if you need any further help.
Regards,
Martin.
I’m testing my new Canon Pro1000 printer. I’ve loaded at 13.5″x14.5″ sheet of paper. I’m printing directly from Capture One 11.3. I’ve selected 3 images to print on the one sheet. I must be missing something because I can’t manage to get all 3 images to show up in the print preview window in Capture One. Only my first selection shows up. I’ve included a screen shot so you can see all my settings, and my image selection on the right side Capture One browser (window under the print dialog window). If anyone could point out what I’m doing wrong, that would be great. Thanks so much!
Does C1 have an option for a floating logo, similar to LR’s identity plate? I couldn’t seem to manufacture that setting. Possibly in the v. 12? Any help would be appreciated.
Hi Shane,
That’s currently not possible, no.
Great article. What’s the difference between soft proofing (for printing from Capture One) with the “recipe proofing” icon enabled, or just selecting my output profile from the process recipe? By selecting the profile in the process recipe, it seems like enabling the “recipe proofing” icon doesn’t really add anything. Surely I’m missing something…?
Hi Santiago,
That’s a great question. I know this isn’t as intuitive as might be, but say for example you don’t want the profile associated with the selected recipe to be automatically used to display the image, you can go to the View > Proof Profile menu, and select a different profile that will always be used to display images. For example, I like to leave Capture One set up to use ProPhoto RGB as the default profile.
With that set, if I then select for example a printer profile, or a recipe with the sRGB profile associated, and I want to “soft proof” that, I can hit the Recipe Proofing button, and it is only used while in Proof mode. I prefer this method now because it’s easy to see that I’m not using ProPhoto RGB because it says “Proofing” over the image. All other times I just want to see ProPhoto RGB.
I also remap the Recipe Proofing shortcut to ALT/OPT + P for easier access.
I hope this helps.
Regards,
Martin.
Thanks so much. This is very helpful.
Martin, You mention creating the process recipe “TIFF 16 Bit Full Size (ProPhoto RGB),” which is exactly what I want to do. I have an Epson P800 printer which will print greens and blues that are out of gamut using the Adobe RGB color space, but are within gamut using the ProPhoto RGB color space. However, the problem is that ProPhoto RGB is not listed as an option in the ICC Profiles drop down list for the C1 Process Recipes panel. So, how do I do what you suggest, i.e., export from C1 to PS in the ProPhoto RGB color space for final edits and printing?
Hi Dennis,
Before you move on, please check that it doesn’t say “Show More” at the bottom of the Profiles pull-down. If it does, click it and see if you do have the ProPhoto RGB profile installed.
If not, there is an ICCProfiles.zip link part way down this page: https://sites.google.com/site/chromasoft/icmprofiles
If you install the ProPhoto RGB ICC profile in that zip file you will then be able to select it in Capture One Pro.
Please keep in mind though, that printers have very small color gamuts compared to our screens, and even our screens are only displaying up to Adobe RGB at best (at this point in time). So using ProPhoto RGB won’t help you to print. In fact, it may hinder your printing.
I work using ProPhoto RGB, so as to not limit my images in any way, but when exporting for any purpose, it’s always necessary to keep the output media or device in mind, and they are pretty much all smaller than ProPhoto.
On rare occasions when printing, I actually have to convert a copy of the image I’m printing to Adobe RGB, just to help the shoe-horning process, down to a narrower gamut.
Also, although I usually print using the Perceptual rendering intent, on similarly rare occasions, using Relative Colorimetric, Absolutely Colorimetric or Saturation is required to get a print. Turn on Proofing, select your printer/media profile and switch between the Rendering Intents to see the difference.
I hope that helps!
Regards,
Martin.