
NOTE: This article discusses an outdated version of Capture One. To learn more about our latest version, click here.
In Capture One you have the option of combining several Styles and Presets in one image. We call it stacking them.
Why stack your Styles and Presets?
Without the stacking option you would only be able to apply one Style or Preset to each image and trying to apply a second one would remove the previous.
But with stacking enabled, you can mix and match several of these pre-configured adjustments. But what happens in case of two or more conflicting adjustments? Which will be saved and which will be overridden?
For each tool, you decide whether you will allow stacking of Presets, and as long as two Presets do not conflict with each other, it makes sense to stack them within a single tool.
For Styles, you also have the option of stacking. When working with Styles, it makes a lot of sense to be able to stack Styles or Presets as they may come from different tools dealing with separate issues.
For instance, you can make a Preset that adds some basic metadata to your images like ‘creator’ and ‘copyright’. You can stack this Preset with a Preset that turns your image into a square crop format and with a Preset that adds some general color corrections.
How to stack Presets
To show how you can stack Presets within a single tool, I will create two different adjustment Presets which I will combine by allowing Capture One to stack Presets.
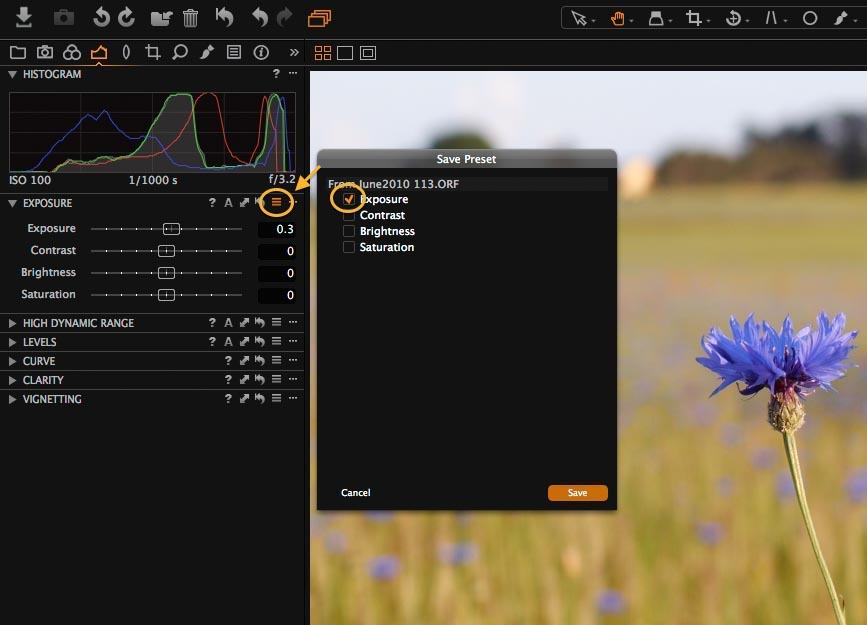
First, I will create an Exposure adjustment Preset pushing the exposure by 1/3 f-stop. I set the exposure compensation to 0.33 and press “Save User Preset” in the Manage and Apply drop-down menu. As the exposure is the only change, it is the only item that has been checked in the save dialog. This is important, as I will later combine this Preset with Presets using contrast and exposure. I name this Preset “Exposure +1/3”.

Next, I will generate a Preset giving the look and feel of old color films. I set the contrast to +18 and the saturation to -56. I save this Preset and make sure that only contrast and saturation are selected in the save dialog. I name this Preset “Old Colors”.
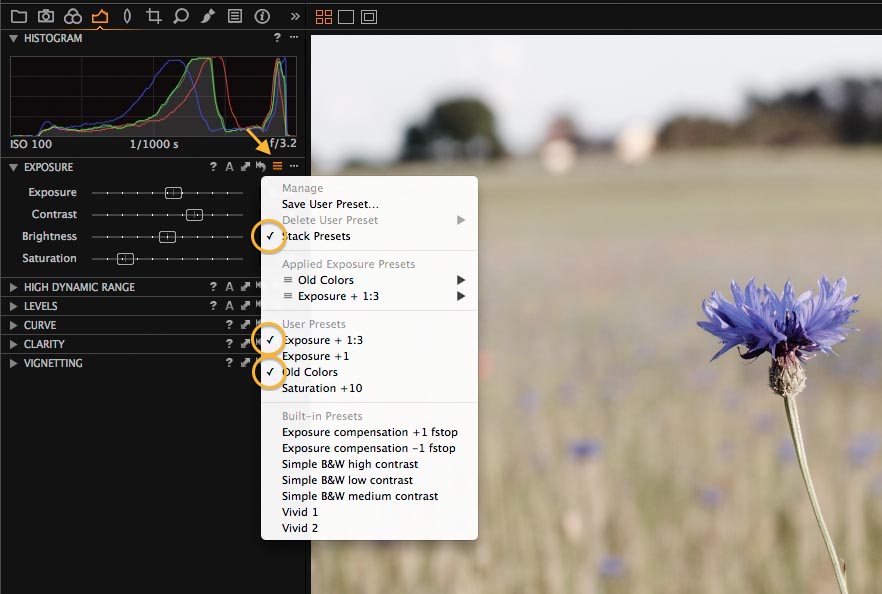
By default, the “Stack Presets” is turned off. Start by selecting the “Stack Presets” menu. Now a check mark indicates that stacking is turned on. Now you can select the Preset “Exposure +1/3” as well as the Preset “Old Colors”. By stacking these Presets, we combine them within a single tool giving you a nice color look, reminiscent of the early days of color films.
If you stack Presets where the individual parameters are not independent, the last Preset you add will be the one that takes effect.
To remove a stacked Preset, you can either click on the Preset again or use the remove option found when pressing the triangle in the “Applied … Presets” list.
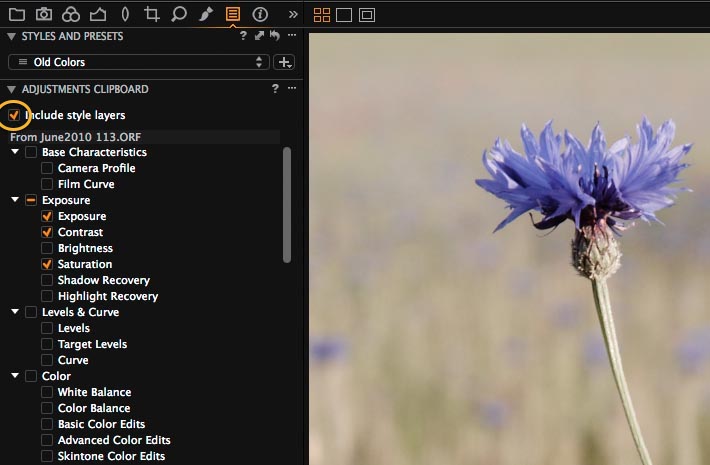
If you want to apply the corrections to other images, you can just copy the settings to the Clipping board and apply them to the selected images. This operation will ensure the right settings are applied. If you also want to see these adjustments coming from a certain Preset, you should check the “include style layers” checkbox on the top of the Clipping board.
See how to create your own Styles and Presets
All the best,
Niels

The Image Quality Professor
The digital pioneer, Niels V. Knudsen, is Phase One’s Image Quality Professor and founder of the IQP blog. Moreover, he is responsible for breakthrough advancements in image quality both in Phase One’s medium format camera systems and in Capture One Pro.


I was enthusiastic when I saw this, but I cannot get it to work with several keyword presets.
For instance. I have set of keywords for ‘nature’ and another set for ‘agriculture’. I want to combine them.
If I follow your instructions here (and I hope I have done properly) the two presets appear stacked in the menu, but in the pane listing the keywords, on the last set chosen appear.
Any thoughts?
John
Hi John,
Keywords don’t unfortunately stack so it is not possible to do what you wish.
That being said, we do realise that this are requires some attention.
David
Does it work similar to ColorEffects Pro where you can continue to build a list of filter presets that apply to the image?
Correct Dean!
I do all edits on an edit layer, to easily be able compare before and after edit. Can a layer be saved as a preset?
Hi
I do all my edits on an edit layer, to easily be able to compare before and after edit. Can I make a preset that add that edit layer and some basic edits?
best regards
Lennart Östman
With every article you write, you need to start with a definition of what you’re talking about. What is a style? What is a preset? That is what a real professor would do in a class, that is to make sure everyone has a basic understanding of the topic before moving on to the details. Even if a tutorial has an expectation of a certain level of understanding, there should be a link to where someone can get more basic understanding, such as, “If you want to understand what styles and presets are, click here.” Thank you.
Hello Phase One professors of all kinds :-)!
C1 v12
May I ask how to create an Exposure Compensation preset that preserves an existing exposure value per image, thus adds the compensation relative to the existing EV not overwrites its value?
I have a bunch of photos which I had normalized in Exposure and WB. Now it turns out after clicking all individual spots applying the eyedropped tone value, that all photos are a little too bright. Adding an Exposure Compensation preset +0.3 would set all photos to Exposure +0.33.
Given some photos have an exposure unequal to zero I want now to add +0.33 F-stops to all photos. Is that feasible? I mean adding an exposure value relative to the existing exposure?
Hi Gerrit,
You can save the Preset as a normal Preset, but instead of simply applying it, you right-click and select ‘Apply to new Layer’. This way it will simply compensate instead of change the value.
– Alex
Hi Alex,
Thank you for your suggestion. It works quite well 🙂
Best regards,
Gerrit
Hi!,
When I like a style and apply it to an image it shows on the “applied style” menu.
The problem is when I copy and paste all the adjustments to another image, all the color settings seem to transfer but the style does not show up as an “applied style” which makes it hard to keep track of what style is applied if any.
Help please?