
NOTE: This article discusses an outdated version of Capture One. To learn more about our latest version, click here.
For the past 6 months, I’ve been using Capture One Pro by Phase One as my RAW converter and image editing software. In this article, I am going to share How I switch from Lightroom to Capture One Pro. I won’t cover Why as many others have already covered this topic (see resource links at end).
With a long career in IT as my background, I put together a transition plan to assist me in moving to Capture One Pro. I’ve simplified the transition plan down to 4 Transition Stages and 2 Post-Transition Activities to help others interested in switching to Capture One Pro.
Disclosure: Since I am a Windows PC user (Microsoft Surface Book and Surface Studio computers), all my workspaces, keyboards shortcuts, etc. reference the Windows version of Capture One Pro.
Stage 1 – Mapping Out Workflow
My process began by reviewing my existing workflow (Figure 1) with the workflow pipeline Sascha Erni covers in his book: Capture One Pro 9: Mastering Raw Development, Image Processing, and Asset Management (Figure 2).

Figure 1 – My high-level view workflow mapped to Lightroom Modules

Figure 2 – Overview of Sascha Erni’s workflow pipeline using Capture One
With a high-level alignment of workflows, I decided to follow Sascha’s detailed workflow pipeline as my Capture One Pro workflow.
Before setting up the Capture One Pro catalog, importing images, and beginning to process the images, I wanted to make sure my Lightroom catalog was in order. I didn’t have to do anything with my raw images because I was going to use my established raw file structure and location.
Stage 2 – Clean Up (Catalog Images, Keywords, Collections, and Metadata)
With almost 10 years of Lightroom usage and significant development in my photographic knowledge, I took advantage of this change to revisit my Lightroom image catalog and clean it up before switching.
Catalog Images
I separated out 9 years’ worth of my family and son’s soccer photos to their own Lightroom catalogs and chose not to bring them into COP. Instead I would only bring over to Capture One Pro my fine art landscape, travel and street photographs.
Keywords
They have never been a strength of mine and my keyword list showed it. There wasn’t any structure to my keywords, inconsistency in keywords usage, redundant words, and misspelled keywords. Within Lightroom, I eliminated all unused keywords, fixed spelling errors, removed duplicates, and set up a hierarchical keyword structure based on Who, What, Where, When, Why, and How. I exported the resultant keywords to a text file. With a text editor, I separated it into individual Keyword Library files to be imported into Capture One Pro (Figure 3) during Stage 3.

Figure 3 – My Keyword Libraries
Collections
I cleaned up my Lightroom collections – rearranging and putting in place a simpler organization that I’d carry forward within Capture One Pro. I arranged my collections in these groupings: Trips, Workshops, Deerfield Beach, Copyright, Portfolio, Prints, and Misc.
Metadata
The last clean-up activity within Lightroom was to make sure all metadata had been saved to xmp files (Ctrl+S). Using Lightroom’s Metadata Status Library Filter, I kept saving metadata to the sidecar files until the status ‘has been changed’ showed zero.
With my Lightroom catalog in order, it was time to configure and customize Capture One Pro.
Stage 3 – Configure and Customize Capture One Pro
Because I had been using Lightroom and its catalog structure, I decided Capture One Pro’s catalog would be my primary file organization structure. I set up a catalog, created user collections to match those established during Stage 2, and imported my keyword libraries. With a common foundation configured in Capture One Pro, it was time to customize Capture One Pro to help me easily transition.
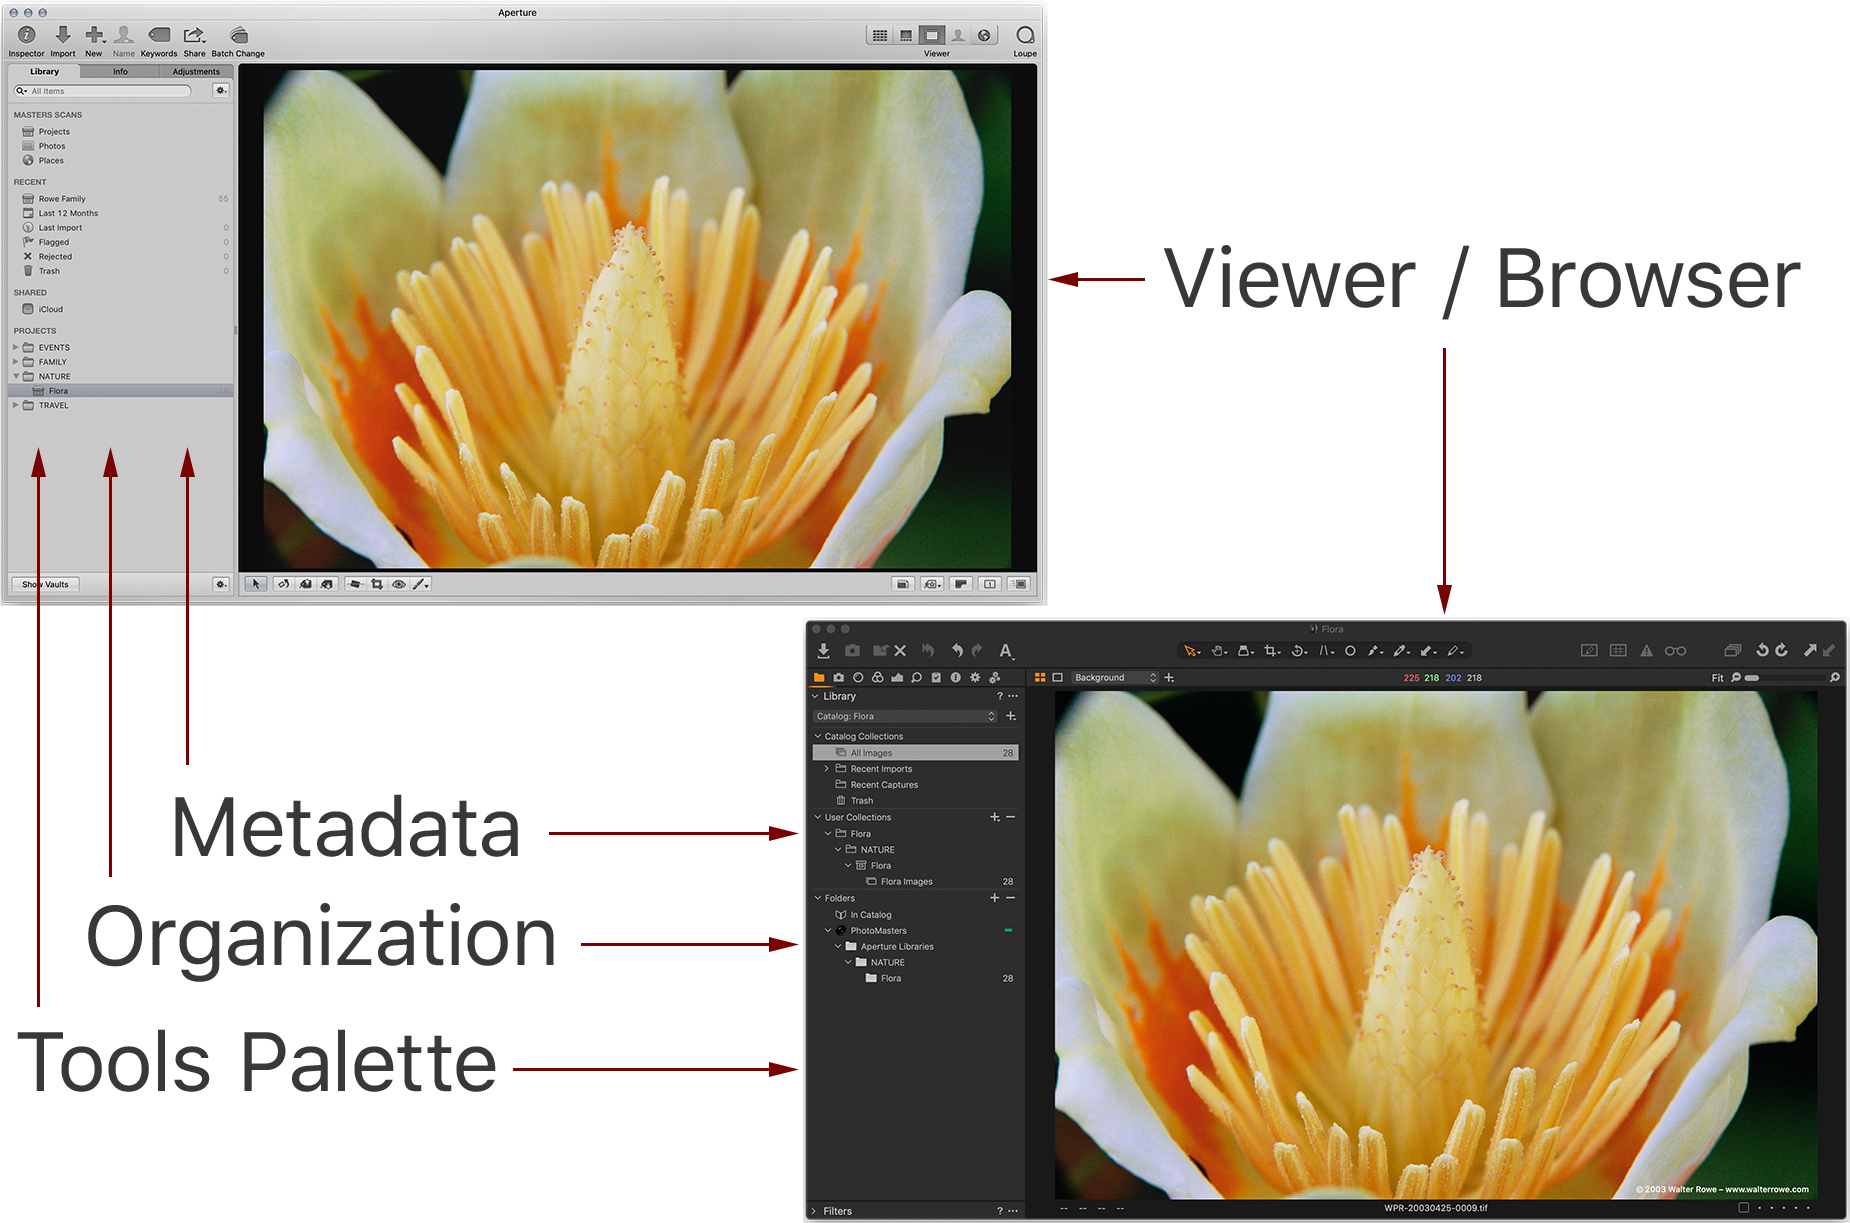
Like learning a second language, you initially translate between the two languages. The same happened for me as I moved from Lightroom to Capture One Pro – I needed to learn the new Capture One Pro “language” compared to Lightroom’s “language”. Capture One Pro’s flexible user interface facilitated the translation by allowing me to create my own workspace. I set up a workspace that enabled me to mimic my Lightroom workflow as much as possible (Figure 4).
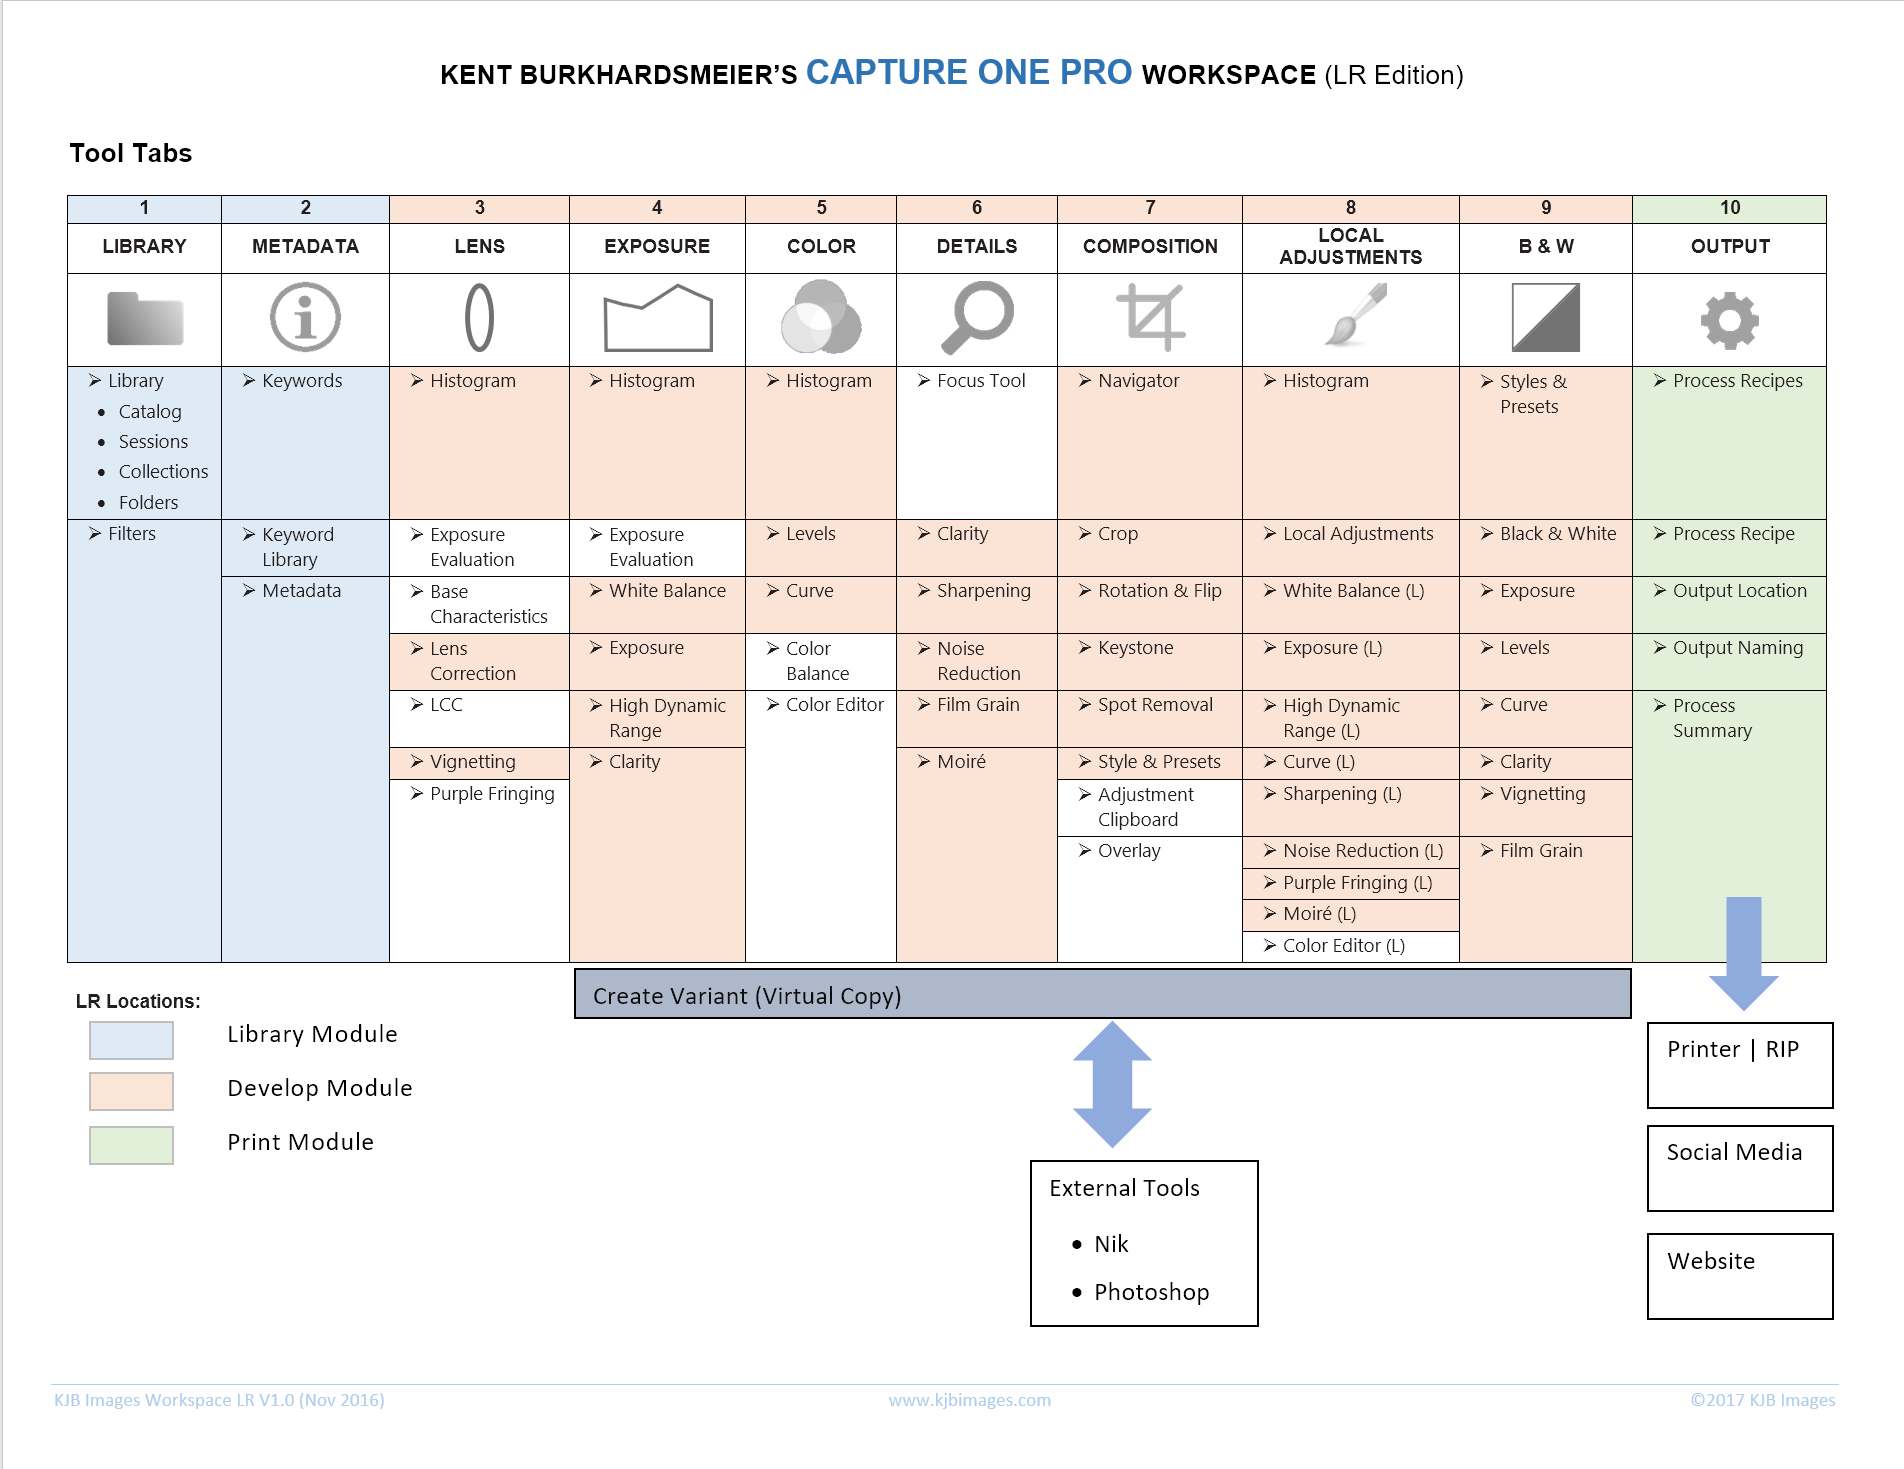
Figure 4 – My Lightroom-like workspace and workflow map
I arranged the Tool Tabs (columns depicted a Tab) with the Tools listed within each Tab/column. I color-coded them to show their equivalent Lightroom Module – assisting my transition. My workflow went from left to right column and from top to bottom within each column. I moved Tool Tabs to the right side as most of Lightroom’s tools are located on the right side (Figure 5).
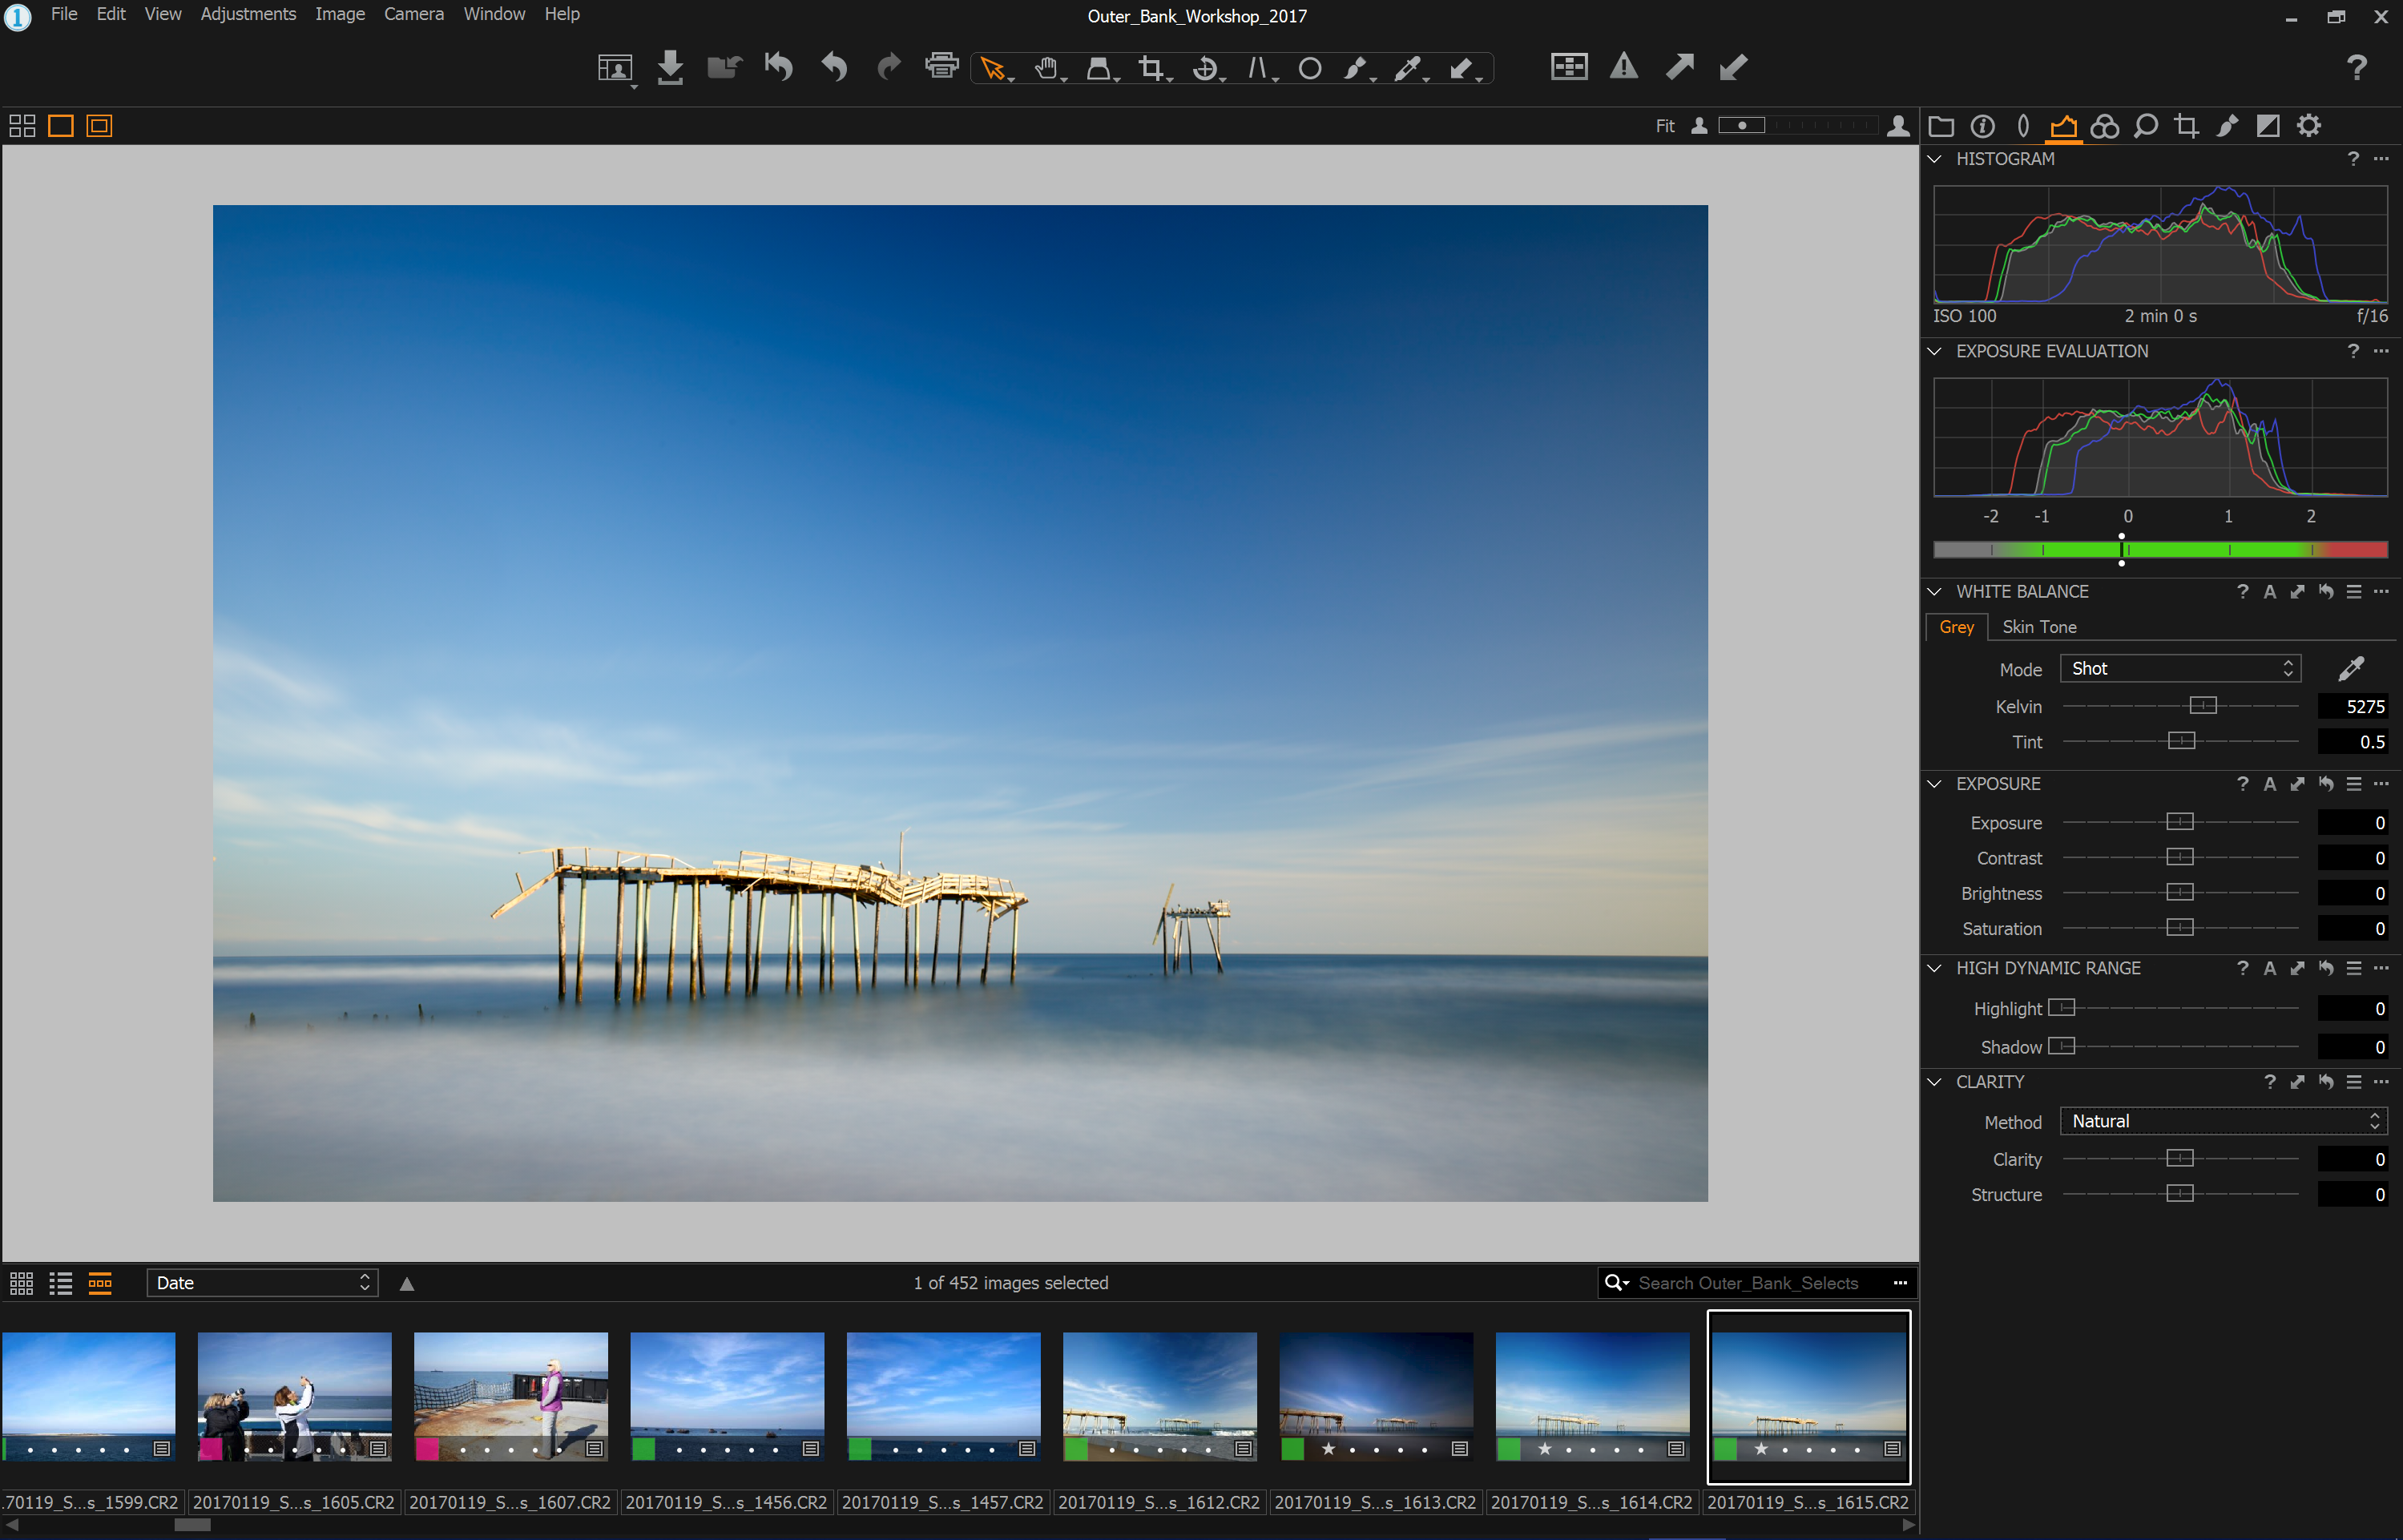
Figure 5 – My Lightroom workspace
Since keyboard shortcuts are completely customizable within Capture One Pro, I printed out both Lightroom’s and Capture One Pro’s default keyboard shortcuts, created a tabular cheat sheet and began customizing Capture One Pro’s shortcuts to mimic Lightroom’s shortcuts. Testing them along the way, I settled on my own custom keyboards shortcuts for Windows (Figure 6).
Now I was ready to begin importing images and using Capture One Pro to process my photos.
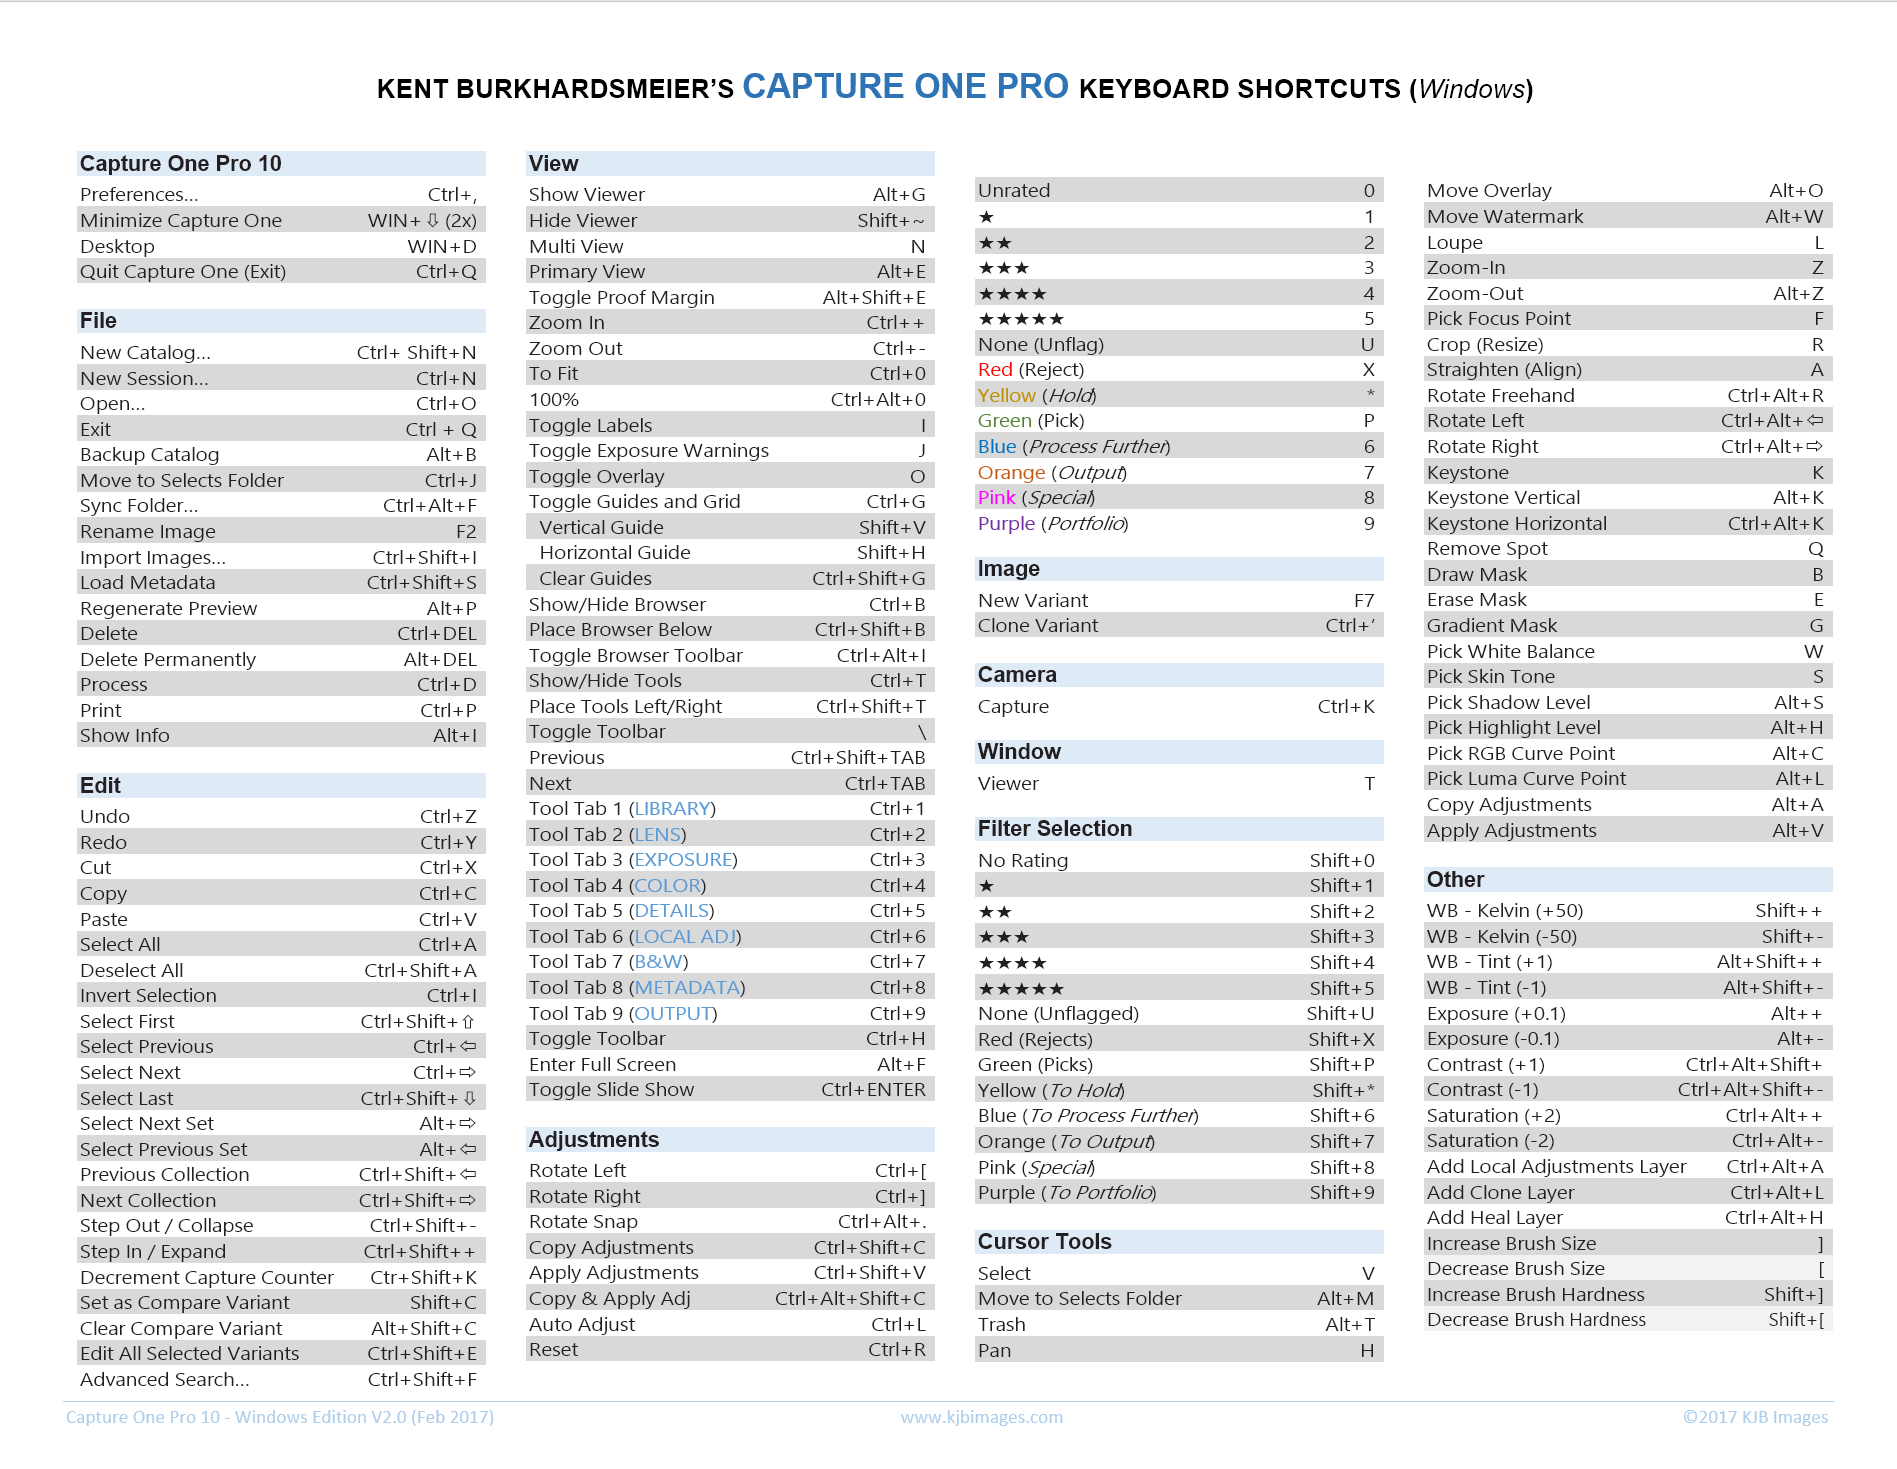
Figure 6 – My keyboard shortcut list for Windows
Stage 4 – Importing and Processing Images
I had decided early on not to move all my existing images to Capture One Pro but instead (a) all new images would go directly into Capture One Pro catalog and (b) over time I would move existing Lightroom images into the Capture One Pro catalog when I worked on them. While this might not be a clean-cut shift away from Lightroom, I felt it was the right approach for me. I wanted to really focus using Capture One Pro on my new photos and not risk previous processing work.
With new images, I followed my workflow for import, selection, process, and output.
When transferring existing Lightroom images to Capture One Pro, I performed the following tasks:
Within Lightroom:
- Create a new collection of images to be moved into Capture One Pro
- Confirm Keywords and Metadata are correct
- Export all Lightroom virtual copies and processed images as a TIFF appending ‘Lightroom’ to its filename, then import into the new collection
- Export the new collection as a ‘new’ Lightroom catalog that I’ll use for importing into Capture One Pro (I don’t include the negative files since I’ve kept the same raw file structure and location)
- Backup ‘old’ Lightroom catalog and open ‘new’ Lightroom catalog
- Verify images I want to import into Capture One Pro are part of the ‘new’ Lightroom catalog
- Backup up the ‘new’ Lightroom catalogs while existing Lightroom
Within Capture One Pro:
- Open Capture One Pro and import the ‘new’ Lightroom catalog into it
- Verify all images were imported into the Capture One Pro catalog
- Confirm and cleanup keyword and/or metadata that might not have transferred correctly
- Align images to appropriate Capture One Pro user collections
- Backup Capture One Pro catalog
Once I confirmed the images were in Capture One Pro and backed up, I’d remove them from my ‘old’ Lightroom catalog and delete the ‘new’ Lightroom catalog and collection created for importing to Capture One Pro. Sometimes I have to reset the image adjustments in Capture One Pro if all of my Lightroom adjustments didn’t transfer adequately or the image doesn’t look good.
Now that I’m using Capture One Pro for all new photos, I continue to do the following two activities:
Continuous Education
While using Capture One Pro, I continue to attend Phase One Webinars, re-watch older tutorials and webinars, monitor the Phase One Blog, re-visit Sascha Enri’s book, and seek out other Capture One Pro users for more tips, tricks, and insights. At the bottom of the article, I have links to resources I found helpful in my education and transition to Capture One Pro.
Working on images and continuously learning about Capture One Pro, helps me identify ways to refine and update my workflow.
Refine and Update Workflow
As I become comfortable with Capture One Pro, I make minor tweaks to my workflow and enhancements to my workspace. In January, after upgrading to Capture One Pro 10 and attending the new Webinars, I updated my workflow map and tool tab layout to reflect my Capture One Pro workflow.
Figure 7 and 8 show my latest workflow and workspace.
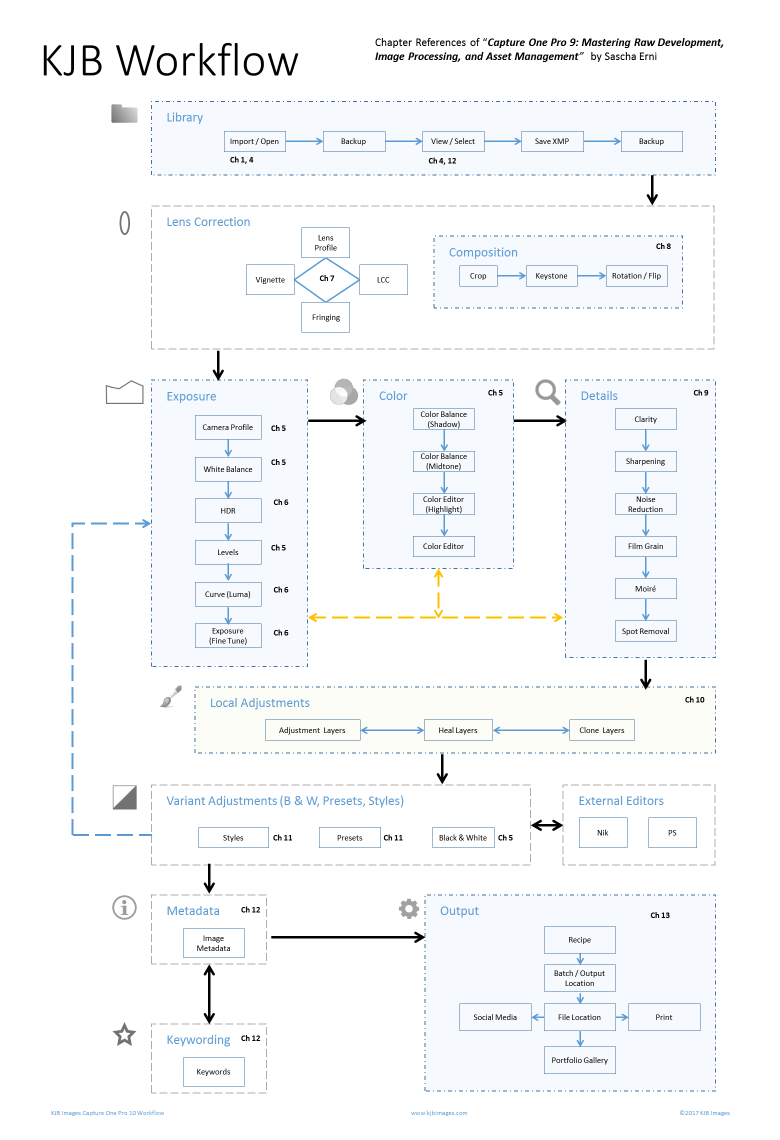
Figure 7 – My Capture One Pro 10 workflow
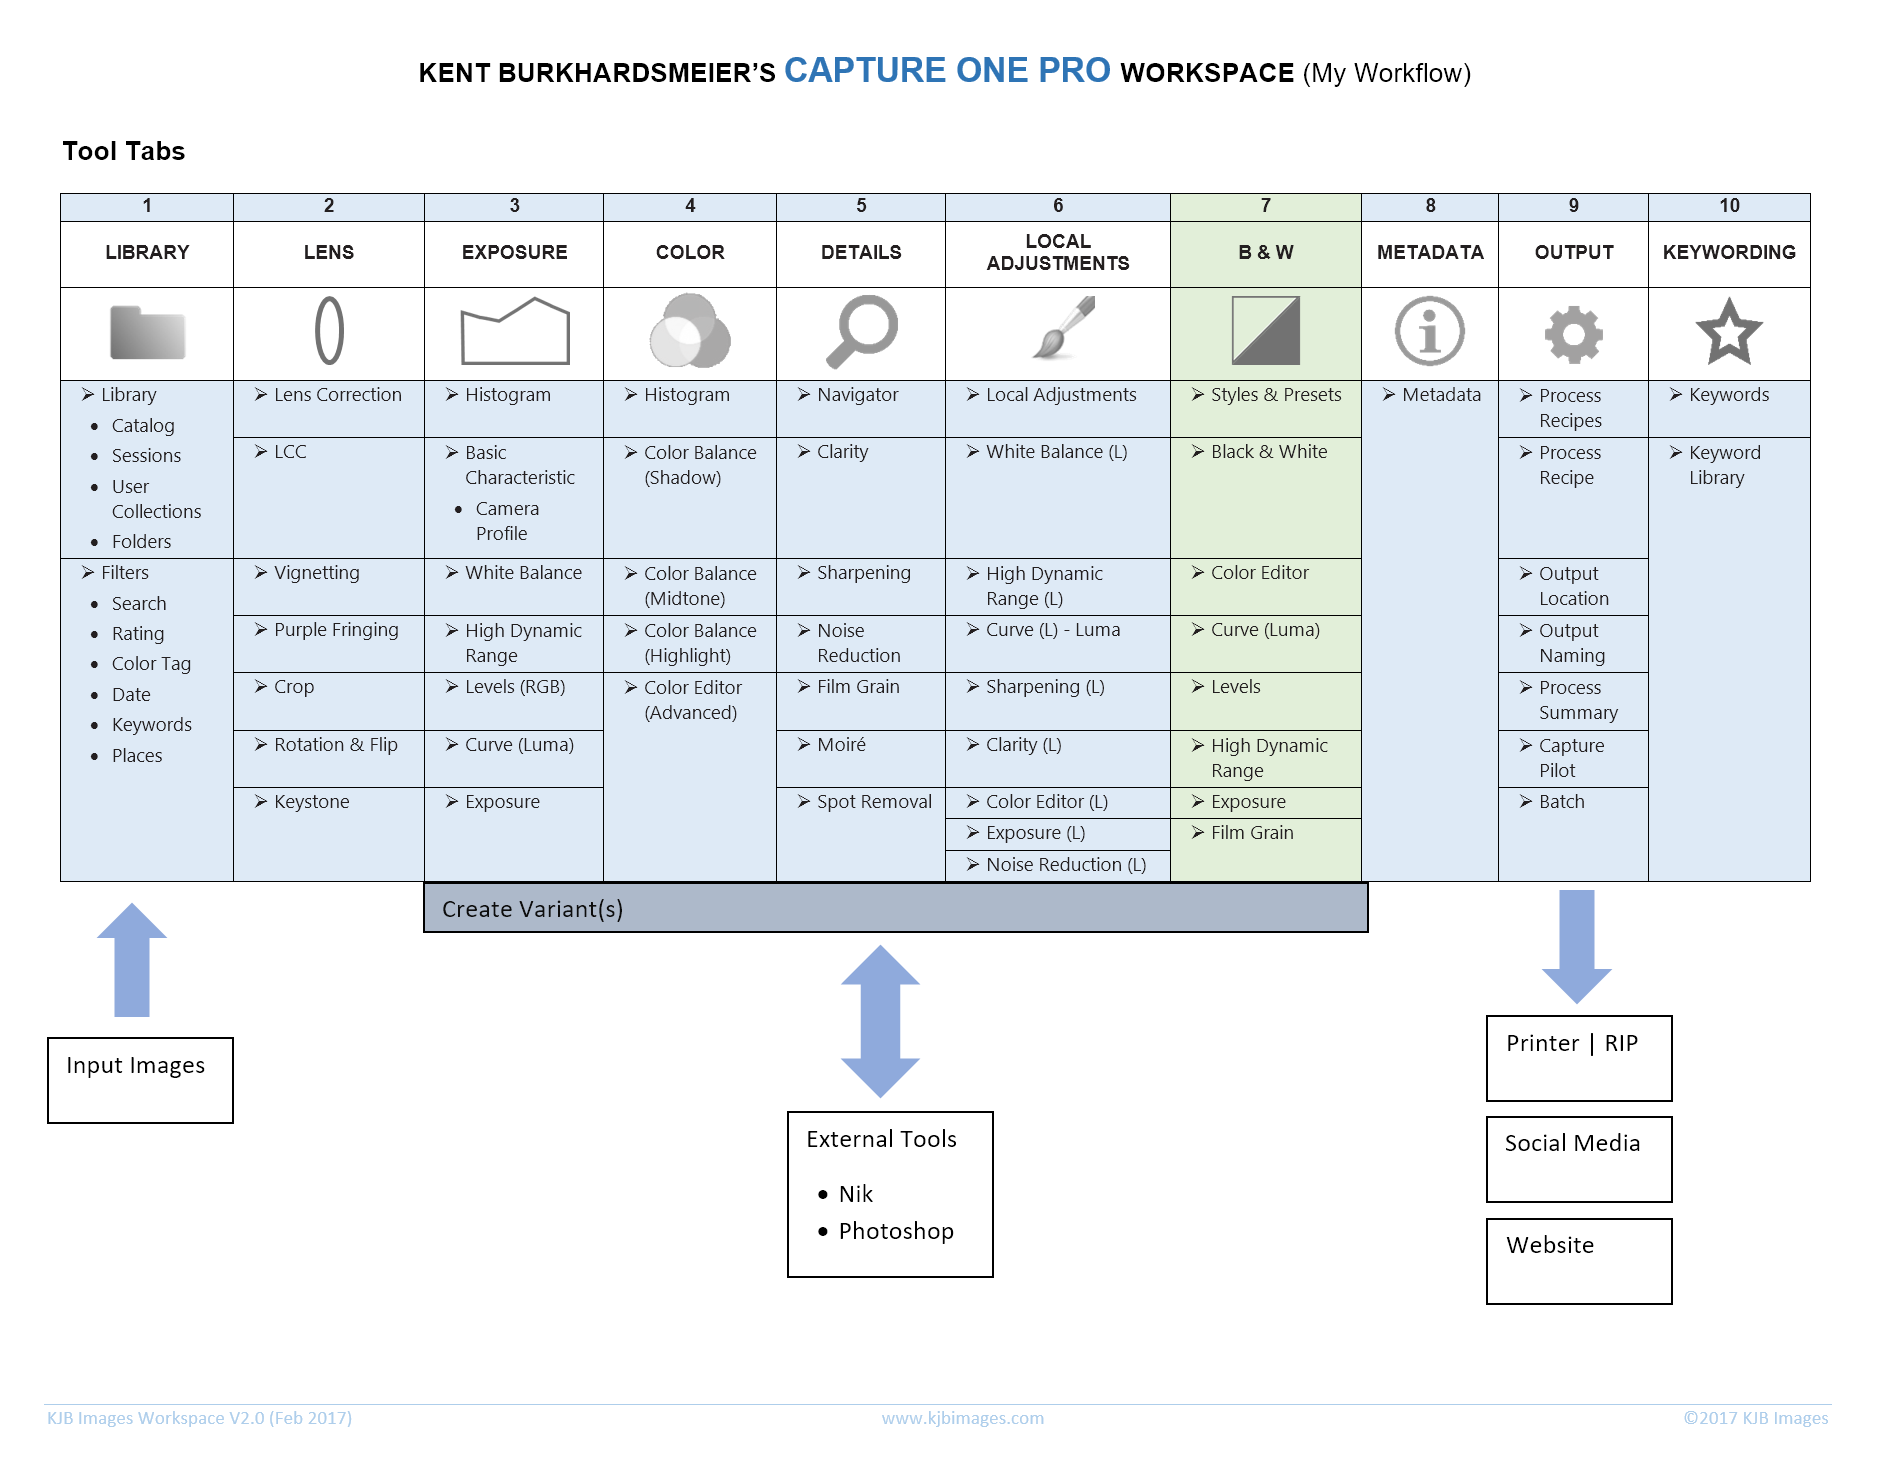
Figure 8 – My Capture One Pro workspace
Summary
I am very pleased that I switched to Capture One Pro. I did not find Capture One hard to learn – the Webinar and Tutorials put out by the Phase One team are brilliant and extremely helpful. These webinars were the tipping point for me – enabling me to transition to Capture One Pro. Sascha Enri’s book has been invaluable. My copy is filled with highlights, scribbles, and tab markers while sitting next to my computer.
You can download:
- The workspace overview PDF [here] and workspace (for Windows) [here]
- The windows keyboard shortcut overview PDF [here] and keyboard shortcut list (for Windows) [here]
For windows users: copy workspace xml file to:
{drive:\Users\username\AppData\Local\CaptureOne\Workspaces}
and copy the keyboard xml file to:
{drive:\Users\username\AppData\Local\CaptureOne\CustomCommands}
Before you switch over to Capture One, I highly recommend you check out these resource links.
Resource Links:
Cameron Davidson Blog has a big list of links relative to Capture One
My Playlist of Capture One videos worth watching
Capture One Training and Support:
Capture One Pro Learning Hub
Book
Capture One Pro 9: Mastering Raw Development, Image Processing, and Asset Management by Sascha Enri
Blogs, Podcasts, and other Tips
Capture One Blog
Bob DeLellis – check out his YouTube video
Cameron Davidson (http://camerondavidson.com)
Presets & Styles:

Kent Burkhardsmeier
Kent is a fine art photographer based in Florida, USA. After a successful career in IT that took him and his family around the world Kent left it to tap into a need for more creativity and pursue his photography passion. Kent focuses on fine art photography involving landscapes while incorporating his love for international travel and cultures. You can learn more about Kent by visiting his website: www.kjbimages.com, follow on Instagram @kjbimages or read his blog: https://kjbimages.blog/


Fantastic job! Finally mak s it look do-able. Thank you!
After a long period of evaluating COP, I decided to make the transition from LR. I’ve been in the process of determining how best to make the transition and this article comes at a perfect time for me. Thank you so much.
Glad to hear this.
Excellent work. Very well thought through. Systematic approach shows importance of your preparations. Big help for all migrating from Lr to CO Pro. Thanks for mentioning Image Alchemist.
Thanks Paul. Image Alchemist site was very helpful in my preparations and valuable to others making the switch.
Thanks for sharing your experiences migrating to Capture One! I’m also looking into moving but have hit some major roadblocks along the way:
First, importing Lightroom Catalogs looses ALL color markings, flags AND rejects. Rejected images appear no different from any other image. Some of my images have XMP files in Lightroom, some don’t. Neither were imported correctly. This is a major disappointment. I came to terms that I can’t have stacks in C1 so I spent hours marking their images with colors just to find out that C1 does not retain them.
Second, my current Lightroom catalog contains about 25,000 images. The import into Capture One runs for about 2.5 hours and rendering previews takes another 15 hours. This is long but doesn’t bother me too much since you’re just doing it once. However: opening the resulting Capture One library consumes 10-12 GBytes of memory! This is just too much, especially as the most powerful MacBook Pro maxes out at 16GByte!
And there are another 60,000 images currently still in Aperture, waiting to be imported as well. I can’t even imagine how C1 would handle that!
Last time I tried the Aperture import, C1 didn’t even import crops, rotation (90° left/right) or straightening from Aperture. At least it kept the color ratings, though. But it’s no use looking into that further as long as C1 is such a memory hog.
Capture One is a great image editor but it lacks SEVERLY on the image management side.
Can you share more details how your images are structured? Did you have any rejects, color labels in your Lightroom library?
Hi Dirk:
I’ll provide some details on my transfer of LR images to C1, but as I’ve never used or seen Aperture I cannot comment or assist on that software.
1. Why bring over Rejects? I delete all rejects from disk and catalog. I don’t even want to be bothered by them, use up disk space, or waste time on them.
2. C1 supports XMP files. I just did a test of 10 LR files, some flagged (Picked), 1 rejected (X), several different color tags, different ratings and a test collection set up for these images in LR. All items came across except the following the flags (Picks and Rejected) C1 doesn’t have a Pick / Reject flag so it doesn’t have a place to land in C1. My test LR collection was also copied over. For the Picks/Rejects, I would recommend either:
A) Using one color flag for Picks – I use GREEN. I use RED for Rejects but I would delete them before moving anyway.
B) Set up separate LR collections for Picks – maybe call it Selects. You could also create a collection for Rejects – maybe call it Rejects. Then move the images to those collections in LR before importing.
It is not my practice to do Large Catalog transfers but rather smaller ‘chunks.’ I’ve found C1 works with catalogs much faster than LR which is one of the reasons most people get frustrated with LR and start looking for other options. Phase One has a image management tool, Media Pro, that you might consider. I have not used it so cannot speak about it.
In summary, I deleted all my Rejects out of LR before transferring them. I also make sure all LR metadata has been saved to the XMP file (CTRL+S) before transferring. And I double check that they have been saved through LR filters for metadata status. I do use colors and flag tagging on my images; these have transferred over to C1. I also make sure that LR virtual copies are saved out as TIF since not all color adjustments will transfer. And any file I’ve done significant processing on in LR, I save as TIFF – again to get all my color adjustments. (Export using ProPhoto Color and 16 Bit).
I’m sure you can find more input on Aperture transfer to C1 on the Phase One Forum.
Hope this helps,
Kent
I just switched two weeks ago from LR. The only thing that didn’t come over was my picks and colllections. My ratings all transferred. I separated catalogs by year. So a few issues with finding things but pros still out weighs cons. I have one catalog for all processed images once they are done and ten catalogs based upon years. I tried importing as one large and six hours later it booted up and then crashed. I did not use the Import for LR. I just made individual catalogs and transferred from there. No fuss no muss.
Also, my tags so far are:
Red =raw
Orange=global adj in c1
Yellow =tiff
Green=ready to edit with 3 ***
Blue =finished with 5*****
Purple = resized and ready to print.
Multiple ways to rate. And I’m just starting since Lightroom was limited by five colors
I found your article to be insightful and helpful in making my transition to CO easy. I just have to bite the bullet and start. Should I try different types of import methods from LR? I noticed a few recommended online.
Thanks Jon.
I believe the approach one takes moving from LR to Capture One Pro, depends on their workflow. You may want to try each of the steps, I and others have posted to see which works best for your situation. E.g. I’m taking a slower and structured approach given my previous LR catalog status.
From my post, the referenced links including tutorials, as well as the recent posting by Nils Wille Christoffersen: “Part I: Fast-track guide from Lightroom to Capture One Pro,” I think you’ll discover a method that works best for your workflow and images library.
Lastly, the people at Phase One and the members of the Phase One Support forum are super helpful.
that is one nice and detailed script for moving to CO! It shows how good preparation can make thing much easier and help avoid pitfalls.
One question: did all of your keywords come over correctly? I have the problem that not all keywords in the hierarchy are correctly assigned – I had opened a support case about this but am wondering if other users have experienced the same issue or if it is just an isolated case. Thanks!
Thanks Thomas.
With regards to your Keyword question, I was not very disciplined with keywords in LR so there weren’t many to pass over. Those keywords that I had used in LR did come across correctly. Moving over to COP did provide me an opportunity to clean up my haphazard keyword structure and start with a fresh, structure keyword.
In preparations for my switch to COP, I created separate individual Keyword Libraries (What, Who, When, Where, Why, and How), then loaded each into COP, and adjusted my existing keywords into the structure. Now I use and enhance these libraries as needed for new images imported into my catalog.
I have a friend who uses hierarchical keywords extensively and just switched from LR to COP, I’ll ask him to reply with his experience.
thank you Kent!
The problem I have encountered is that if the hierarchy is deeper than two levels, only the first and last keywords are correctly assigned in the hierarchy. The keywords in between loose the hierarchy and end up in the catalog keyword library without any hierarchy.
Thank you Thomas. Unfortunately, since I didn’t have a robust, multi-level keyword structure in LR, I unable to provide guidance, support, or suggestions.