
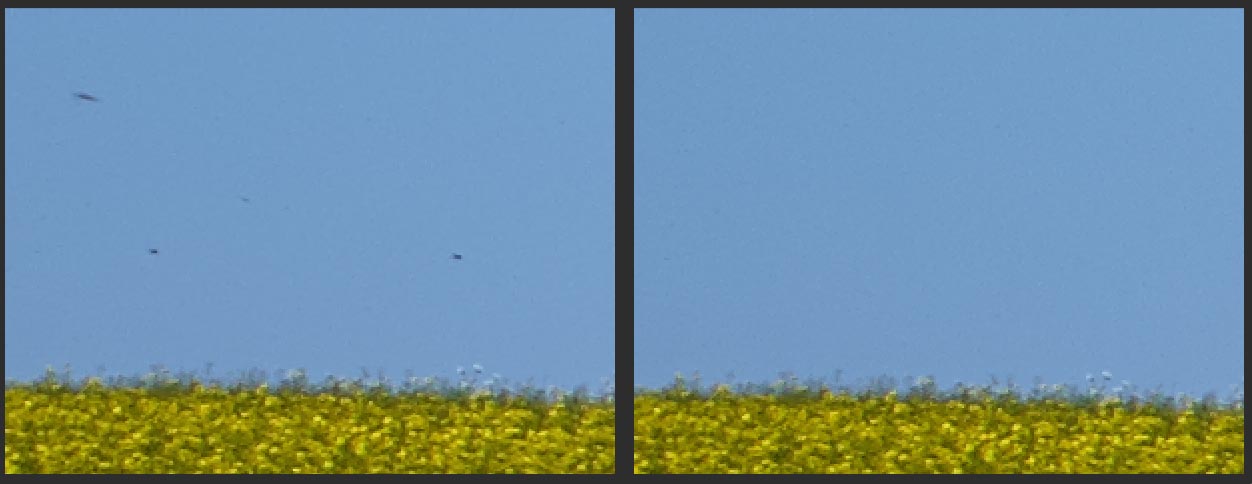
When capturing the above image on a beautiful spring day I could clearly hear the lark birds singing in the sky. They typically just show up in the image as blue spots not really looking like birds, so I was prepared for cleaning up this image in Capture One Pro 7.
Something unexpected
What I didn’t expect though was the large number of bees and bugs that showed up in the image when zooming in. Luckily it only took a minute or two to clean up the raw image with the Spot Removal Tool in Capture One Pro 7.
Dust or Spot?
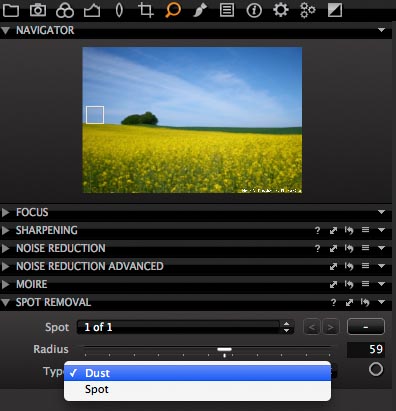
The Spot Removal Tool is a very easy and efficient tool for removing smaller spots in an image. Whether the spots are caused by dust on the images sensor or are actual spots in the images, this tool can help you!
 Before After
This is a 200 % zoom into the image above. The image to the left shows the bugs and bees that suddenly appeared in the image. The image to the right has been cleaned up using the Spot Removal Tool in Capture One Pro 7.
The Spot Removal Tool is by default located on the Details Tool tab in Capture One Pro 7. The tool gives you two options for spot removal depending on the type of spot: Dust or Spot.
Get rid of dust in your images
You should only choose the “Dust” option, if the spot actually comes from a dust spot on the images sensor. When choosing “Dust”, a special algorithm will remove the influence of the dust spot and reconstruct the image 100% correctly as though the dust spot hadn’t been there in the first place.
Safely copy the dust fix
Another advantage of using the “Dust” option, when it’s actually a dust spot you are dealing with, is that you can safely copy the dust spot fix from one image to another without any risk of the spot not being removed correctly.
This means that if you fix a spot in an image for instance shot in landscape orientation, where the dust spot shows up in the upper left side of the sky, you can safely apply the fix to even a portrait oriented image, where the spot may shows up on top of some meaning full information. If you copy and paste settings between two or more images the dust spots will automatically be transferred to the next image as this is a safe way of fixing a dust spot. This makes a lot of sense, as dust normally stays in the same position on the sensor between different images.
Remove spots from your images
The “Spot” option works differently. When fixing a spot of this type, the colors and textures of the surrounding areas are used to fill in and fix the spot. This works very well in many cases like in a sky or when fixing skin spots in a portrait.
When you copy and paste settings between two images, these kind of spots are not automatically transferred, as it normally does not make sense as the camera or the object may have moved between the two images. If you still want to copy the spot fixes of this kind you should manually check it on the clipping board.
Fixing Spots:
1. Select the “Spot” type
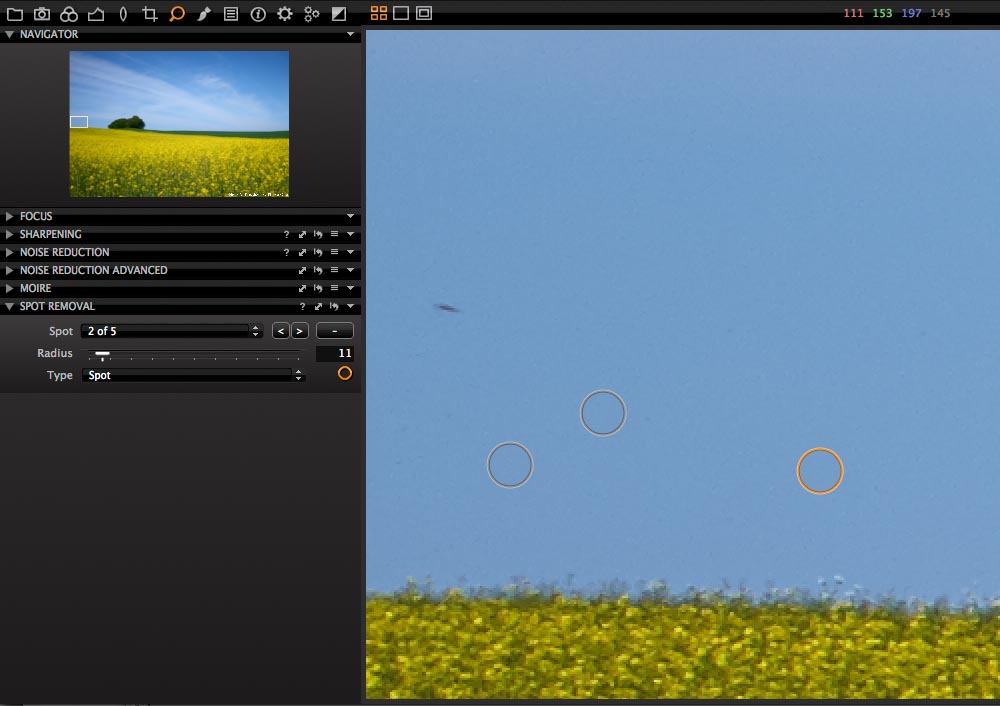
2. Select the Spot Cursor Tool either from the Spot Removal Tool or from the Cursor tool bar.
 The red circle shows the Remove Spot cursor
3. Right-click with the mouse to adjust the Remove Spot cursor size to a size 3-4 times larger than the spot you want to remove. Working on a blue sky as in this case I don’t need to pay much attention to the cursor size as long as it is big enough.
4. Now just click on the spots with the cursor. If you need to adjust the size of a spot fix you can drag on the edge of the cursor mark. If you for a reason need to delete a spot fix use the “-“ button in the Spot Removal Tool.
5. To view the result without showing the cursor marks, just select another cursor, e.g. the Pan (Hand) or Select (Arrow) Cursor Tool.

At zoom to fit with the Remove Spot cursor selected you can se all the spot fixes you have made on the image. In this example quite a few fixes but it was done very easily in less than 2 minutes.
All the best,
Niels

The Image Quality Professor
The digital pioneer, Niels V. Knudsen, is Phase One’s Image Quality Professor and founder of the IQP blog. Moreover, he is responsible for breakthrough advancements in image quality both in Phase One’s medium format camera systems and in Capture One Pro.


Niels,
Thank you for yet another very informative blog. I use the Spot and Dust function a lot and find it very useful and easy to use. Two questions:
1. After a recent assignment I discovered that I had about 4 dust spots on my sensor which were showing but I only discovered after I had worked on more than a third of the files (cropping, exposure, levels, etc). Could I have used the dust tool in an image which hadn’t been worked on and then copy the correction to the images that I had already worked on or do you have to copy the dust correction before any other adjustments are made (eg cropping)?
2. Is there a way in Capture One to remove lines instead of just spots (eg telephone lines in a landscape)?
Many thanks in advance,
Erik
Hi Erik,
To answer your questions:
1. Yes, it is possible to fix dust spots after having applied all sorts of adjustments.
2. Thanks for your feedback. We see the point.
All the best,
Niels
Tool works good for small spots but what if you are taking a longer exposure and the insect leaves a long streak? It would be nice if this tool could be dragged to fix streaks or remove power wires.
Hi Paul,
Thanks for your feedback. I agree.
All the best,
Niels
That was very helpful to learn the difference between the dust and spot tool. Is there some way to increase the intensity of the dust tool? I have a time-lapse sequence with one really bad dust spot. The dust tool improves it but does not get rid of it completely, the spot tool does. Since there are several thousand pictures it sure would be nice to copy and paste the dust tool.
Hi Ralph,
For the dust option to work, there needs to be some good valid data inside the dust spot. So if the dust spot is too severe, only the spot option can fix it, as it takes data from the outside. You can still copy spot fixes from one image to another, you just need to check the spot mark box on the clipping board.
All the best,
Niels
Hi Niels,
According to my experience the dust tool works much softer than the spot tool. As a result the dust tool is more preventive but also less capable in removing dust and spots.
Regards
Thomas
Hi Thomas,
You are right. Also see the reply I gave to Ralph.
All the best,
Niels
Niels,
As you have pointed out the ‘static’ nature of dust spots makes it possible to correct one image and fix many others quite easily. It can be planned in advance.
Spots are a different matter.
How about a tool that automatically seeks out spots in likely places (sky, skin tones, etc.) and suggest a fix?
One might have easy controls to alter the degree of detection intensity and some slick way to include/exclude the ‘spots’ found. All as oart of the manual use of the tool of course!
Grant
Hi Grant,
That’s a good idea. Thanks for your feedback.
All the best,
Niels
Can I use these tools to remove both dust and spots in the same image? Recently I removed a dust mark and then switched the tool to Spot to remove something else. If I am not mistaken, this had the effect of changing the first adjustment from Dust to Spot too.
Ian,
You should be able to use both types concurrently.
If you open the spot tool from the tool set a the same time you can see the total number of corrections and which type of correction each is. You should be able to change the type as well.
Grant
I see what I was doing wrong. I should select “next” or click for a new blemish BEFORE changing from Dust to Spot. Thanks.
Ian