You can have a great scene, the right expression or the ultimate moment in your shot. However, it is the mood or atmosphere in an image that makes all the difference between success and failure.
Telling your story and transferring emotions is a secret of finding the right tonal scale. Just like the French say: “C’est le ton qui fait la musique” (It is the tone that makes the music). The tool you need for this is the Curve Tool.
Why use the Curve Tool?
The Curve Tool differentiates itself from the Levels Tool in that it allows you to control how tonal values of the original image are translated in the end result. With the Curve Tool you have control over shadows, mid tones, and highlights (darker or lighter) separately and independently.
Where the Levels Tool mainly controls the endpoints of your tonal scale, the Curve Tool gives you control over the tonal distribution of the entire tonal scale between these endpoint. Only the mid tone marker of the Levels Tool gives you ‘Curve-like’ control, but the Curve Tool gives much greater flexibility in control and much better contrast control.
Before using the Curve Tool
As with the Levels Tool I suggest you first make adjustments with the Exposure and High Dynamic Range Tools if necessary. Do not use the Brightness slider in the Exposure Tool.
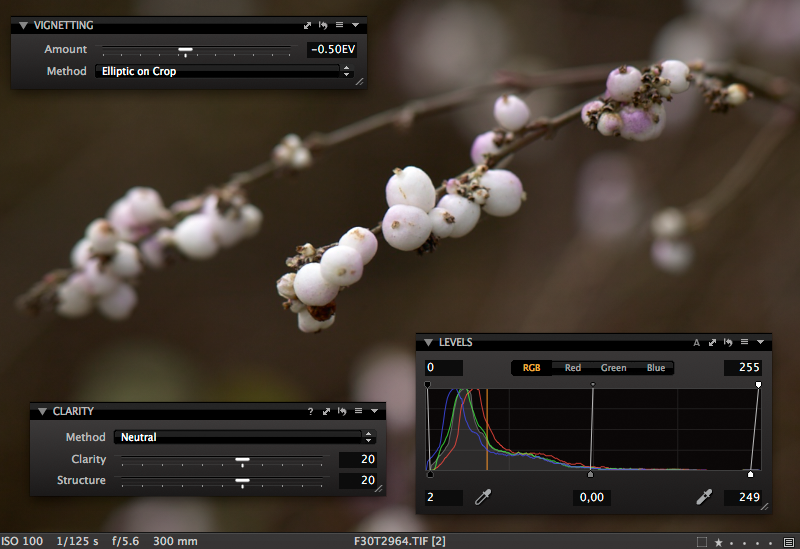
With this image, I didn’t change the exposure or the High Dynamic Range, but I began by first cropping and rotating the image to get the composition I wanted. I then set the black and white points using the Levels Tool, but didn’t touch the mid tones. I also prefer to adjust the clarity and add a vignette at this stage in my workflow. This is my image before I start using the curves.
You are now ready to start with the Curve Tool because all mentioned adjustments affect the histogram you set the curve on (that is the histogram in the Curve Tool).
Preset for speed
A reason why users often skip the Curve Tool is because it seems time consuming or looks too complex. Speed improves with experience (as always) but the predefined presets in Capture One Pro 7 give you a quick start. Note that you can easily apply a preset on a selection of images. You can also copy/apply a curve on similar images. After applying the built-in preset “Mid tones – darker”, I get the following result.
How does it work?
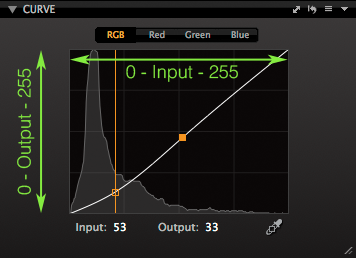
The Curve Tool is an “input-output” kind of game. Take a look at the example below.
I added some green text and arrows for explanation.
The horizontal axis represents 256 levels on the input side of the image. Input means what the Curve Tool receives. Without a curve (straight line) these input levels are translated unchanged to output levels with the same value (0 to 0, 128 to 128 and 255 to 255). Output levels are represented on the vertical axis.
In this example the input level of 53 (see orange vertical line) is lowered to an output of 33. Level 53 is a shadow or dark tone. Because the curve now translates it to 33 it will become darker. You can move any point on the curve line up or down, and left or right. Whatever you do, you constantly create a new input-output translation for that point and (to a lesser extended) adjacent levels.
Manual approach
Lesson one in using the Curve Tool manually is dragging the diagonal line up (to lighten) or down (to darken the image). Next, step two, you can give the quarter and three quarter tones an extra push in the same or reverse direction if needed.
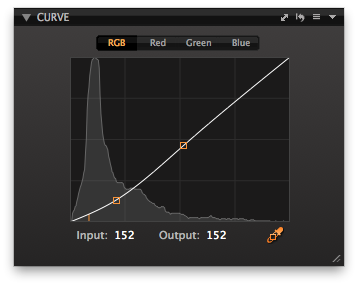
If you like to affect a particular brightness level in the image, use the Pick Curve Point Cursor Tool.
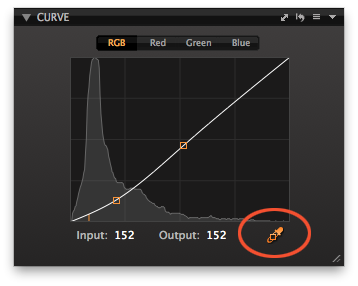 Select the Picker Tool, select a brightness point in your image and that point will be selected in the tool. You can drag the curve point with the mouse or select it and use the cursor keys on your keyboard (the latter is Mac only).
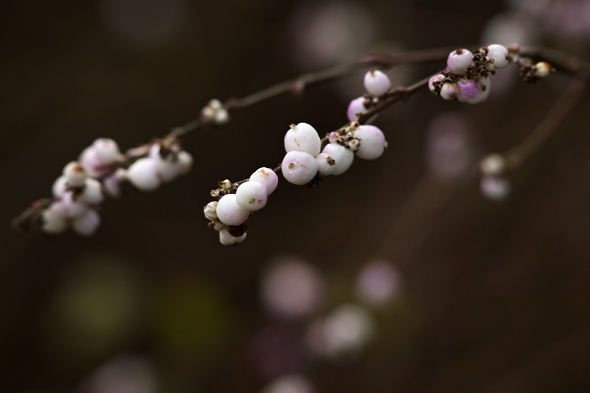
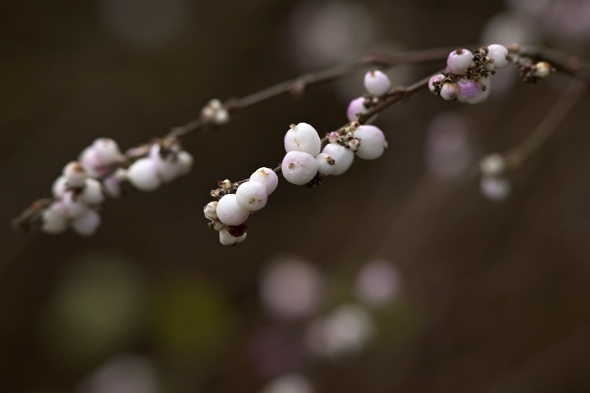
After moving the shadow curve point downwards, I get a darker background which increases the dramatic impact of this low contrast image.
Results
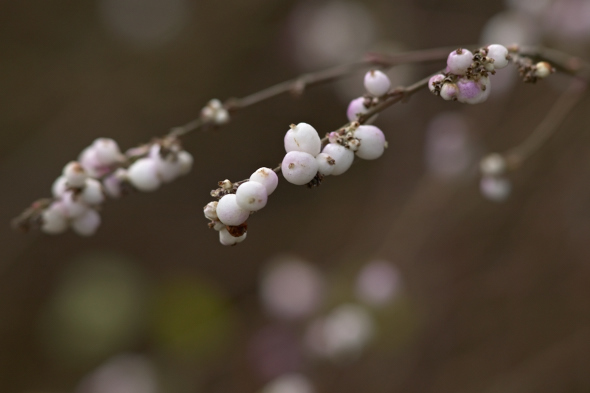
In term of results nothing beats the art of a good curve. Curves give you much more control about how an image looks in terms of brightness and contrast. You can open up shadows and darken highlights. You can make a more natural look or let your creativity go all the way. After the last adjustment mentioned, I got this result.
More Help
Exclusively available for our dear blog readers, I provide you an entire set of Curve Presets. The set contains 23 presets for adjusting Contrast, Highlights, Mid tones, and Shadows.
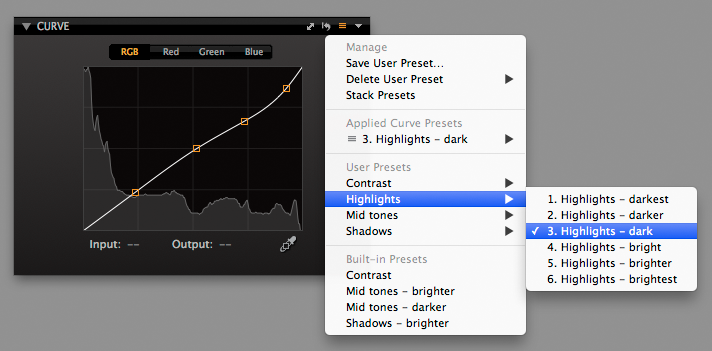
Place the presets in the curve preset folder and start Capture One. Locations are:
<user name>/Library/Application Support/Capture One/Presets60/Curve (for Mac)
C:\Users\<user name>\AppData\Local\CaptureOne\Presets60\Curve (for Windows)
Tip
When you start working with curves, clone variants are a great help to compare different adjustments.
Summary
With a proper curve you can create the exact atmosphere in your image. First, make your adjustments with Exposure, HDR, and Levels. Just start with Curve, then start with a preset. Adjust the curve if necessary or try another preset.
Best regards,
Paul
Paul Steunebrink
Besides being a photographer in the field of architecture and landscape, Paul prefers to teach and preach the better photographic workflow. He is also a regular contributor to the Phase One moderated user-to-user forums.



there is no file named “curve” in presets60.. if I create and put these presets Capture one doesn’t recognise 🙁 same result if I put directly in Presets60. Fail!:’
Hi Tuncay,
In the Presets60 folder a sub folder Curve is created by the program. If it does not exist, create a Curve preset first, so Capture One will create the folder. Next, copy the preset download into the Curve sub folder. Restart Capture One to allow it to identify the curve presets. Hope this helps.
Best regards,
Paul
Thanks Paul, I found this just as informative as your last post.
You state ‘Do not use the Brightness slider in the Exposure Tool.’ Is this purely for when wanting to use curves?
Also I haven’t managed to get my head around how the brightness slider is any different to shifting the mid tones on levels – do you have any recommendations over their relative use?
Kind regards,
Calvin
Hi Calvin,
Thank you for your kind comment. Your assumption is correct in that I leave the Brightness adjustment in favor the Curve Tool. Together with the Levels’ mid tone marker I could write another blog on this topic to explain the differences and similarities.
For now, regarding brightening or darkening your image, you can keep in mind that the Brightness Tool is the easiest to use but the most limited, and the Curve Tool gives the best result with great versatility, though more complex (until you read the blog, of course). The Levels’ mid tone marker is the in-between solution regarding complexity versus quality.
Best regards,
Paul
Hi Paul
Many thanks for your input in the workflow with curve.
The curve in Capture One Por works very fine and accurate.
Sometime I forget to use it! So, I will take an eye on!
Best regards
Jean Pierre
Hi Jean Pierre,
Thanks for your reply. Enjoy the Curve Tool. It can make your images stand out from the crowd.
Best regards,
Paul
Would the path be different in Mavericks? I don’t have that path on my Mac, nor anything close to it.
Hi William,
The trick is that the user’s Library folder (~/Library) is hidden by default in OS X and at the same time there are other Library folders that are not hidden. This can cause confusion. There are several ways to unhide the user Library (temporarily or permanently). You can do a web search of use this trick: Finder > Go menu > Go to Folder > ~/Library (enter).
Best regards,
Paul
Thanks, Paul. Your presets work great and will be a real time saver.
Hi,
Thank you for letting us know. They were meant to be. 😉
Best regards,
Paul
I am struggling to install these presets,i have only had cap one a week so it is new to me .so I would appreciate a bit of help please.
regards
john
Hi John,
You are a brave man: dealing with curves after one week of Capture One! 😉
Most users have a problem finding the right folder for the presets, due to Apple’s policy to hide the parent \Library folder.
One of the tricks to work around that issue is: Finder > Go (menu) > Go to Folder > ~/Library (enter)
Next, drill down to the folder for the Presets as mentioned in the blog. Hope this helps.
Best regards,
Paul
A cooler Mac-trick to get to the Library/ is to press the Alt key while in the Go_To menu.
At least it works in the Lions’ OSX (when Mac started to hide that folder !), and should in Maverick.
Hi Greg,
Thanks for the tip. Yes, it still works in Mavericks and is actually one of my favorites.
Maybe I can share another with you: once you have the ~/Library folder, move it to the sidebar of a Finder window. Now you always have it available!
Best regards,
Paul
Hi Paul,
Thanks for sharing. These are invaluable.
I have managed to download the presets but they are listing by number rather than by category. Is there a way to reorganize the listing?
Regards,
Stefan
Hi Stefan,
Great you like the presets.
Each preset is a single file. I named the files starting with a number. This is what created their order (CO7 sorts the files by name). Just rename the respective preset files to your liking and they will appear in a different order. Use Finder to rename the files.
Best regards,
Paul
thank you for presets and the tutorial !
I was wondering why there is int ” normal contrast or linear contrats” in the presets.
Would be also be interesting to know how to use red, blue and green curves channel and what you can do with those ?
Hi Timo,
Glad you like the presets and the tutorial. I understand that you might want to add more (contrast) curves. Please do so, add them, make any change you like. The download was meant to get you started!
I appreciate your interest in the color channels R, G and B in the tool, because I already know what is coming in a future blog. Stay tuned.
Best regards,
Paul
Hi Paul,
Thanks for the presets, I got there in the end with a little help from a friend who knows his way around a pc much better than I do.lol
Regards
John
Hi John,
Good to know you succeeded in installing the presets. I think many readers appreciate the presets but the installation process needs some work. The manual copy process is cumbersome.
Best regards,
Paul
“…You can drag the curve point with the mouse or select it and use the cursor keys on your keyboard (the latter is Mac only).”
With Windows, after I create an orange point on the curve by clicking on the line, I can use the scrolling wheel on my mouse to fine tune placement of the point. Works better for me than dragging and is almost as convenient as cursor keys.
I move the mouse cursor near the point I want to adjust. Hovering near and at some… point, there will be a vertical orange line through my orange point and I move the point left/right by scroll wheeling up/down. I move the cursor a bit around the orange point and I get a horizontal orange line. Scroll wheeling will now move the point up/down.
Now, I am not at my computer and might have the conditions reversed but this is pretty much how it works. Prb works the same on Apple stuff? Who knows. Yeah, the word ‘point’ was overused…
Hi Tan68,
Great tip, thank you very much!
Just to confirm, using the scrolling wheel of the mouse to move the curve point works both on Windows and Mac version of CO 7 (v7.2.1).
Best regards,
Paul
Just a caveat here: Using the scroll wheel makes every unit of adjustment ‘an action’ as far as the Undo history is concerned. If you drag and then don’t like the adjustment, Ctrl-Z will get you back to no adjustment; if you use the scroll wheel, every hit of Ctrl-Z will revert one unit of adjustment only. It can be maddening!
A workaround I found was to just take note of the initial input values and then, if you want to undo, just use the scroll wheel to get the output values back to match the input ones. Forget about keyboard shortcuts if you’re scroll-wheeling your curves.
HTH
Hi Alveric,
Very good observation. Thank you for your feedback. Very good observation. This is most helpful.
I assumed you are on Windows. On Mac I notice the same behaviour.
Best regards,
Paul
what is the difference between ; ‘ base charters film high contrast ‘ , exposure tabs contrat slider and ‘ curves preset contrast ‘ .
Hi Timo,
That is a very good question. The three tools you mention have each their distinct purpose. Let’s assume a low contrast image I like to work on.
The film curve is what you set before making other adjustments. It determines the base characteristic of the image all other tools work on. It is a kind of switch (on/off > normal versus high contrast) taking big steps, lacking fine or granular adjustment. I use it for low contrast images to get a better starting point (and tonal scale). It compensates the linear nature of the camera sensor versus the non-linear human eye.
The Contrast slider of the Exposure Tool is a more subtle extension of the Film Curve Tool, making smaller steps. Both contrast slider as the film curve have great effect on the histogram and increasing contrast may result in clipping the histogram. Whenever possible, I prefer the filmcurve over the Contrast slider for better tonality.
Making a contrast curve with the Curve Tool has two advantages. First, I have full control over the amount and characteristic of the end result due to controlling the shape of the curve. Second, the Curve Tool does have a much lower the risk of clipping as it does not change the end points of the histogram it works on (as do Contrast slider does).
Like the Brightness slider of the Exposure Tool, the Contrast slider can be replaced by a more sophisticated tool. I have compared several images with the respective tools, and always came to the conclusion the Levels and Curve Tools create images with a better tonal scale. I seldom use the Brightness or Contrast sliders, unless I need a fast workflow. The filmcurve tool is highly recommended as well as main switch and starting point.
Best regards,
Paul
Hi Paul
Many thanks for your information. I agree with you. The filmcurve is so good, even betteer than the filmcurve from Lightroom!
I always observe the histogramm while using filmcurve. It gives me a very good feedback, what I want to do and if the tonal are still there or not!
Rarely, I use Contrast and brightness slider. On the other hand, when I use Lightroom the contrast and brightness slider works!
If someone start with Capture One Pro, he has to try all slider to understand, how C1 works. I asure it is different to Lightroom.
After that you will adore C1!
One question here:
When adding contrast either way (Curves tool or Contrast slider) the saturation goes way up and the colours can be all messed up. Is there a way to control this?
TIA
Hi Alveric,
You are right that saturation is affected as well when increasing contrast (saturation is color contrast). The best workaround I can come up with is to either lower the Saturation slider in the Exposure tool or use the Clarity tool to increase contrast. The Clarity tool has a different way of increasing contrast but has less or little effect on the color.
Best regards,
Paul
Speaking of saturation; other programs have a Vibrance slider/tool that ups the saturation of weak colours but leaves colours already saturated and skin tones alone, but CaptureOne does not have this. I used to use that tool a lot in Lightroom and really miss it. What would the equivalent for this tool in C1 would be?
Late response, here…
I think the saturation slider works some like vibrance slider. I can’t remember which tutorials I have read this in, but the saturation slider in C1 is described as ‘smart’.
Increasing saturation causes stuff that are already saturated to not be saturated much more while things that are not saturated as much get more saturation… if that makes sense.
When saturation slider is decreased, though, the affect is uniform. Saturation is decreased the same amount for everything evenly.
Hey Paul, just wondering…
You mentioned not using the Brightness slider. (Instead opting for the mid tone marker in the levels (or to raise the midpoint of the curve).
Is that because it’s unnecessary? Or does it create a bad effect?
Also, I have often wondered, why would I want to use the Contrast slider in the exposure tab, if I planned to adjust contrast later with a curve? Isn’t that double handling? Couldn’t I get a similar – or even better – result by just applying a stronger curve?
Hi Ben,
Adjusting brightness can be achieved in all three ways you mentioned. I tried them all and found the curve midpoint giving me the best result, next the levels mid tone marker and last the brightness slider of the exposure tool. Try and test and see what fits your needs best. It is all there for us to grab.
Same for contrast: I prefer curve over slider. But the sliders are fast to work with in particular for someone just started learning Capture One! But I hope I made using the curve tool more accessible with the blog and presets, so that everyone can benefit.
Best regards,
Paul
Is it really true that Capture One curves tool can’t work in luminosity mode? I don’t understand how an application so adopted by the fashion industry could miss such a colour-critical feature. I’ve only just started using C1-8, although years ago I used 3.5 … hopefully I’m missing something!
Thank you for all of your work in explaining curves as well as everything else Capture One.
I have just started to explore using curves more than I used to and have a query that I can’t find any information on.
Not all of my images show the histogram in the curve panel extending all the way upwards.
I have found that (especially for highlights) dragging the black point output selection point downwards to meet the highest point on the histogram helps but only to a certain degree.
If the top of the histogram is quite low dragging the black point down to meet it does more harm than good.
I’d love to see some examples of similar situations to see what your recommendations are?
Thanks again for all your work… 🙂
Is there a way of choosing a curve point with a shortcut key? Using my pen always changes the value of that point.
Thanks
Hi Michel,
You can use the picker in the curve tool to pick a point, if that helps.