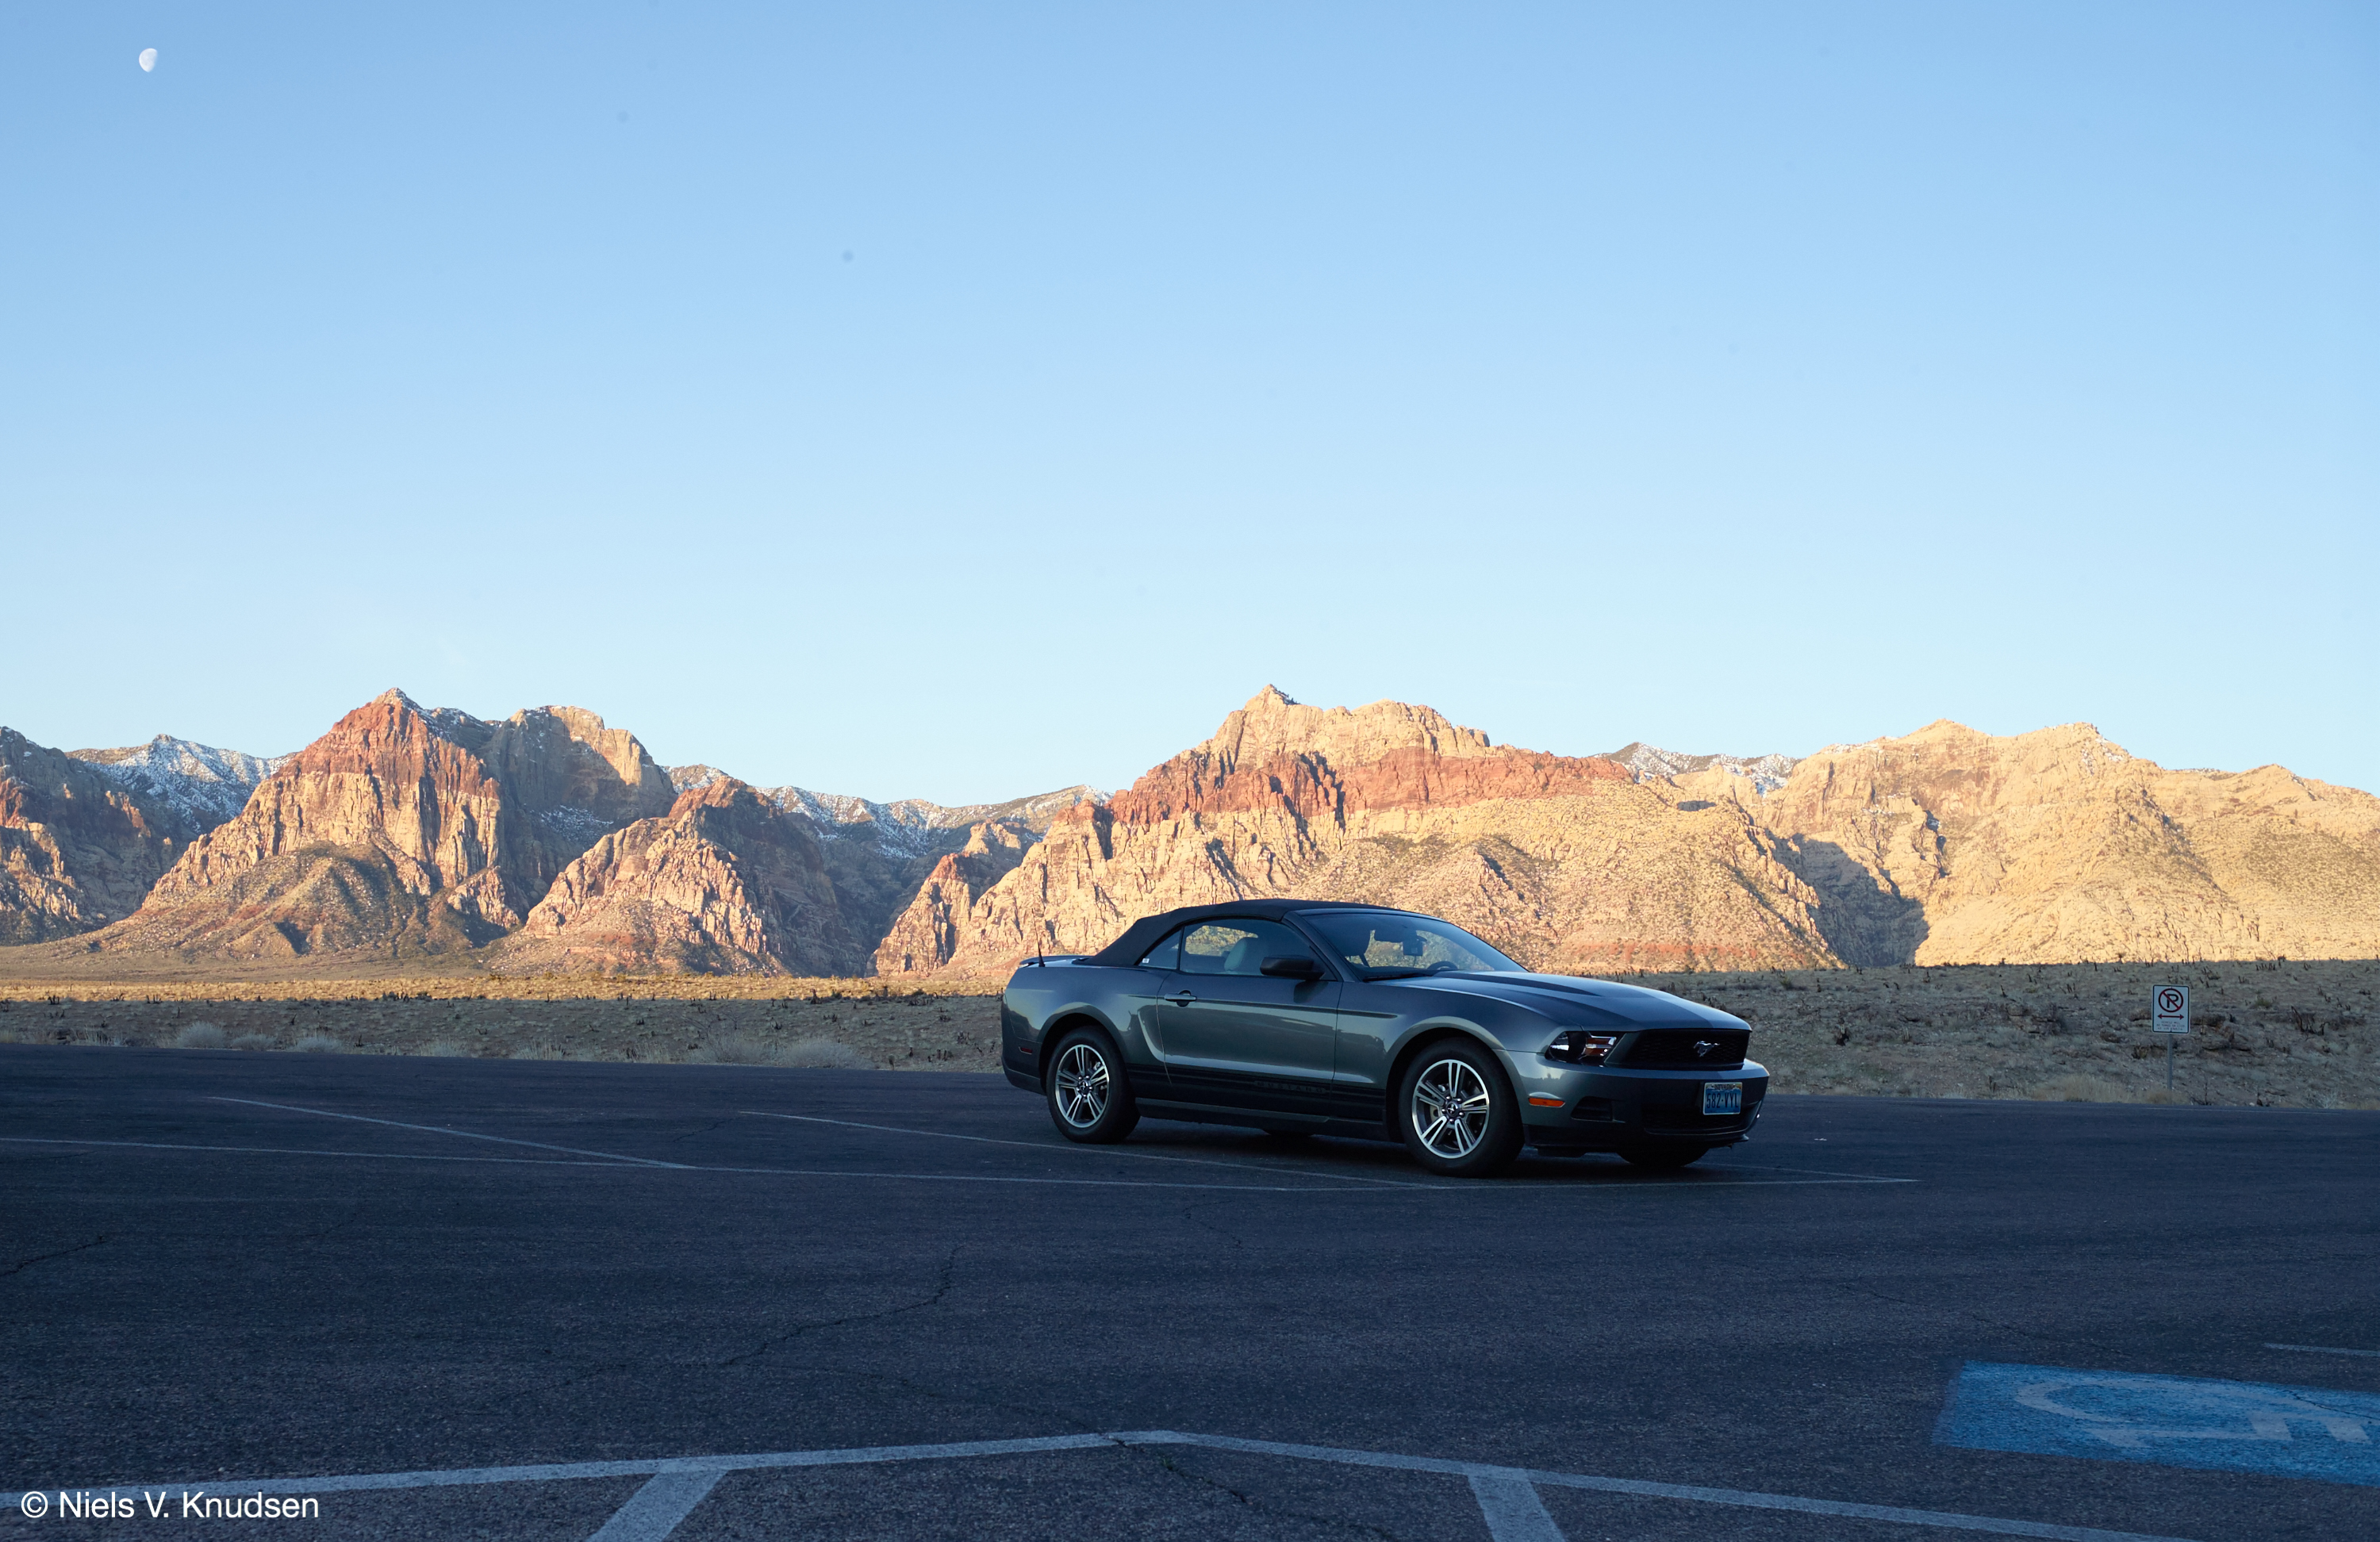
Our Image Quality Professor, Niels V. Knudsen, took the shot below of his rental car some years ago while on vacation in the sunny American desert.
I will use this image (with intended room for improvements) to really illustrate just how easy and powerful the creative tools are in Capture One.
Powerful Adjustment Layers
With the update to Capture One 8.1, the maximum amount of Local Adjustment layers increased from 10 to 16. This is an example of how far you can actually go in Capture One, using Local Adjustments in an intelligent way.
In total I used 14 Local Adjustment layers for this image. I won’t go into details for every adjustment and provide specific examples, as not all of them are equally important. However, I’ve mentioned each adjustment in the text so you can follow along.
Healing the road
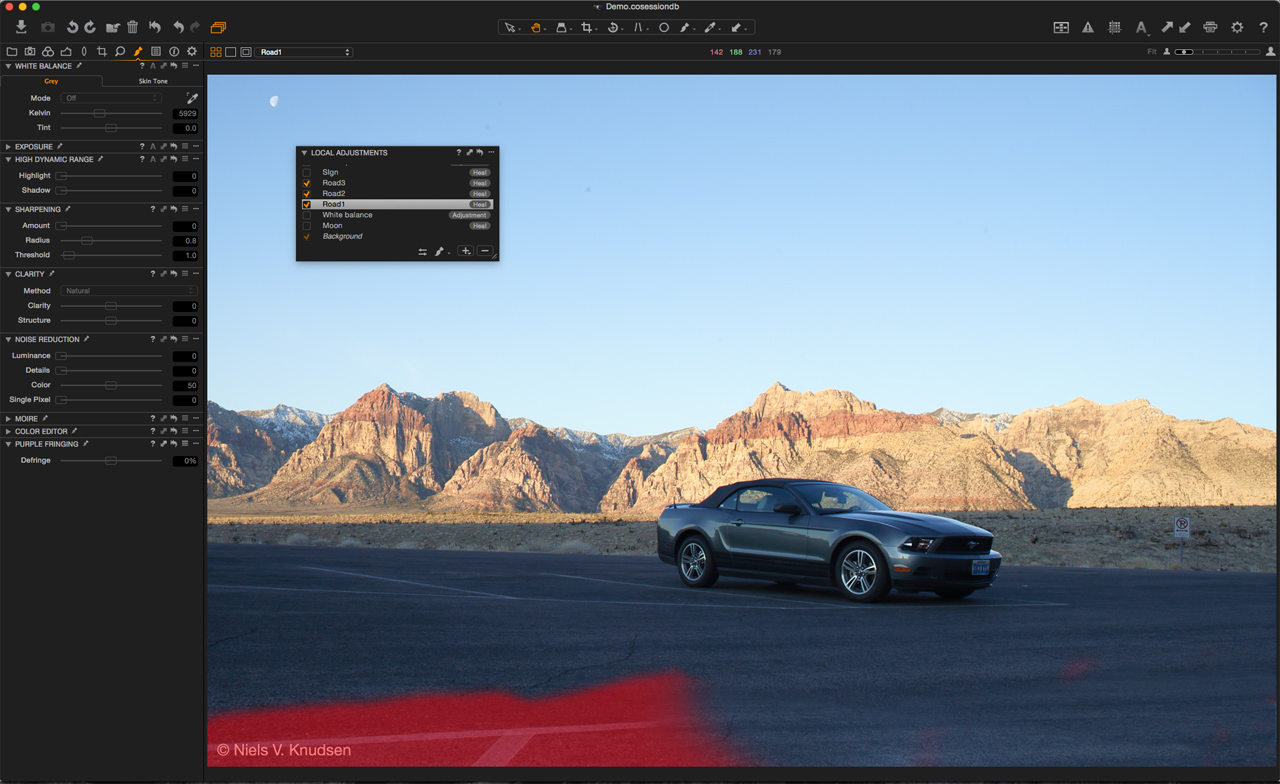
The first thing on the list of improvements was the road. I used three healing layers in total. One heal layer helped to remove some of the undesirable elements but all three helped to retain the detail and tones of the foreground.
Fixing the color temperature
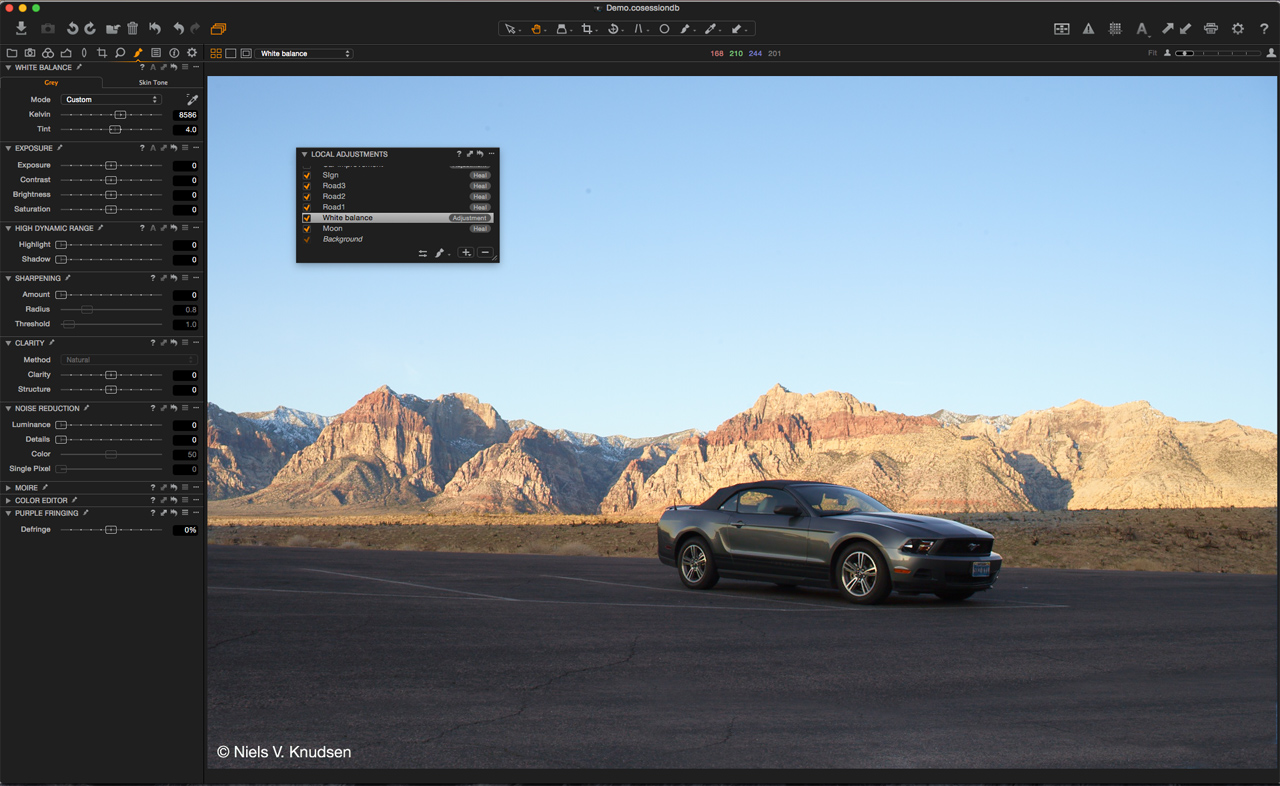
Next I wanted to fix the White Balance between foreground and background, shadow and highlight. The area in shade was masked in and the white balance kelvin was increased by ~2500K. I then created another layer to clean up the image, removing the moon in the corner and any signs of dust with two healing layers. The image is well on its way to professional polish! See below.
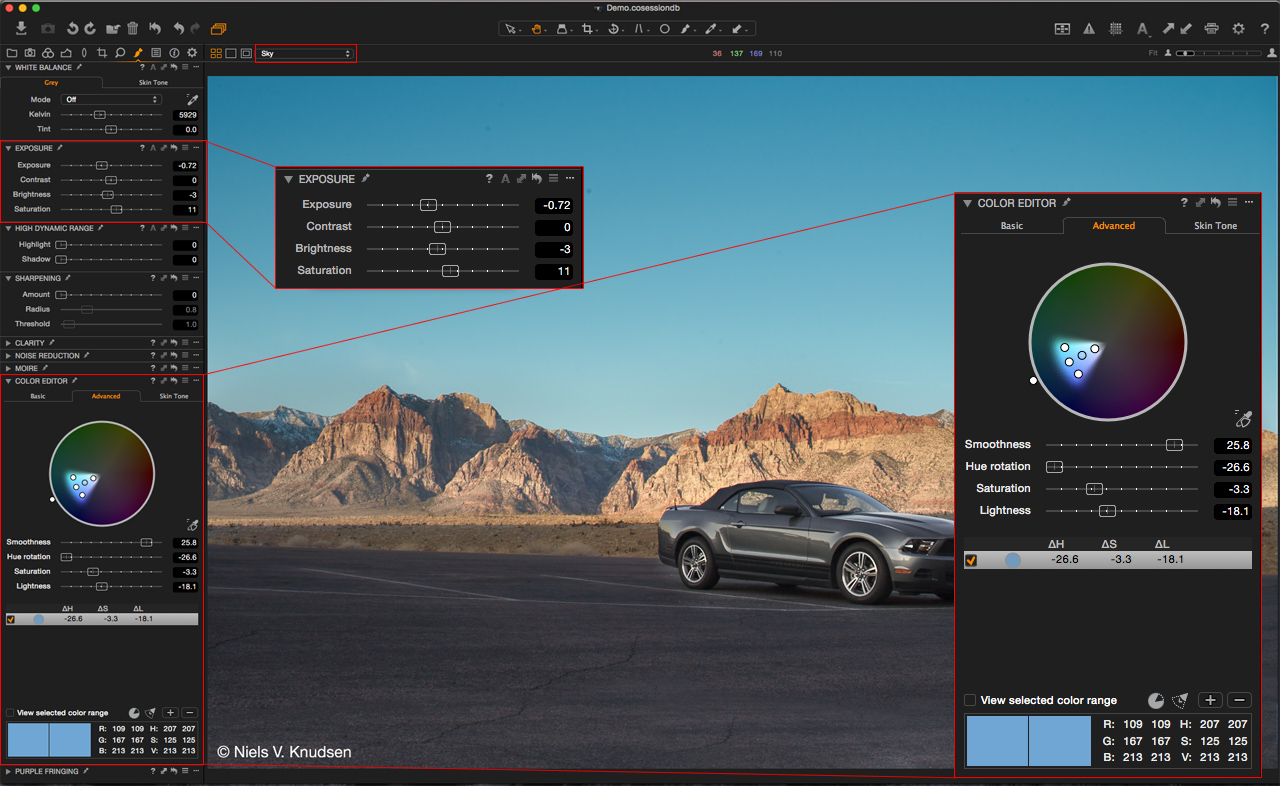
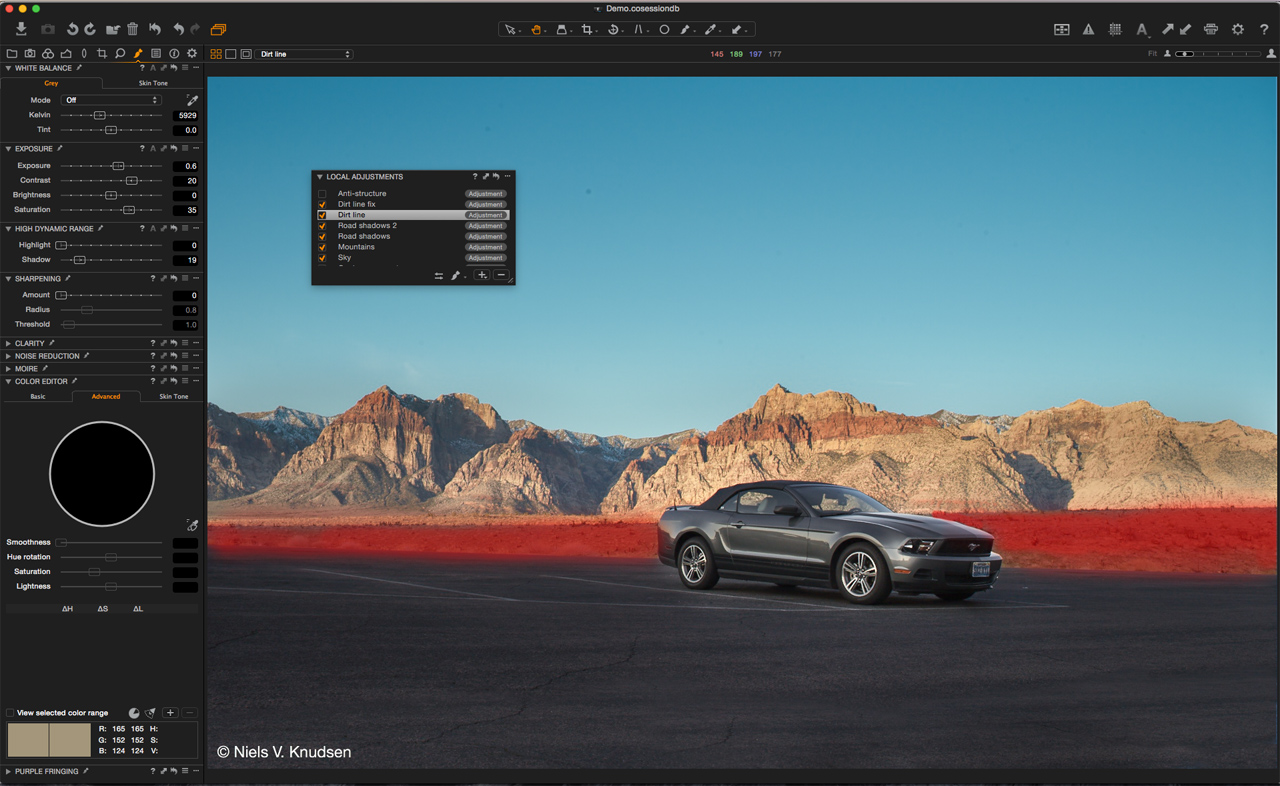
I then went ahead and created a gradient layer for the sky, changing the exposure and color to a more pleasing tone. Still within Local Adjustments, I went to the Advanced Color Editor, picked the color of the sky and changed the hue, saturation and brightness just slightly. See screenshot below.
I also decreased the Exposure and increased Saturation for the masked area. In the next steps I added a little Brightness and Contrast to the car, along with adding some “dullness” to the mountains in form of less contrast, less saturation and more highlight recovery. This helps in increasing the focus on the car.
This next step was to increase the light, contrast and saturation to the horizon line that lies in shade, creating a bit more separation between the asphalt and the sunlit mountains. I also added two soft masks to darken the asphalt around the car, which helps the focus on the car even further by adding a custom Vignette effect.
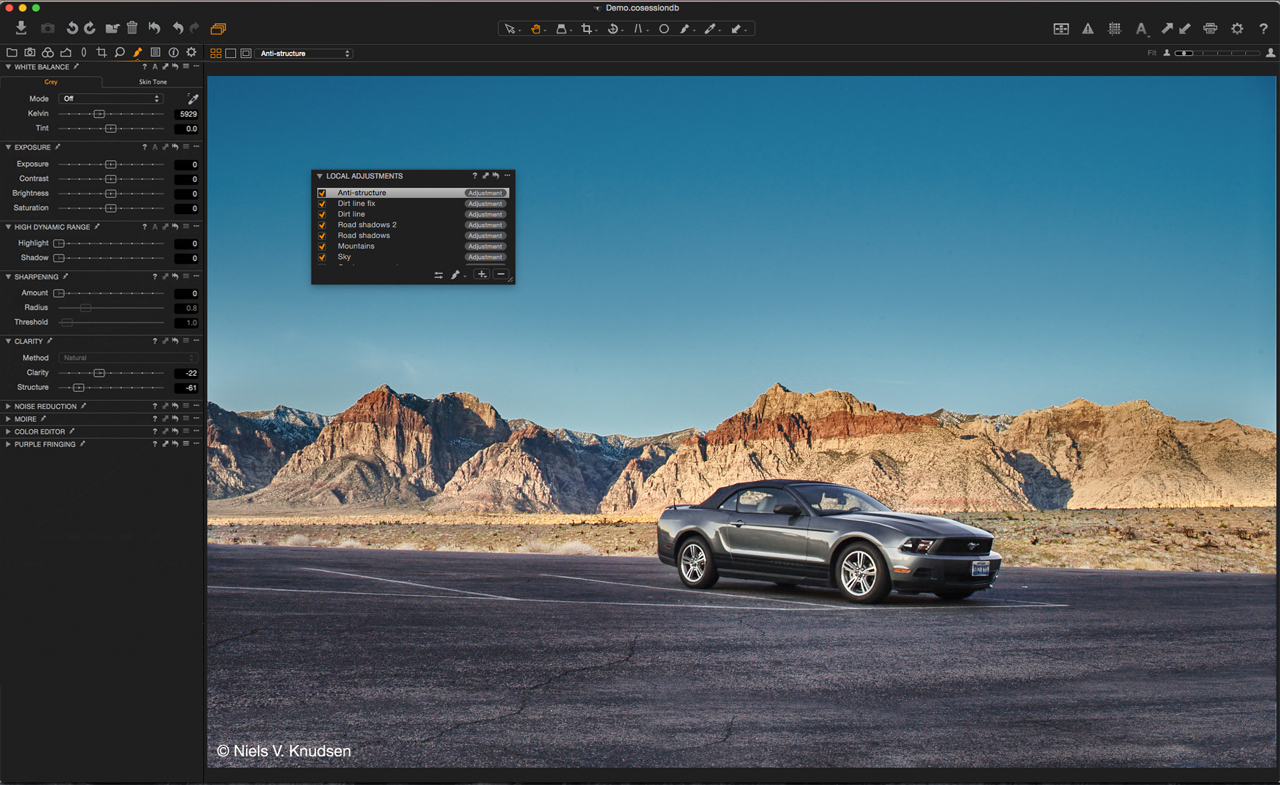
In this step I added Contrast overall, a bit of High Dynamic Range adjustment, Clarity (both overall and Structure adjustment) and a bit more color change to the sky using the Advanced Color Editor. This helped to create the micro contrast that’s very important for images in this style.
The dust specs in the sky were removed. I went in and added a tiny bit of Negative Clarity, as well as Negative Structure to the car with a Local Adjustment layer. This was to distinguish the car’s detail from the asphalt and the mountains surrounding it. Again, this adds necessary focus to our subject.
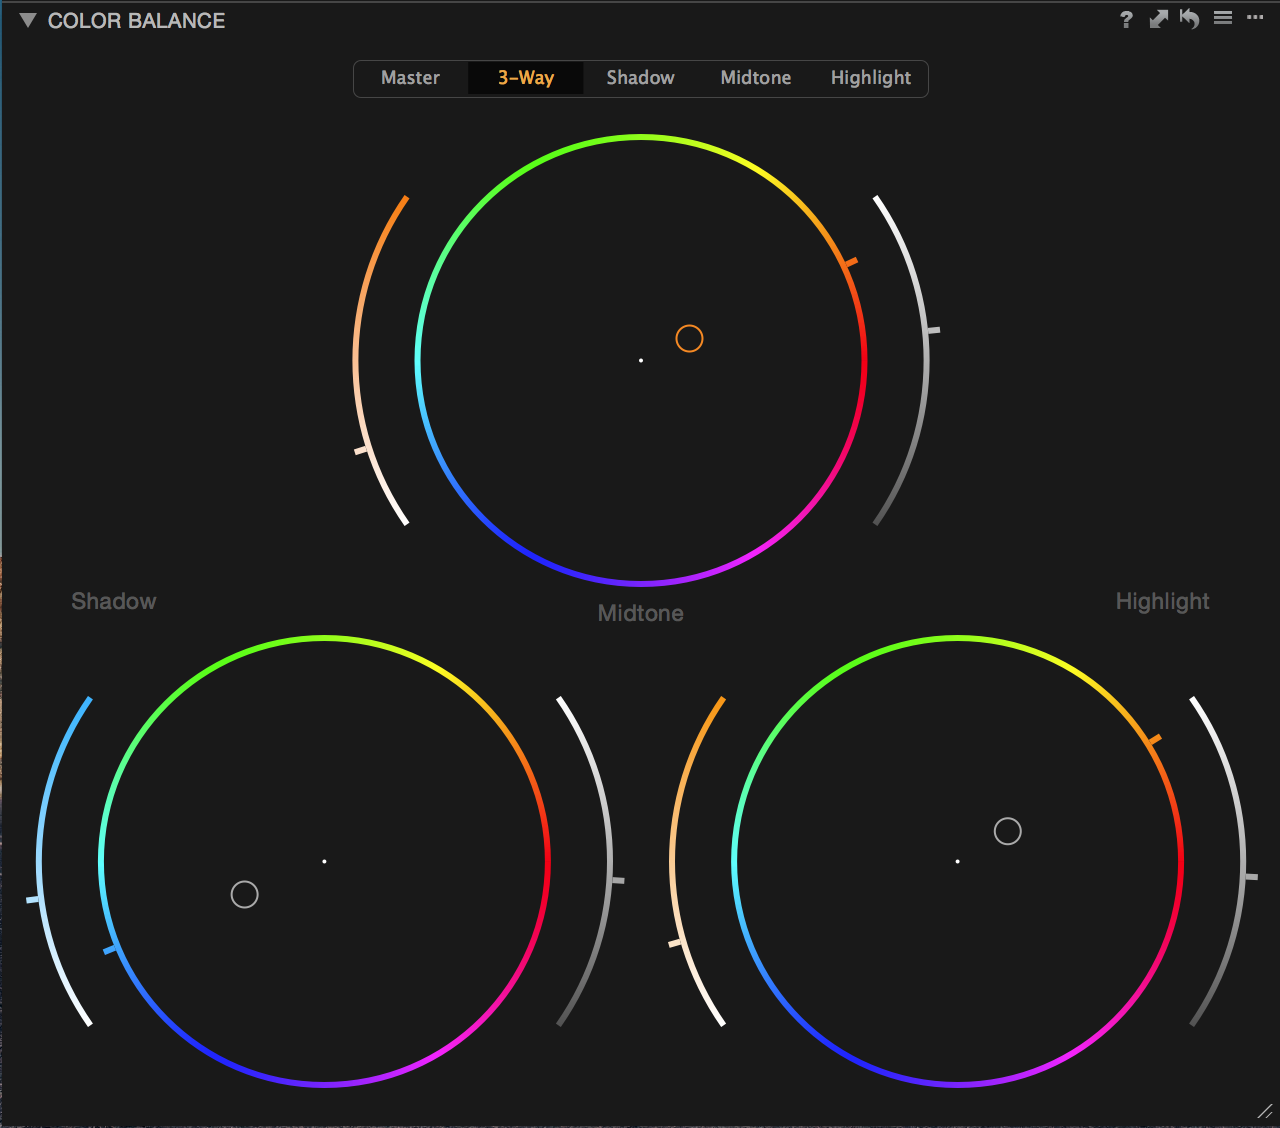
Finally, with the new Color Balance Tool outside of the Local Adjustment Tool, it was very easy to give the image the overall toning I wanted. I added some turquoise to the Shadows and some orange in the Midtones as well as the Highlights. The complimentary tones do wonders to emphasis the composition of the image and it adds to the look I was trying to achieve.
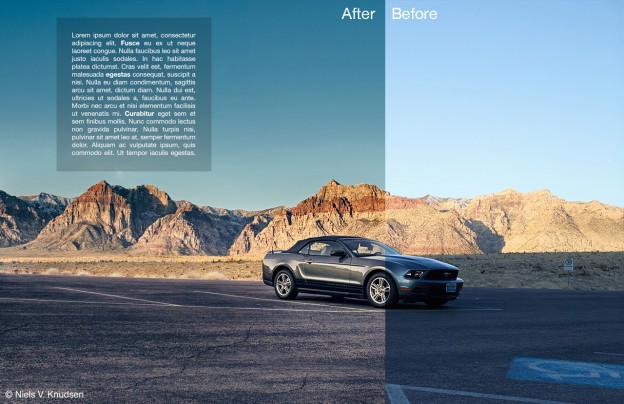
As the crowning detail I added some text filled with gibberish and a homemade logo to a separate document and imposed it over the image with the Overlay tool to get an idea of how a final mock-up might look. I think it’s safe to say the image came a long way. I present to you the brand new Awesome SuperCar, brought to you by Capture One Pro 8!
The before-image for comparison:
Best regards,
Alexander Flemming




It would be nice if we could download the picture to try this by us self.
I agree with this 100%
I would love for you to add colour to the gradient filter, so we could on this this image add blue and make the sky much richer. ???
Hi Mark,
That could definitely work as well! A tiny change in the Saturation and Hue sliders in the Advanced Color Editor for the Sky-layer would do the trick.
Regards,
Alexander
Thats not really a super car just america muscle.
Capture One 8.2 is fantastic software .
Hi Ahmed,
Nice to hear. I’m glad we share the same passion for Capture One Pro 8!
Regards,
Alexander
Wonderfull how Capture One keeps improving( working with it since 2000 I think) You did a great job here, but I think an additional adjustment layer removing all those dust spots in the sky ( top en righthand side) would have been a nice final touch before releasing it into the wild 🙂
Best regards, Ronald
Hi Ronald,
Thank you, I’m glad you like it! Whoops, it looks like I forgot those in the heat of the moment. Good catch.
Regards,
Alexander
Hi Guys,
After weeks of testing I will switch to CO 8.2 from LR which I have been using for years, since version 1.0. Being just an amateur I can see my old “dull” pix getting new life. The new pix seem to look better just out of the box. I regret loosing simplicity of LR workflow but the quality advantages took me by storm. Let’s see if LR will catch up but till then I am on CO side…
Hi Andy,
That’s good news! I hope you’ll get used to the different workflow quickly to really enjoy the features of Capture One Pro 8. I highly recommend moving the tools around and creating a personal workspace that fits your workflow perfectly!
Regards,
Alexander
Great example. It is taking me a while to grasp all the tool options and the great possibilities available with CO.
A great example of the more you learn the more you realize you don’t know YIKES!!! RV
Can you please explain a bit more about the negative structure use on the car?
Yes, certainly! After using Clarity and Structure on the whole image, I found that the car got a bit too ‘crispy’ for my liking. Adding a Local Adjustment Layer with Negative Structure pulled some of that crispyness back to a more smooth look, which I found more pleasing.
Regards,
Alexander
a u tube type vid tutorial of how you did the local adjustments in detail would be very good to see
things like how to select the area etc. why you did etc. better than a general tutorial
ok the copy bit at the end is less important but the rest is very interesting
Nice to see the possibilities, but one question where is the car in the reflection??
This image isn’t straight out of the camera 🙁
M.
Hi Maarten,
I’m not quite sure what you mean. The only thing I can find in this image reflecting light is the car itself. What do you think should show a reflection of the car?
Regards,
Alexander
Hi Alexander, thanks for the fast feedback.
I meant, in de side of the car there is some sort of reflection visible which would indicate that there was a car standing closer in the shot…
Maybe it was just out of the frame ?
Maybe my eyes are fooling me, but that looks like a building as far as I can tell. Anyway, the point is that this image is indeed a RAW image from the starting point. No cheating here. 😉
Regards,
Alexander
Alexander,
Thanks for the great write-up. I shifted from LR to COP8 a few months ago after seeing how much more intuitive the organizational systems are. Within the last few weeks though, I finally started moving entirely away from shooting in JPG and now shoot only in RAW. I am, however, still learning how to process RAW images, so this tutorial was very helpful in showing me what can be done. It’s exciting to learn how to make an otherwise dull image really standout. This is truly the magic of digital photography.
That said, would you mind taking a couple minutes to explain a bit more about to apply a local adjustment layer? I’ll give you a specific example. I was at Shenandoah National Park yesterday. One of my shots that turned out awfully dull, nothing like what I was seeing in person is this one:
Now I haven’t really found any start-to-finish tutorials on how to process RAW with COP8. So I used this one for LR as a starting point, and have tried my best to follow it in COP8’s corresponding functions. (e.g. I used the HDR shadows and highlights in lieu of “Fill Light”).
Where I’m breaking down in your process is applying effects to specific parts of the image. For example, I tried to:
“[create] a gradient layer for the sky, changing the exposure and color to a more pleasing tone. Still within Local Adjustments, I went to the Advanced Color Editor, picked the color of the sky and changed the hue, saturation and brightness…”
I was able to get the gradient layer for the sky to show the exposure change I wanted. But I wanted to also adjust the color of the sky, specifically the area below my clouds and above the mountains–it shows in the original as a very white/dull sky. Truth is, it was quite hazy as we were heading into sunset, but I’d like for it show a little more blue than white.
I tried to use the Advanced Color Picker, picked the white color, and messed around with the sliders and tried even the values you used. Two things happened. First, no matter the value, it was a small effect; even at the extremes of the sliders, it didn’t really change much. Second, it applied it to the entire image. (I was working on a gradient mask layer I had added, in which I dragged down the center from the top of the photo to the top edge of the mountains on the horizon. I also tried adding a new gradient mask layer and dragging down just the white area I wanted to change).
What am I doing wrong? How can I change the color of that dull white area of the sky? And, how do I select a local area to selectively apply an effect to?
Here’s what I have so far. I’m excited by how easy it was for COP8 to help me rescue an otherwise worthless image, but would love your thoughts on the above.
Thanks!
Hi Dan,
Thank you for your interest and comment! It sounds like something that’s a bit complex to explain in text. Have you had a look at our database of webinars? They are around one hour each, and cover different topics. Take a look at the link below and let me know if any of these solved your problem.
https://www.youtube.com/playlist?list=PLDMRz3ssFQH5bVekS7WX6rW9pZu_X_vLJ
Regards,
Alexander
Hi Alexander,
I’m also not able to apply color adjustments to a specific layer. I have watched close to 10 of the hour long webinars and could not find any reason why that might be the case.
If you have any suggestions, I would highly appreciate that.
Thanks,
Jan
Hi Dan, I currently have the same problem and can not figure out why the color adjustments to my image are not only affecting the layer I am working on. If you figured out a solution, please let me know.