If you are an architectural or interior photographer using a technical camera, the LCC Tool in Capture One 7 is a tool you wouldn’t want to miss.
LCC is an acronym for Lens Cast Correction and this tool will help you correct common issues that arise when using wide angle lenses and movements on these types of cameras. In fact, users of any camera may benefit from this tool too.
Fixes color casts and uneven exposure swiftly
There are many kinds of technical cameras available particularly suited to architectural and interior photography.
Lenses for technical cameras are typically designed as non retro focus lenses, which means that they behave according to the classical lens equation. This equation says that if you for instance have a 35mm lens and you focus at infinity then the distance between the lens and the sensor will be 35mm, which is actually very close the sensor. If you also use movements then the light exposing the sensor will be arriving at an extreme angle . This can cause color casts and uneven exposure across the whole image.
An LCC file can be used to swiftly correct this, along with the additional bonus of detecting and removing dust spots in the image. The dust removal feature can be applied to any kind of camera, not just technical cameras.
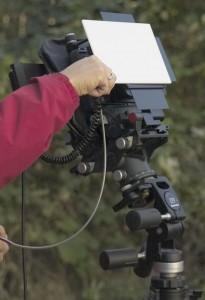
The only additional piece of equipment you need is a semi opaque piece of perspex, available from most photographic outlets. The opaque filter allows for some light to enter through the lens, while still providing a uniform surface accentuating the image created by only what happens when light passes through the lens.
How to create LCC files
Creating and applying LCC files is a simple process and does not require much time, especially as they can be created and applied as a batch in Capture One Pro 7.
Out in the field, remember to capture a LCC reference image with the same conditions as the capture you wish to correct. I.e, don’t change any settings on the camera with respect to movements, position or aperture. If you need to add a bit more exposure to prevent the LCC reference image being too dark, do so by increasing the shutter speed as opposed to changing the aperture.
Also try to keep the same order for capturing LCC reference images compared to the actual image as this makes batch correction much easier, for example:
Image – Image – Image – LCC reference image. Image Image – LCC reference image.
So, in this case I capture the actual images before capturing our LCC reference images under the same conditions.
Capturing an LCC reference image can look something like this. Note the kind of semi opaque filter the photographer is using.
Applying LCC files in Capture One 7
Before we can use the corrections to improve our images, we first have to create the LCC file. In Capture One 7 this process has been optimized so we now can calculate the LCC correction files and later apply them to the real images in a batch process. Below we have a sequence of captures and LCC reference images in Capture One 7. Note the uneven exposure and color casts on the LCC reference images.
 In this case the photographer has chosen to capture his LCC reference image after the capture itself. If your captures have become out of sequence, manually sort them by dragging them into the right sequence.
 Now, simply select all the LCC reference images, right-click on one of them, and
choose Create LCC. A small dialog box will appear at the top of the screen to set the parameters for the LCC correction.
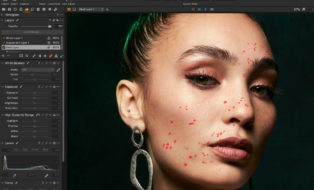
 The first check box includes dust removal information in the LCC file. This is very useful for correcting a large batch of images with the same dust spots. This option could be beneficial for any camera not just technical cameras!
The second option will create a better LCC file if you are using a very wide angle lens coupled with movements. If you are not sure if you need to check this box, then the safe option is to check it anyway. It does not mean that the LCC will be unsuitable; it just takes a little longer to create.
Capture One 7 will then proceed to analyze the LCC reference image. When the operation has completed, the LCC reference images will be marked with a LCC label at the top of the images.
 You can already see that the color cast and exposure variations have been removed on all the LCC reference images. We now need to apply this correction to our real images captured under the same conditions. Now select all the images both the LCC reference images and the real images, right-click on one and choose Apply LCC. The following dialog box will appear.
 Remember, you could have captured the LCC reference images after the images, just keep the format the same for a collection of images. Click Apply and the LCC correction will be applied.
Let’s look at the options in the LCC Tool (by default in the Lens tool tab) for a particular image.
 In the LCC tool the “Profile” shows us the name of the LCC reference image we are using for the LCC correction. It is a simple matter of choosing which parameters of the LCC correction you wish to use – Color Cast correction, Dust Removal and Uniform Light.
When the Uniform Light correction is set at 100%, then all the lens introduced light variations will be evened out. Sometimes you will get a more photographic pleasing image if you only partly compensate for the light variation by selecting for instance 70 % Uniform Light.
Now the images are ready for further adjustments as you would normally do with images from a non technical camera.
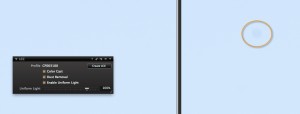
If I place a cloned variant of the image next to the original you can see that the Dust Removal option is working well.
Now that we have checked the Dust Removal option you can see it has removed the dust spot that is visible on our original image, shown on the right in the orange circle. Again, this feature of the LCC Tool could be used for any camera, not just technical cameras.
As I have stated earlier on in this blog post, for the best results it’s best to capture the LCC reference image in exactly the same conditions as the image is to be captured. However, if you are unlucky enough to forget to do this, you could consider saving a library of LCC Presets. For example, each of your lenses at a variety of your common working apertures. You could include movements as well.
Simply save them as a Tool Preset.
If you have a stubborn dust spot on your sensor that you cannot remove by cleaning it or don’t want to risk it, then you can also consider including an LCC dust removal as part of a Capture One style applied on import or capture.
LCC reference images can be created and used in a Catalog or Session and are also cross compatible between Mac and PC.
Best regards,
David




Would this work with a fisheye lens?
In terms of correcting exposure variation and cast, yes. However, it will not correct distortion.
Hey,
thanks for the great tip. Do you know what brand the opaque filter is? I have not been able to find a similar one in a store.
best,
Einar
Hi Einar,
Get in touch with your local Phase One Partner. They should be able to point you in the right direction.
http://www.phaseone.com/en/FooterMenu/Partner-Locator.aspx
Could you suggest another name for the filter ?
At a popular on-line photo supply, the closest I have found are two brands of filter designed to help set white balance. The device is designed to be held in front of the lens. The surface of these things is not smooth but is covered in little pyramids similar to those on covers for fluorescent light tubes in recessed ceiling fixtures (typically offices).
These things are advertised to be color neutral and etc. Are these things I can use? -Thanks
PS – with the new format, I am having a bit of trouble finding comments… even previously followed comments show an error page.
You are referring to an expo disc. You don’t want that. You just want a file that will let C1 assess the information later.
Just use a white piece of plastic. It isn’t “proper” but it works. Think, pringles can, etc. Now, if you have a thin piece of clean plexi, even better.
That expensive filter is nice but if you don’t have it or don’t feel like shelling out the money, go with the above.
Yes, I was referring to the Expo disc but wasn’t sure I should mention it.
I can certainly do the Pringles can cap and see how it works. Then go from there.
Thanks for the reply and tip!
Question:
We you using a grey card before the shoot or after the shot?
You will most likely still need to grey balance wether that is via a grey card or simply adjusting the WB sliders. But the order is not important.
Looks far easier than trying to correct these things individually, the “old fashioned” way. Thanks for sharing!
Thanks Allen! We think so too.
what is the name for the LCC filter i tried searching but couldn’t find anything like your showing here?
Hi Corey,
Most Phase One Partners should be able to point you in the right direction.
http://www.lapfoto.com.au
I believe you are in Australia, so give them a call.
David
thanks much!
it,s very useful when i takeing photo.
me interesa mucho tener conocimiento de como procesar imagenes pero recibo los tutoriales en ingles y no los entiendo bien con profundidad sera bueno recibir en castellano por favor, gracias
Hi Omar,
We are investigating different language options for the blog but currently don’t have a time frame for introduction.
In the meantime you could experiment with translate.google.com to convert the postings to Spanish.
David
Hi David,
Can the LCC being used in studio with a prime lens say 50mm to shoot a painting for instance?
Hi Ron,
Yes, that is an excellent way of using LCC. If you are copying artwork, then instead of using a filter in front of the lens, you can also replace the painting with a clean, white board. Use that for your reference LCC capture. So even if your lighting is not 100% even in exposure or colour you can correct this with an LCC>
David
Hello David,
Thanks for reply, just did a test with one lightsource and it works fantastic.
For the people who are searching for a piece of perspex I searched for “Perspex Opaal” this comes with three degrees of light comming through so if you buy all three you could use the best result at that moment of shoot.
Thanks again
Hi Ron,
Great! I am glad you have had a good result.
David
Good write-up, but I taught that the sequence was better LCC-PIC-PIC-LCC-PIC-PIC-PIC, so that the LCC is always the first one. That makes the batch correction easier. If you do as described in the artikel (PIC-PIC-LCC-PIC-PIC-PIC-LCC) then the LCC will be applied to the wrong series of pictures when using batch.
Or do I have this completely wrong ?
Kind regards.
Hi Stephan,
You can do either! The important thing is to be consistent with your ordering of Pic before LCC or vice versa.
Capture One will figure it out.
David
Hello Ron,
I think this subject is very interesting , I have a 14mm2.8 canon wide angle lens and a 15 mm fisheye canon lens I use on my canon 1d mark III and my 5d mark II.
I’m curious as to the difference on checking for white balance with a gray card and checking with a true white card?? Wouldn’t it make more sense to check white balance with a white card? I have my color checker, a gray card and an ExpoDisc. I’m on my way now to get a can of Pringles just for the TOP.
I’ll give it a try and let you know my results. I forgot to mention, I shoot residential & commercial panoramic and spherical photos for MLS real estate listings. Looking forward to your response.
Jack
YOUR Phase One doing fantastic Job.I really would like to know Monitors, Monitor Profiles and Ambient is also important to view the images on the monitor.What you say about Ambient Light and Luminiance? and how it affects viewing quality?
Thank you Thanu – I am glad you are enjoying what we do.
It is of course important to have a good monitor profile. It is your primary source of viewing images after all.
Ambient light can have an affect on viewing quality so it is best to optimise those conditions as best you can. Many monitor profilers can also take into account the ambient conditions to create the best profile as well.
David
Happy New Year 2014!
Could you please show me how to set us Capture One preference so THAT when I import pictures from card into a catalog it shows up in window ready to be edited. I have been having issue since upgraded to 7 pro from 6 pro.
Please need help.
Cheers
Richard
Hi Richard,
This is the default behaviour after importing from Capture One (at least in a Catalog).
Have you contacted support?
David
Hello David,
Apologies if I’m late to this thread, but I have just purchased an IQ160 back – very exciting – which comes with the white LCC board. Could I ask how one should use the LCC white board with other ND filters e.g. graduated? These can often bring their own colour cast (although I use Lee, which are pretty clean).
Would you recommend taking the LCC reference image with or without graduated ND filters attached?
Thanks
Hi Gary,
Hmmm good question.
I guess if you want to correct for the light fall off on the lens, you should take the LCC without the ND filters on. That way you will correct for any cast / light fall off on the lens, and then the ND filters will do their job as normal.
If you took the LCC with the ND filters on, then you would only be able to correct for colour cast and not light fall off as you would then negate the action of the ND filters.
But! Why not try both solutions and see?
David
Thanks for the reply David. Its a good point – just try it !
Will wish to understand to the best of my knowledge how to appear custom white balance.
This very important for me because I really want to get the color balance of each of my image.
Thank you
Victor Ngaling
Maybe a dumb question, but it is not clear to me; when capturing the LCC reference image, do you point the camaera to the sky (as evenly lit as possible) or to the motive, the buildings in this case….
I guess the sky, am I right?
Thanks,
Marc
HI Marc,
No! Not to the sky, you don’t change the positioning of the camera at all. The only thing you should perhaps do is increase exposure time by 2 stops, but only adjusting the shutter speed, not the aperture.
David
can we even hope one day a French version of this blog and your video tutorial
thank you very much
Hi Florian,
Glad you like the blog.
We are definitely looking into creating learning resources in other languages – including french.
All the best,
Gitte
Q.
if 8mm fisheye lenz for 35mm dslr format
is it possible LCC?
please~