
Quite often we would like to export more than one file type at a time, for example a full sized TIFF and a smaller JPEG for email or other web applications.
Many imaging applications require you to enter a separate dialog screen each time you want to process a new file. With Capture One 7 you have the option to build multiple recipes, each containing the specific parameters of how you would like your images processed.

Once the Process Recipes are created it is a simple matter of deciding which recipe you want to use to export your images. Processing is easily achieved by one click or using a keyboard shortcut.
Alternatively you can make an immediate ad-hoc Export for a single image or group of images. This is achieved by simply choosing File>Export Variants.
Saving time with Batch Processing
Building Process Recipes in Capture One is easy. Once created, you can use these recipes in all of your Sessions or Catalogs.
The Process Recipes Tool shows an overview of what recipes have already been created and indicates if they are enabled (checkbox to the left of the name). It also shows the currently selected recipe (highlighted name).
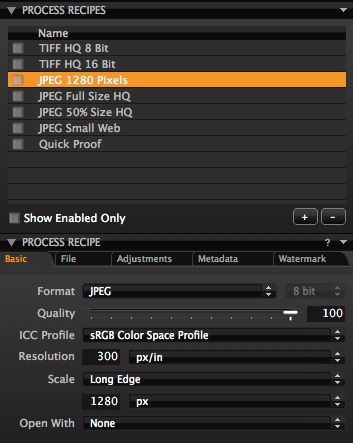
Creating a Recipe
To create a Process Recipe click on the ‘+’ icon in the Process Recipe Tool and name your new recipe.

Once named, define the parameters for the recipe in the Process Recipe Tool. In the Basic tab, set the criteria for the File Format, Resolution, Color Profile and Scale. The further tabs contain other options, for example the option to include Metadata in the file as well as the option to apply a Watermark. Work through the tabs to decide what settings work best for you.
Once processed, your images will be saved to the location defined in the Ouput Location Tool. This tool is also in the Output Tab. Change the location by changing the ‘Store Files’ drop down menu. This is specific to the Session or Catalog as a whole.

The File tab, back in the Process Recipe Tool, has some advanced options that can be rather important. The Root Folder describes where the files will be saved when processed. This can be set specific to each Process Recipe so that each will save the file to a specific and separate location of your choosing. You can see in the example below that the Root Folder is designated as Output Folder, as previously mentioned this is its default setting.

The benefit of setting your Root Folder is that your Process Recipes are independent of the “global” Output Location. However if you do not want to set specific Root Folders for your recipes you can always change the output folder in the Output Location Tool without having to edit each recipe.
The use of the Subfolder option is also useful. This option will automatically create a subfolder in your output location, reflecting the name of your choice. This option makes it is easy to separate each image by its different process recipe.
Processing Images
Select a number of images in the Capture One 7 browser and decide what Process Recipes you want to use by enabling each of their check boxes.

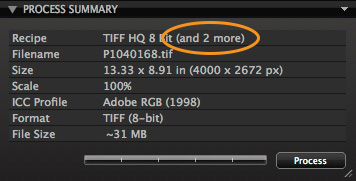
The Process Summary Tool describes the currently selected recipe and if you have additional recipes selected as well.
Next, simply click on the Process button.
Alternatively, at any point during your shoot or editing process, simply select any image and choose File>Process or, as a faster workflow option use the Keyboard shortcut Cmd-D (Mac), or Ctrl-D (Win).
Processing images on the fly is a great workflow option during the editing process. On completion of editing an image, just use the keyboard shortcut to process and move on to the next image. When the editing is complete, we only need to wait for the last image to finish processing before beginning the next workflow step.
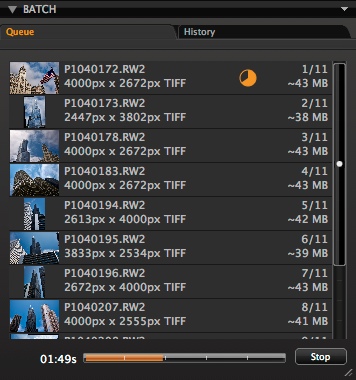
The status of the processing can be seen at any time in the Batch Tool in the Batch Tool tab.
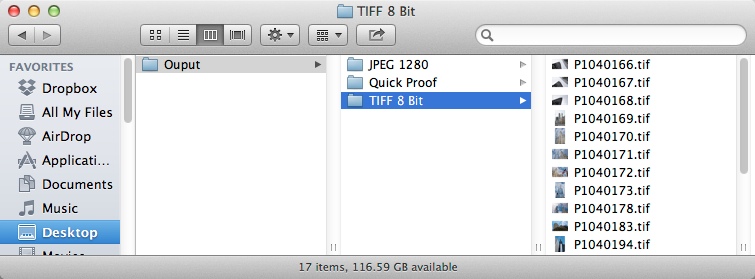
Finally, a quick look in the Finder shows our Processed images, located neatly inside the automatically created subfolders as defined in the recipe. This workflow lends itself well to efficiency and organization.
All the best,
Niels

The Image Quality Professor
The digital pioneer, Niels V. Knudsen, is Phase One’s Image Quality Professor and founder of the IQP blog. Moreover, he is responsible for breakthrough advancements in image quality both in Phase One’s medium format camera systems and in Capture One Pro.


Hi Niels,
Thanks for these tips! I have a wish that one could add a preference of sharping to the recipe as different sizes require sometimes very different ways of sharpening the pictures. /Martin
Hi Niels
I am under the impression that the option “Output Folder” for the “Root Folder” on tab “File” points to the location chosen in the “Output Location” tool, the field labelled “Store Files”.
If I am correct in this I’d like to suggest that the label “Store FIles” be altered to “Output Folder” making the relation obvious. References to the same entity should always have the same label.
To me at least this has been a major source of confusion.
Best regards,
Mogens
Hi Niels,
Thanks for the useful tips. There is one thing I would like to see added to the “Output naming” where you can choose from a set of “tokens”, and that is “variant number”. This is useful when you have more variants of an image and want to process them with the same recipe. Makes things a bit easier, at least the way I work. But that may just be my bad habits getting the better of me.
Camera make and model from the EXIF data would also be nice to have as a “tokens”.
Kind regards,
Morten
I am having trouble using the process recipe to batch export files. I choose a number of files in the browser but only the first file chosen exports to the various folders I have created process recipes for. Can you help? Terribly frustrated or must revert to using file export variants and re-setting for different export purposes. Thanks
Hi Stephen,
Go to the EDIT menu and make sure ‘Edit all selected variants’ is checked!
David
hi all:) I hope will explain my question. When I am processing file capture is taking name from JOB NAME example NEW_CAR. but if I made mistake and forgot to change JOB NAME it will process as NEW_CAR 1, another one NEW_CAR 2, and another NEW_CAR 3 – I hope you now what I mean. I would like capture don’t do this or ask me OVERWRITE or NOT. is it possible to change this? thanks in advance jacek
Hi, I’m finding difficult to export files in various formats. Can you tell me which tutorial I shoul follow and can you send me the link please.
Niroon.
Hi, I’m finding difficult to export files in various formats. Can you tell me which tutorial I should follow and can you send me the link please.
Niroon.