
The Auto Levels feature in Capture One 8.2 now has some new options, allowing you to optimize your images more efficiently and with more control.
Auto Levels now has two different modes: linked RGB channel optimization and individual channel optimization.
The new individual channel mode can, for instance, be very efficient for optimizing landscape images of mountains in the winter and spring time, where the combination of UV, snow, blue sky and distant haze can introduce a color cast.
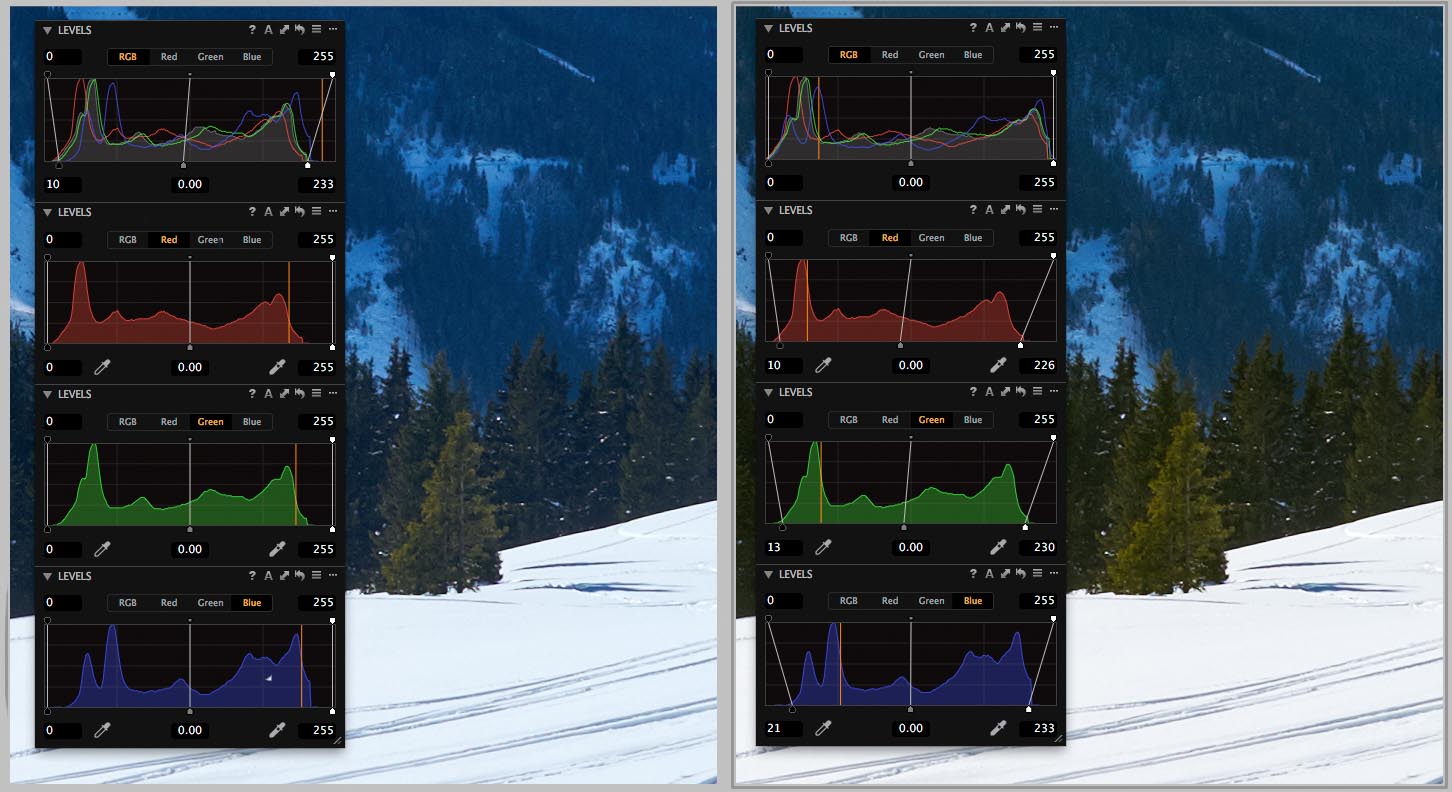
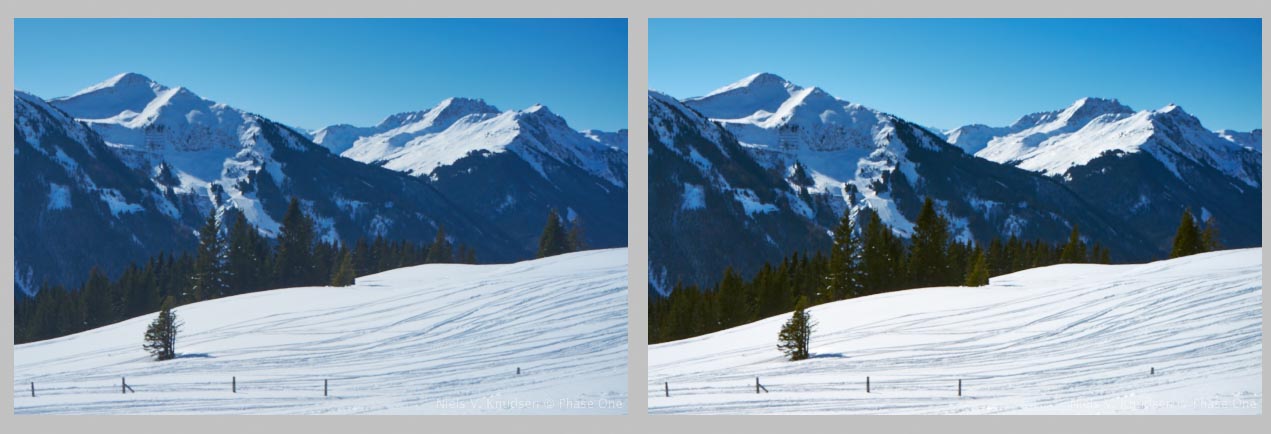 The left image has been optimized using Auto Level set for linked RGB Channel Mode. The right image has been optimized using Auto Level set for individual Channel Mode. The individual channel mode removes the color cast both in the highlights (the snow) and in the shadows giving a much more pleasing image.
A Level tool for each color channel:
Let’s take a look at the image from the comparison above. In order to show you the optical challenges I will start creating three floating Levels tools. This allows me to see all the individual channels at the same time.
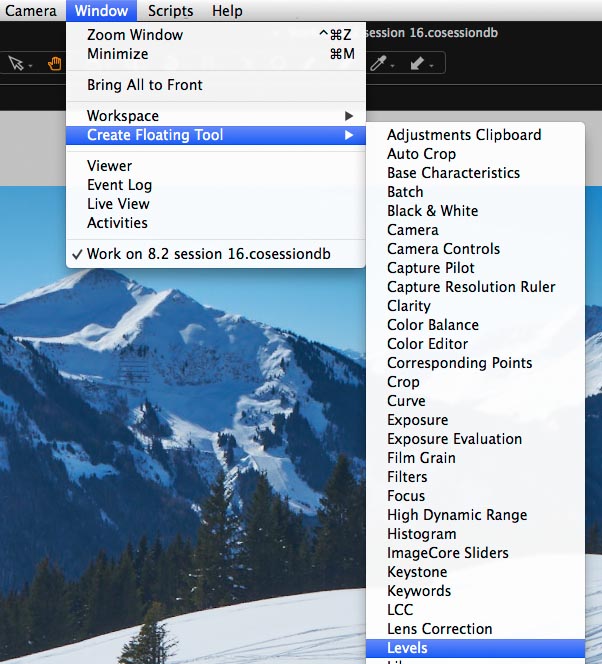 Adding an extra floating Levels tool from the Window menu
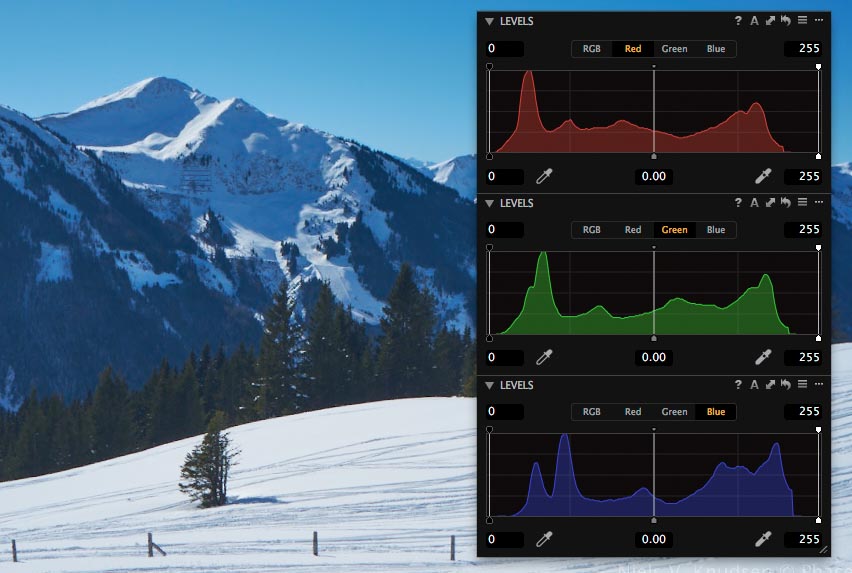 The 3 Levels tool stacked together each showing one color channel
When placing a tool underneath another floating tool, it will automatically stick to the first one. Now with the three individual histograms open at the same time, it is obvious to see that the black offset is not the same for the three channels. Distant haze and the high amount of scatter light hitting the lens cause this.
Individual channel mode:
When the histograms look like this, it makes sense to optimize the Levels for each individual color histogram. This can of course be done manually by dragging the end points but the new Auto Levels mode makes it possible to automate this task. To change the Auto Level mode from the default linked RGB Mode to the individual Red, Green, and Blue Channels mode, go the Preferences under the Exposure tab.
 Changing Auto Levels mode in the Preferences menu
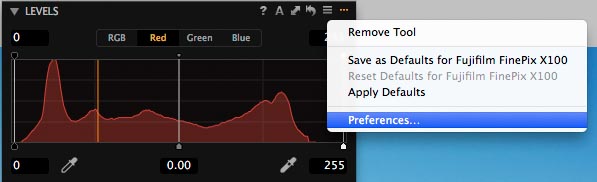 It’s possible to go directly to the Preferences menu from the Levels tool via the tool context menu indicated by the three dots. See screenshot above.
In the Preferences for the Levels tool it is now also possible to set the Auto Level Clipping thresholds. These thresholds determine how far into the histogram the shadow and highlight slider moves when using the Auto button in the tool.
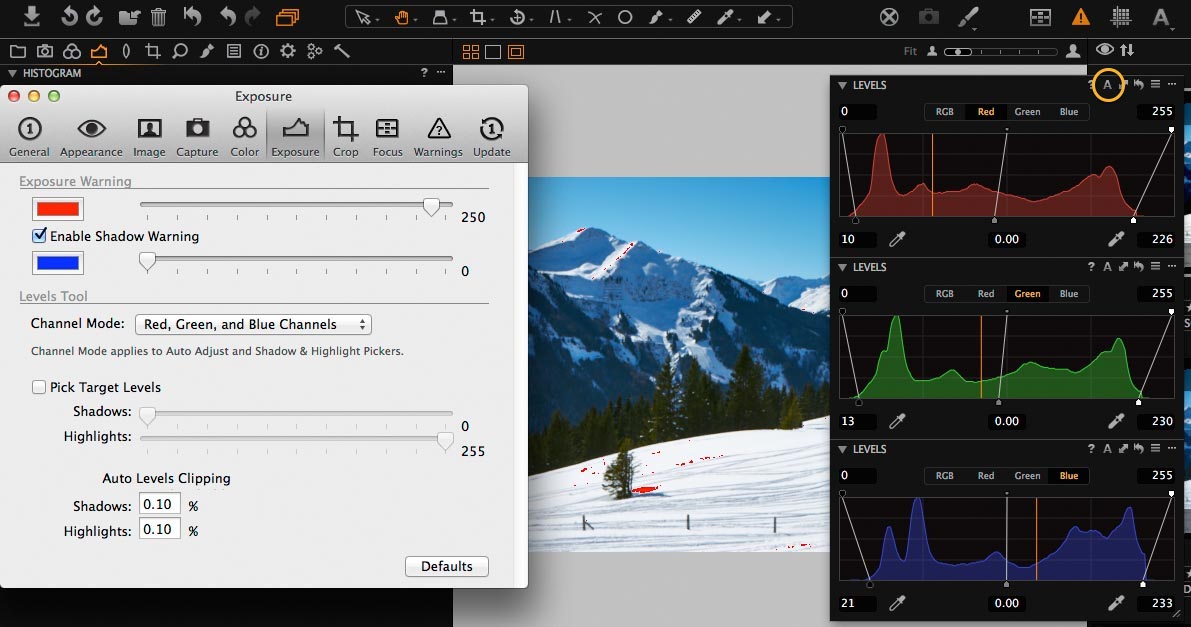 The result of using the Auto button for the Levels tool when in individual channel mode. Notice how each color histogram has been optimized. The Exposure Warning is turned on and shows just a bit of highlight warning for areas reading more than 250. The red circle shows the Auto button for the Levels tool.
The default values are set for clipping only 0.1% of the histograms, which works well for most images. Setting higher values for the thresholds will lead to more clipping but will also result in an image with more contrast.
 In this example the Auto Level Clipping thresholds have been set to 5%. With the Exposure Warning turned on we see that a much larger portion of the image now exceeds the warning levels.
Comparing the two different channel modes:
Now let’s go back to the comparison image where the Auto Levels feature has been applied using the two different modes. When using RGB channel mode we see that the RGB levels histogram gets clamped leaving the individual color histograms untouched.
In Red, Green, and Blue Channel mode the individual histograms get clamped, which leads to a fully expanded RGB histogram. Again it is easy to see the benefit of using the individual channel mode in this case as it leads to a more clean green color of the trees, removes the blue cast of the distant trees and cleans up the color cast in the snow.
 RGB channel mode Red, Green, and Blue channel mode
Picking a Shadow or Highlight point works differently depending on the Channel Mode:
When the channel mode is set for the default RGB channel, the Shadow and Highlight picker will set the corresponding sliders as well as any target value in the RGB histogram. This will ensure that the White Balance of the image is maintained, which is extremely important for many images
In Red, Green, and Blue Channel mode the Shadow and Highlight picker as well as target values will work in the individual histograms.
All the best,
Niels

The Image Quality Professor
The digital pioneer, Niels V. Knudsen, is Phase One’s Image Quality Professor and founder of the IQP blog. Moreover, he is responsible for breakthrough advancements in image quality both in Phase One’s medium format camera systems and in Capture One Pro.


Nice tool. Thanks.
Small quibble:
‘Fewer’ Clicks… Not ‘Less Clicks’.
– evan
Hi Evan,
Glad you like the tool. And thanks for the “Fewer clicks” comment.
All the best,
Niels
This is fantastic advice. I just went back to some snowboarding pictures that I thought were pretty good and applied this trick. They were just that 5% better that really went from good to great.
Thanks
Hi Peter,
Fantastic! Happy you liked the post and that you found it useful.
All the best,
Niels
Grazie!
Glad you enjoyed it.
All the best,
Niels
So cool! I can’t wait to try it out! All these new updates are so great and have really taken my shots to new levels with so much time saved. It really opens up the creativity too because the learning curve and time involved to do these new things are shortened.
Hi Nate,
Thanks for your comment and fantastic to hear!
All the best,
Niels
It’d be super to have a keyboard shortcut to switch betwixt these two modes, especially considering the last remarks anent white balance. Now, that’d be way fewer clicking!!
Hi Alveric,
Thanks for your input. We will take that into consideration.
All the best,
Niels
Incredible processing tool, I last used it in 2008 with Phase one backs, it is a completely different animal now, well done!
Very useful advice, thank you!!!
Thank you for this explanation. I have a question and a remark.
The question: when I load a RAW file with the Auto Adjust preset checked, it adjusts the exposure globally via the levels tool. Namely it plays with the combined, RGB channel. Setting the preferences to “Red, Green and Blue” as you explain does not change this fact, and I need to go and click on Red (or on Green, or on Blue) in the levels tool, then click Auto Adjust. Not only do I need to do that for every image, but on top of that doing so does not “undo” the adjustments made to the global RGB channel — I further need to manually set that back to the “untouched” state. This is unfortunate in my view, since I consider the infependent-channel auto-adjust to be way better than the global one (cheers on the improvement!). In general it gives me better results, and hence I’d like it to be the preset for my images. How can I make it so?
The remark: if I set the White Balance to Auto Adjust (custom) and, from there, compare a version of the image with levels Auto Adjusted via the RGB channel to an image with Red, Green and Blue channels independently auto adjusted, I sometimes notice a very big difference in white balance. Drastic, I’d say. So far I guess that’s normal. The weird thing is, I find the resulting white balance to be generally better in the latter case. Any idea why that is ? Am I doing something wrong? Well I guess the remark turned into a question :-).
Thank you very much for your time,
Gustavo
Thank you so much for this great tip.
I’ve tried it on a few images and it made a huge difference; the images looked more like I remember them to have been.
There were some images that it didn’t work do well on but not many.
There’s always something to learn with Capture One, I wouldn’t be without it now.
Keep up the good work and again, thank you so much for helping to improve my knowledge and the end result, which is my images.
HI! what curve did you use? auto? 🙂