I am going to take you through my process for three images – one for each blog post. The first is a recent landscape image shot with my Alpa Max camera and Leaf Credo 60 back.
I have used Capture One since version 2.7 and am always learning new tricks from the Capture One Webinars, The Image Quality Professor’s Blog and the good folks at Capture Integration in Atlanta, Georgia, USA.
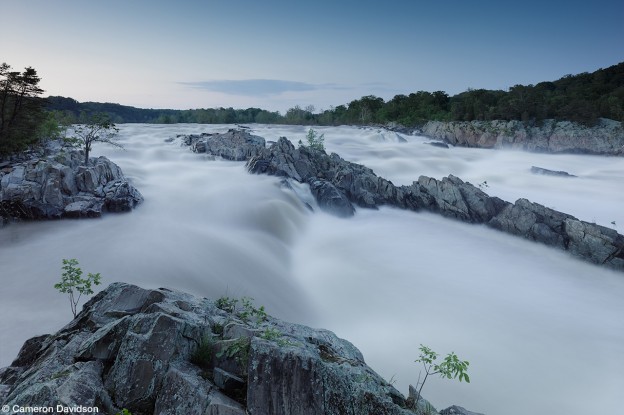
The right day at Potomac River
The image of Great Falls on the Potomac River was shot on May 19th when the river was above flood stage and cresting after several days of intense rain. The Potomac River watershed is huge and drains a good portion of Virginia, West Virginia and Maryland.
All of this water flows across Great Falls, which is a few miles upriver from Washington DC. This view was shot from the first lookout around 8:30 in the evening. Two days earlier, when the river was higher, the rocks in the center part of the frame were completely submerged.
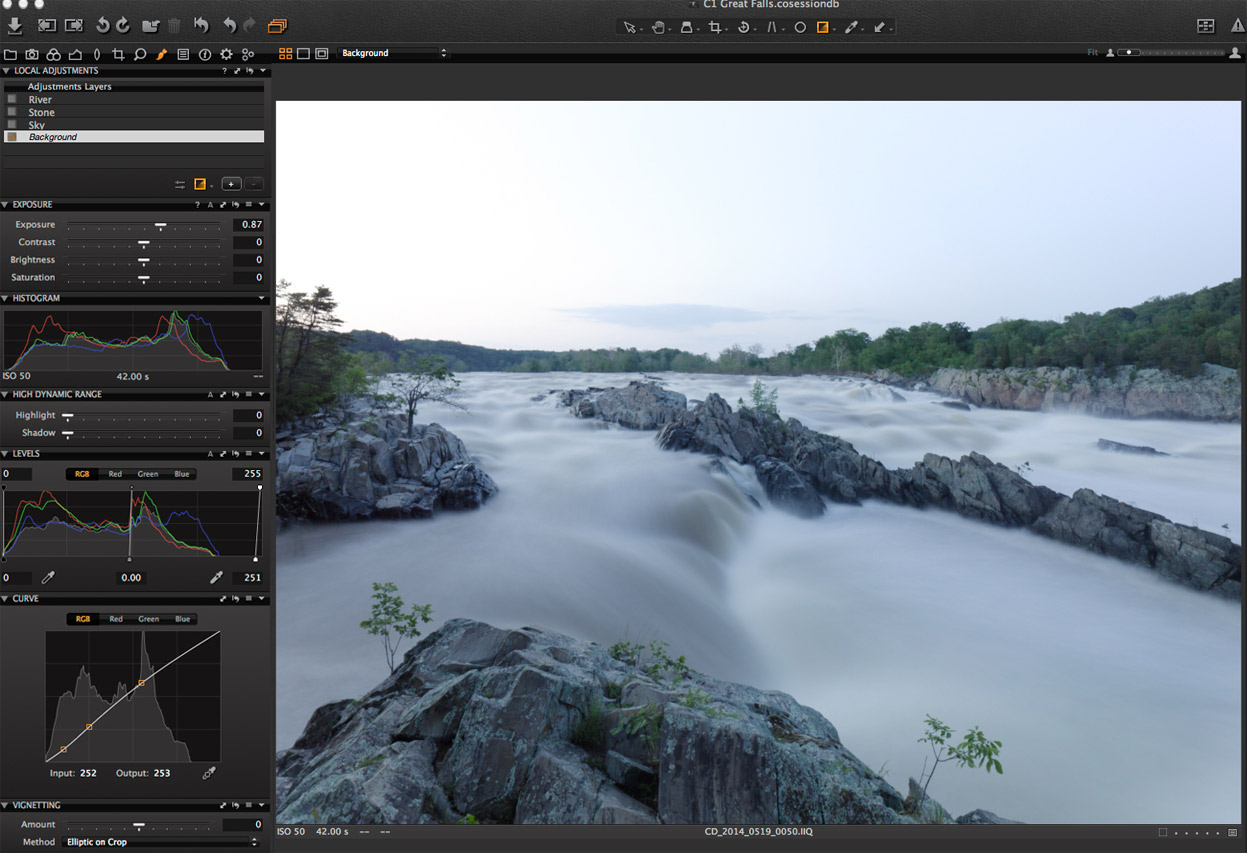
 Above is the original image as shot. I will walk you through what I have done and why.
The very first thing I do when shooting with the Alpa is to apply a Lens Correction to the file. I was shooting with my Alpa 35mm XL Schneider lens with a center filter and a five-degree down shift to include the rock in the lower portion of the frame. This can produce a slight lens cast, which LCC can fix.
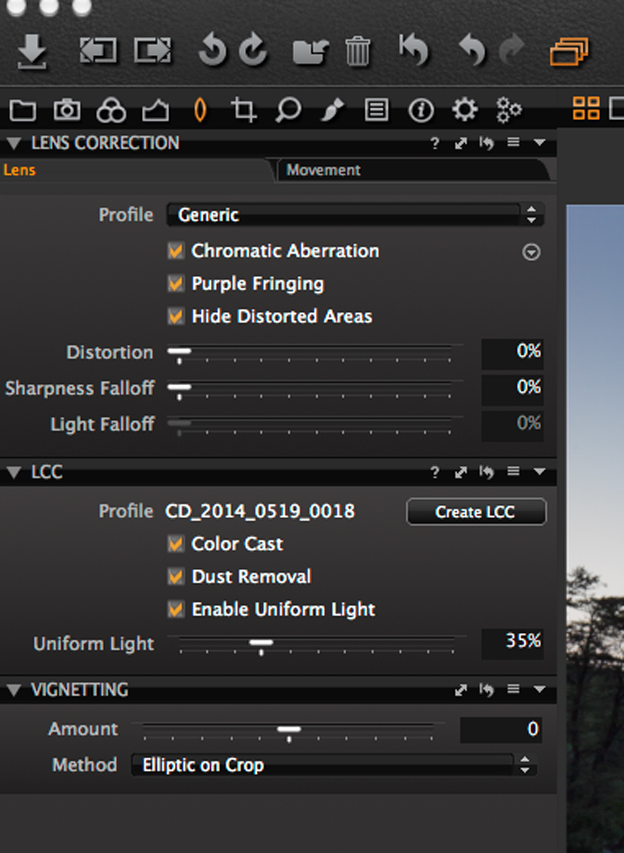 With the LCC I enable uniform light and then back off the percentage to 35. I find 100 percent uniform light for my landscape work to be too precise and clinical.
One advantage of the LCC is you can enable it to remove dust in the frame. I often shoot LCC’s for my aerial work with my medium format or Nikon cameras. I keep several LCC’s shots with my prime lenses at infinity and the f/stops and ISO’s I often use.
Bring out detail
Next up is to apply an exposure correction to bring up the details for the overall view. This was a bit more than I expected and I ended up opening up the exposure by .87 of a stop.
I also applied a slight curve to the image and brought the highlights down to 251. I wanted to keep a little bit of moodiness in the water and not brighten it up overall by bringing in the highlights all the way to 217.
 Next up were the blown out highlights in the sky. I used a gradation and brought the end point to just above the center of the rocks in the river. The exposure reduction was pretty heavy: 3.6 stops. In reality it was 2.73 stops since the original exposure was opened up by .87 of a stop.
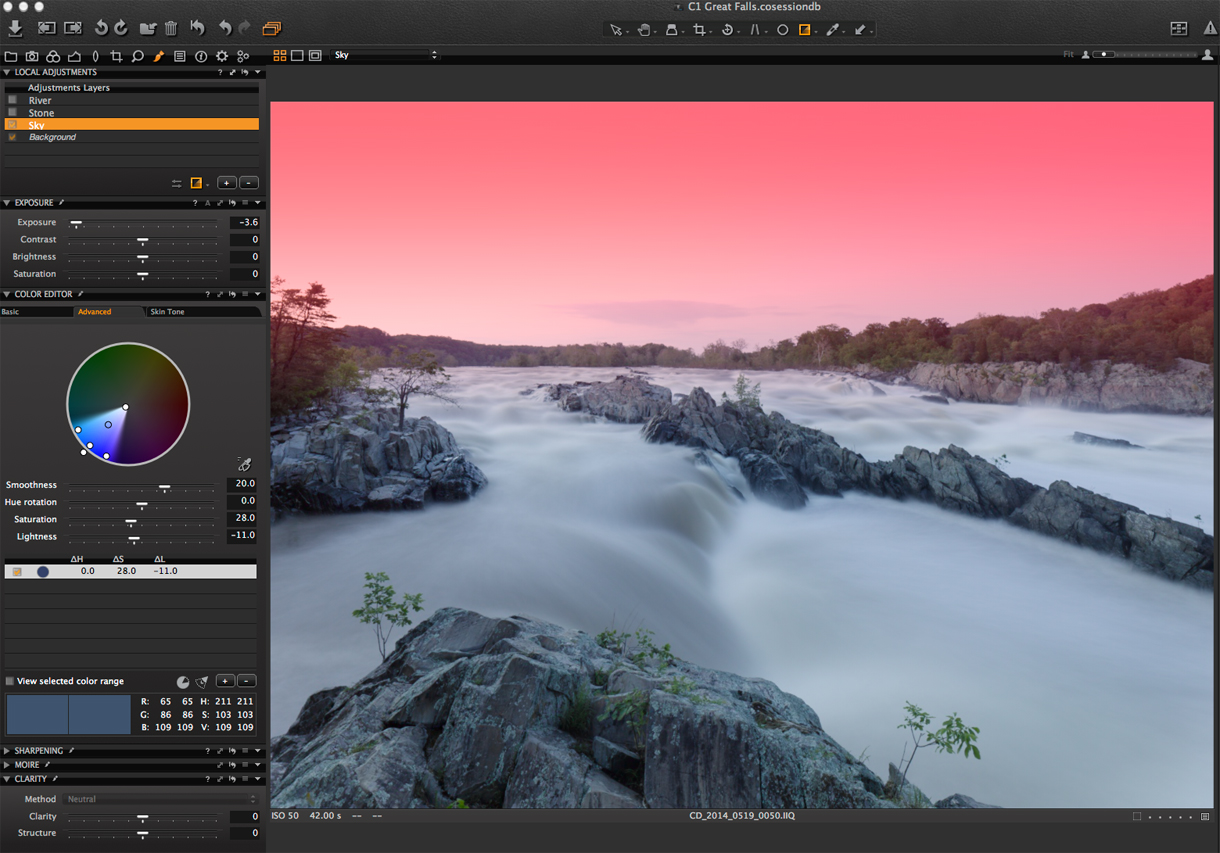 I also shifted the color in the sky a bit using the Advanced tab in the Color Editor. I find the Color Editor is a great place to start when you want to refine the exposure of a color. I dropped the lightness of the blue in the sky by 11 percent and increased the saturation to 28. The smoothness was set at 20.
Smooth edges & more contrast
I then used the Erase Mask Tool at 17 percent opacity and erased the gradation along the tree line and edges of the river. The hardness was set to 0. I like to keep the edges smooth and not have a hard line when I reduce exposure in a mask. One advantage of using the Erase Tool in the mask is you can easily dodge parts of an exposure.
I wanted the stone in the lower portion of the frame to be a wee bit darker to create contrast against the flowing water. I used a low level of opacity with the hardness set a zero and painted over the center portion of the rocks. Additionally, I added a fairly heavy dose of Clarity at 61 and of Structure at 26.
 The water flowing near the rocks was a bit murky and I decided to open it up just a bit. The mask is little hard to see below – but I drew over the water on the left side of the frame and the opened it up 2.31 stops plus added a bit of brightness.
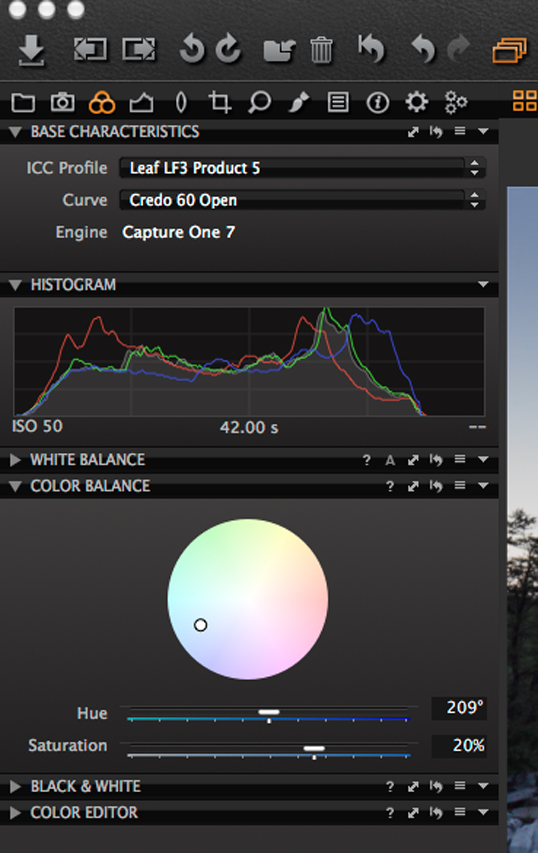
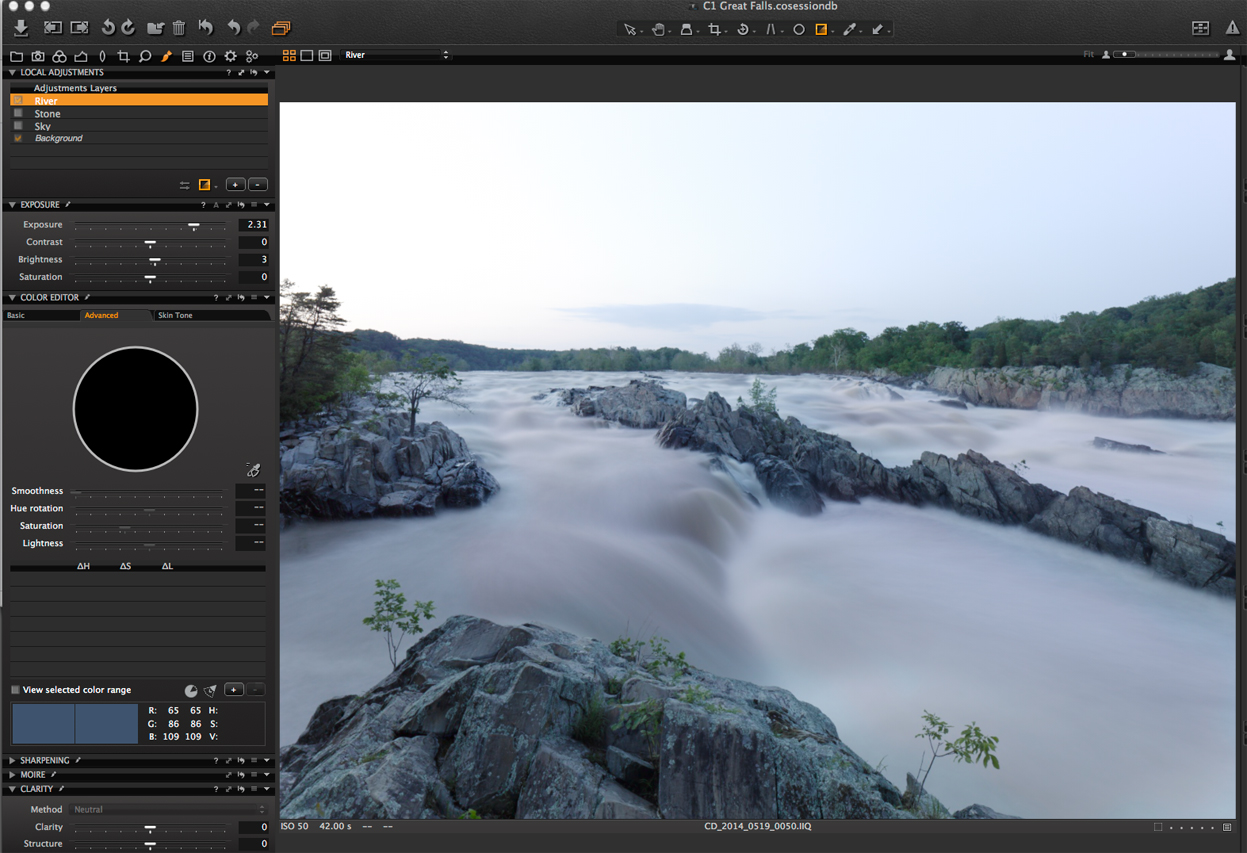 I shifted the color balance to 209 on the hue scale along with 20% saturation.
 All in all a pretty simple process. For me, to be able to do these adjustments with the RAW file is a plus and makes my workflow a bit faster. Plus, I can always go back to the raw file and make adjustments with the layers or even add additional corrections.
 Best regards,
Cameron Davidson
Cameron Davidson
Cameron Davidson is a well known American aerial and location photographer who shoots for a healthy mix of editorial, NGO and commercial clients including Vanity Fair, Dominion Resources, Virginia Tourism, Money and ESPN The Magazine.


hi
i noticed in the profile “cd-2014…..” that you included the fonction “dust removal “and i was wondering if it was efficient just for this picture or in general :that is to say , every tilme you import files .
i’m working for the national archive and when we take shots of archive documents, we take care that there’isnt any dust removal fonction for ,sometimes it can suppress informations on the original document
that was my comment of the day
sincerely
I use the LCC primarily with my Alpa camera and Leaf Credo back combo. Additionally, I use it with aerial shots with my Nikons. It is dependent on focus and F/stop used. If you are always shooting at the same distance and f/stop – then you could make one before hand. It is easy to create an LCC frame. You purchase a opaque piece of plexiglass (perplex in UK) and place it in front of your camera lens. Shot a frame at two shutter speeds less than your current speed. Don’t change your f/stop. Phase One has an excellent short video on how to use the LCC. https://www.youtube.com/watch?v=KBoSHz4kBKA&index=18&list=PLDMRz3ssFQH6HhCcWLh7xL0SapRxUNzs9
I prefer the original version! It is much deeper, more intensive… has a bit of Lord of the Rings style
Markus – Thank you for the comment. The idea behind this post was to show how I use the tools in C1 to modify an image.
I’m glad you like the RAW file image.
What I like about the C1 color editor is how you can subtly shift tones without making the photograph look overly digital or manipulated.
Nice picture and clever processing. Thanks for sharing.
I am a bit surprised by the 35% coverage for the LCC. With the Canon 5D MKII, the picture is blown out at 100% (not only clinical…) and above 15% I get disturbing halos in the sky around clouds and on the edge of trees or buildings.
Do you (or some C1 person) have an explanation for this? Have other users made similar experiences?
Reto
Reto –
Did you shoot an LLC frame with opaque plexiglass? At least two shutter speeds slower?
I adjust the light uniformity across the frame to suit my mood for the image. Each image will be different. The LCC corrects for the light fall off and I did not want the corners to be the same level of brightness as the center.
I am not sure why your are experiencing difficulties. Did you try to apply an LCC without shooting an LCC frame? If you apply an LCC to an image without a reference LCC – it can do what you are describing. The video by Phase on LCC should help you.
Thank you for your detailed answer. It clarifies my issue.
I made a confusion between two procedures, the one you apply, which is the classical lens cast correction, and another one I used on a regular basis and which is described in a blog entry by Niels: https://phaseoneimageprofessor.wordpress.com/2011/01/13/the-secret-hdr-tool/.
I am using this technique much less often since the HDR tools were updated in Version 7. Making some new tests with the ‘secret hdr tool’ I am discovering it is also much less halo prone…
Reto