One of the great benefits of working with Catalogs in Capture One Pro 7 is the ability to work on your images – even when they are ‘offline’.
When you work with a Catalog in Capture One Pro 7, you can choose to store your original images inside the Catalog itself or you can store them at their existing location, for example on external hard drives.
The Catalog contains a preview image of every raw file in the Catalog, so even if you don’t have access to your storage media, you can still work with your image Catalog, edit metadata, organise it and even make visual adjustments.
Why do we use Previews in Capture One?
Every time an image is imported into a Catalog, Capture One Pro 7 creates an exact preview of the raw file and stores it within the Catalog. Most operations in Capture One Pro 7 actually work with the preview, as it is much faster to use the smaller preview file than constantly having to read the much larger raw file.
Therefore, the images you see in the Browser and Viewer are the preview images. Capture One Pro 7 only needs to access the full raw file in order to show the image in the viewer if you need to view the image at 100% or if you work on a monitor with an extremely high resolution. Capture One Pro 7 also does some smart caching, by reading images before and after the currently selected image thus making the shift to the next or previous image faster.
The preview will of course visually match the output image based on the adjustments made in Capture One Pro 7.
Preview Sizes in the Capture One Catalog
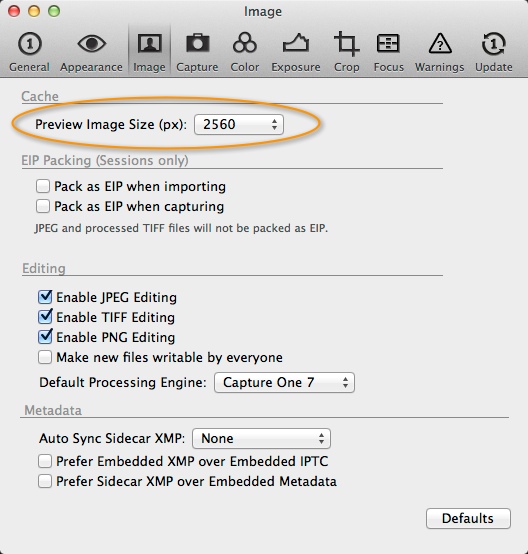
The size of the preview inside the Catalog file can be controlled by the Preferences Dialogue under the Image Tab.
By default, the preview size is set at 2560 pixels in Capture One Pro 7 while the preview size was only 1024 pixels in version 6. Because Capture One Pro 7 now uses a much smarter method for compressing the preview files, the new default preview at 2560 pixels takes up roughly the same space as the old preview at 1024 pixels in Capture One 6.
The new high resolution default preview in Capture One Pro 7 really gives you great benefits when you work with offline files. The 2560 pixels give such a high resolution that you may not notice that you are working with offline images. Typically, you can even zoom into the images to about 50% without missing details in the images.
If you are working a lot with your images offline, it makes sense to use a larger preview size. A large preview will increase loading times for previews in the application, but on more powerful computers this will be less noticeable. Larger preview image sizes will also increase the general size of the Catalog.
Catalog Size Comparison
The following table shows the Catalog size for different number of images and preview sizes for Canon 5D Mark III raw files placed outside the Catalog.
| Nr. of images |
1000 |
5000 |
10000 |
25000 |
% |
| RAW size( Gbyte) |
28 |
140 |
280 |
700 |
100% |
| preview size = 2560 (default) |
1.62 |
8.12 |
16.24 |
40.6 |
5.8% |
| preview size = 1440 |
0.53 |
2.63 |
5.26 |
13.15 |
1.9% |
| preview size = 1024 |
0.28 |
1.41 |
2.82 |
7.05 |
1.0% |
| preview size = 640 |
0.15 |
0.76 |
1.52 |
3.8 |
0.5% |
From the table, you can see that using the default preview size at 2560 pixels only takes up 5.8% more space than the original raw files but you get such a nice and large preview file for working with offline files. On the other hand, the Catalog will take up 40.6 Gbyte if you have added 25000 images. So, if you find that the “offline” preview quality is good enough with 1440 or 1024 pixels, then your catalog can actually be considerably smaller.
Changing Preview Sizes
To change the preview size, simply select a new value in the pull down menu.
Any changes made here will only affect images imported after the change has been made. The previews of existing images will have the size set in the preferences at the time of import.
If necessary, you can update existing images with a smaller or larger size preview by :
1. Choose the new preview size
- Select the images in the Catalog to be updated
- Go to File>Regenerate Previews. The Activity Monitor will show the progress of the preview generation.
Existing previews will be replaced with the new preview size. Subsequent imports will also be made with the new size.
This may be useful to do if you have in the past chosen a smaller preview size and would like the benefit of a larger preview size.
All the best,
Niels

The Image Quality Professor
The digital pioneer, Niels V. Knudsen, is Phase One’s Image Quality Professor and founder of the IQP blog. Moreover, he is responsible for breakthrough advancements in image quality both in Phase One’s medium format camera systems and in Capture One Pro.


Interesting information. A few days ago I set the value for the size of my screen, but did not realize where it had an impact.
Thank you!
Great information. I was also lucky to catch up with you recently Niels when you talked about this in London.
A quick question if I may? Given that many users will wish to view at 100% (for close work), what is the fastest way of calculating the relevant preview image size for a given RAW (in my case D700 NEF) dimension?
thx
Edward
Hi there, after reading this awesome piece of writing i am
too delighted to share my experience here with colleagues.
Hi,
I am trying to figure out the best preview size for me to work with. I import my images so they are stored on an external hard drive with the minimum preview size, then tried to regenerate a better quality preview.
Nothing seems to happen when I try to regenerate the previews?
Nothing happens on the activity monitor and the previews are still minimum quality.
Any suggestions?!
1st question – Why not import the images with the preferred preview size?
Did you select all pictures you wanna regenerate previews for ?
Hello,
How does it work with sessions?
Does the preview generation behaviour remain?
JR.
Has anything changed with Capture One Pro 10?
If I understand this correctly, it is saying that when you are EDITING a photo you are actually looking at an adjusted PREVIEW image unless you are viewing at 100% (at which point the software swaps in the actual RAW file and displays exactly what is being used). Is this true only when “offline” or is it also true even when the RAW file is available?
This would imply that if you want the “best” clarity when editing you need to either zoom to 100% (a small portion of your picture for modern cameras) or you must create previews at the width of your window on your monitor (very large if you have a 4K monitor).
Hi John,
Nothing changed with Capture One 10. Even if the RAW file is available, there is no point accessing it if the image is fit to screen. If you want to correctly asses sharpness, the only way to do that would be at 100% or using the Proof Recipe feature.
David
Is there any chance to put a cancellation on generating previews?
I imported about 1000 images from a folder, and want to edit only couple of images, however I need to wait 1 hour to finish the previews, why everything is so painful and complicated in Capture One?
To match the resolution of my 5K iMac, I have to set the preview size to the maximum of 5120px (Capture One 11). To use anything lower really negates the benefits of the preview images. Those large previews lead to an enormous catalog file though, and there is no built-in option to cache them outside of the catalog. Fortunately, I came up with an easy fix. It let’s you move the cache to an external drive: https://www.packafoma.com/blog/2018/10/29/how-to-move-capture-one-preview-cache-to-external-drive/