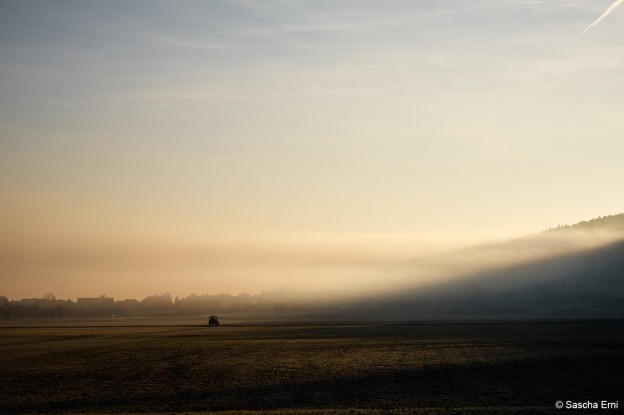
Usually, I carry little when I am on a job – only cameras, lenses, memory cards, pen and paper, and that’s about it. I’m not required to lug around a notebook, I edit RAW files on my workstation and deliver images and text the next day or so.
From time to time, though, I get assignments, which require overnight stays, and delivering images on-site. Capture One Pro’s Session mode really makes my life easier, both during an assignment, and afterwards.
Why Sessions?
First of all, Sessions are what I’m used to working with. I’ve been working with Capture One for years now, and once a “workflow” works for me, I’m not inclined to change it. I started using Capture One Catalogs on my workstation a while ago, but on notebooks? It’s definitely Session time.
Apart from force of habit, Sessions make it easier for me to cull images, back up files via FTP or Dropbox, and move photos, and settings, to my main Catalog once I am back from a job.
On-site
I create a fresh Session in Capture One Pro 8 using a pretty basic workspace template. I don’t usually shoot tethered, so I don’t need the “Capture” tool tab, for example. I then import the day’s images, rename files and add metadata such as copyright with tokens and templates.
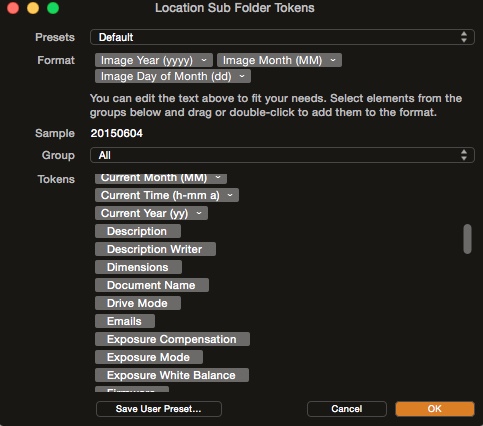 Tokens make it easy to dynamically create structure and rename files.
Next, culling. One thing I never do while on a job is to delete images directly on a camera or memory card. Things can get pretty hectic, and the risk would be too high, that I accidentally delete the wrong file(s). So, I often end up with a couple hundred images within a few hours.
For culling, I disable the Viewer with CMD+ALT(option)+V, and use the red color tag by hitting the “minus” (-) key. I filter out images tagged Red in the browser. They’re still on the work drive, but won’t get in my way.
 Keeps your browser tidy: The minus key can tag images as a “reject” button.
Sometimes, clients need printouts or JPEGs the same day – say, as a present to speakers or for a wrap-up at the end of a conference. So, while culling, I also move key images to the Session’s “Selects” folder by pressing CMD-J (PC users hit Ctrl-J). Culling and selecting is completely keyboard-driven for me, and I can go through hundreds of images very quickly. If I DO need to take a closer look, I switch to the Loupe tool (P key) and magnify portions of an image right inside the browser.
Why not just use another color tag, e.g. green, for key images? Networked backup, that’s why. With hundreds and hundreds of images, and wonky internet connectivity at some venues, it’s just not practical to upload the complete session to e.g. an FTP server. If I end up with two dozen or so key images, backing up the most important files by dragging-and-dropping the “Selects” folder, as appose to the entire Session, it’s more feasible.
 A Session’s folder structure makes networked backups a bit more bearable.
Next, I switch to the “Selects” folder and edit my key images. Thanks to Capture One’s Copy/Apply Settings tool, I can easily transfer basic development settings to the rest of the day’s shoot. Afterwards, I process the key images for the client’s needs, as specified prior to the shoot.
Usually, I don’t add much more metadata at this stage. Everything is contained inside the Session’s folder structure, so I don’t need to differentiate between clients, jobs or topics. Also, I might not have all names of speakers, artists, guests etc. yet, so keywording doesn’t make much sense at this stage.
There and back again
Once I’m back in my office, it’s time to move the images to the workstation for the heavy lifting (say, the client also wants files for a print ad) and archiving. Sessions make this step very easy: In the workstation’s Capture One Catalog, I hit the import button and navigate to the notebook’s Session folder in my LAN. I make sure to check the boxes “Include Subfolders” and “Include Existing Adjustments”, hit “Import All”, and have some coffee.
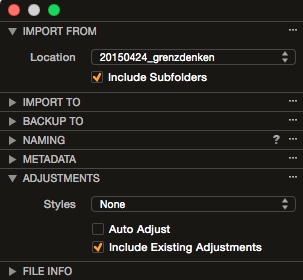 Don’t forget to include your adjustments when importing images to the main Catalog.
Using Sessions on the notebook, rather than Catalogs, saves me the step of either exporting all images, then importing them, or moving the notebook Catalog to the workstation and merge with my main Catalog. Merging the Catalogs would require a clean-up to get file naming, file location, keywording etc., so it’s less than ideal for my workflow. Importing images, using my usual import templates, is easier and leads to more consistency.
“Easier” is the key word here. With Sessions on notebooks, and Catalogs on the workstation, I have a robust workflow that is easy to maintain. If it’s too complicated, I tend to avoid going through all the necessary steps, especially when I’m a bit tired after travelling for a day’s shooting. Using the best of both worlds – Sessions on the road, Catalogs in the office – helps me minimise potential mistakes, while it is also saving me time.
A word on EIP
You might have noticed in the screenshots that I use EIP while in Session mode.
I do this due to my obsession with back-ups. On slow networks, uploading a single EIP file rather than the original RAW file plus Capture One sidecars, shaves a couple of minutes waiting for a large backup to finish. It’s not much, but if you’re using your mobile as a WiFi hotspot it can be something to consider.
It’s not a perfect solution, but for the time being it’s how I do things. As mentioned above, I don’t like to change tools that work for me – but naturally, your mileage may vary. Will I stick with EIP? As Capture One’s Catalogs grow more powerful, sooner or later it won’t make much sense to do so. Thankfully, opting out of EIP is easy with Capture One: Either use the “Unpack” option in Session mode, or import your EIP files into a Catalog.
Best regards,
Sascha
www.saschaerni.com
Sascha Erni
Based in the lovely mountains of Switzerland, Sascha works freelance as a photographer, writer, and copy editor. His new book “Praxis Capture One Pro” (dpunkt.verlag) / “Capture One Pro: Mastering Raw Development, Image Processing and Asset Management“ (English translation, Rocky Nook) will hit book stores this Summer. When not taking pictures for newspapers and corporate customers, Sascha enjoys photographing odd things most people would never consider worthy of a photo to begin with.


Hello Sascha,
do I understand correctly that you never actually delete the culled images, i.e. they also end up in the catalog on your workstation? Or do you somehow filter on catalog import?
Btw, I’m very much looking forward to the book. Just preordered it.
Cheers
Chris
Hi Chris,
I usually keep images marked with red, but go through my catalogs from time to time to prune those red-flagged files. Main reason: You never know whether future versions of Capture One or other RAW developers might save an image I’d consider unusable today. Just think of the leaps in the Shadows / Highlights tool and Noise Reduction going from C1 6 to 7, then 8.
As a reportage kind of guy, it’s often more about image content than, say, quality worthy of a Fine Art exhibit.
When pruning those red-flagged image files, I delete by content – is it a shot in a series where I already have a better version in my archives? Is it an LCC shot for a lens I don’t use anymore? Is it a ColorChecker shot? Hit the release by accident and I have a glorious image of the insides of my photo bag? That sort of thing.
Hello Sascha
Always very interesting to hear how the pro’s are working.
I knew there are key shortcuts for red and green, but have never able to find any information about which keys. And to be honost, never tried to check by trying.
Do you know about other shortcuts for color tags, eg how to delete any color tags.
br Per Ulrik
Hi Per Ulrik,
you can change your keyboard shortcuts for colour tags using “Edit Keyboard Shortcuts” from Capture One’s main menu. The colour tags are to be found in the “Adjustments” section; by default, C1 uses + for Green, – for Red and * for Yellow.
So, if you’re used to e.g. Lightroom’s x key for rejecting images, you can remap the Red label to x in Capture One.
Best,
-Sascha
Hi Sascha,
My workflow is very similar to your workflow, beside of the fact that I´m not on the road but using sessions when arriving at home a editing the pictures I´ve shooted. I use sessions, because I wanna use my fast SSD for editing and when finished import into Catalog, where the pictures and the database is stored on the NAS.
This works well, but I have one question, as I do not have a solution for this:
The editing in the session is finished, I do import all pictures to catalog (never do delete a picture!) and pictures and adjustments are copied to NAS. Now I want to edit some pictures again. I have to do that in my network catalog now, which is slower than editing on SSD.
I didn´t find a solution to edit the pictures a second time inside the session and import again in catalog when finished, because this does not work with C1. I can´t import a second time, as there is no option to import only changes to picture adjustments without the pictures itself.
Thanks
Martin
Hi Martin,
I ran into the same problems once I used C1’s catalogs more often. My solution might not do it for you, it’s feasible for my line of work though:
I keep the running month’s images on the SSD and only move them to the NAS once a month. I usually don’t need to re-edit files which are older. In most cases, I wouldn’t be “allowed” to anyway (that’s the version the client paid for, that’s the version that got published, no need to fiddle with it later).
I haven’t run out of SSD space yet, but then, I never have needed more than a couple of hundred shots per job. Sometimes, I walk home with 5 exposures for one event, that’s it.
Btw, that’s the main reason behind the EIP paragraph – I *need* to be able to transfer both files and settings easily to the NAS. That’s no issue when I use a C1 catalog, with Media Pro though, EIP is more robust.
You can have both SSD and external HDD/NAS in the same catalog. That’s the way I use it: I have a folder “C1_incoming” on the SSD, work there, and move the images onto an external USB3 HDD when done. All in one catalog – C1 works just fine when most of the images are offline, and you can even connect the external drive while C1 is running.
Chris
Hi Chris,
that sounds reasonable, so you work without sessions, using only Catalog. But where do you have the Catalog database?
Second question: How do you move the original pictures? By moving them inside C1? I think this is the only way, as otherwise you would loose the link from C1 to the pictures.
Thanks
Martin
I have the catalog on the SSD, too, so I can always use Capture One even without the external HDD. This might be a space problem, depending on the number of images you have in the catalog. I’m currently at 22000 images, and the catalog takes about 50GB.
You must move images within C1 only, otherwise the references are lost. (I think can can somehow reassociate lost references, but I prefer to avoid the problem right from the start).
Chris
Chris,
I can imagine, that works for your workflow, but mine with a laptop and a desktop is a little bit different, therefore I tried using sessions.
So far, the solution Sascha described, is that one, which works for me best. I made only one mistake, what I realized yesterday, where I misunderstood what Sascha wrote. I tried to import the local session into the network catalog and that does not work well. Much better is to import the pictures instead, like described by Sascha.
Thanks for the great discussion here on this topic.
Hi Sascha,
I don’t usually read the promos sent by C1 but yours looked promising. I’m glad I did. I haven’t completely committed to C1 yet still using LR. But after reading your blog post I am closer to pulling the trigger. I no longer do much work for hire but still do lots of personal shooting. One of the things I have never been good doing is post shooting organization but I really like how you use sessions to speed up your process. Now this will sound like an amateur question but I am not familiar with eip file type. What is it and how do you get an eip from a raw file and when are ready to import to the master catalog do you import both eip and raw file? I am it’s in your post and I just overlooked it. Thank you in advance for responding.
Sincerely,
George
Hi George,
EIP stands for “Enhanced Image Package” – it’s comparable to a ZIP archive of the original RAW file and all sidecar files Capture One uses for this particular image (LCC profiles, settings files, ICC profiles etc.). In short, instead of one original RAW file plus 3+ sidecars in different sub folders you have one EIP file containing everything needed to transfer all metadata and settings made in a C1 session.
The introductory article from 2012 is still valid:
https://blog.captureone.com/eip-file-format-enhanced-image-package/
Mind, I don’t know whether Phase One will continue to support EIP in future versions a couple of years down. The main reason I still use it is Media Pro; if/when C1 caters for all my cataloging needs, I’ll probably ditch EIP.
Cheers,
-Sascha
P.S.
Sascha, one last thing. One reason I haven’t switched to C1 is I can’t figure out how to setup a file rename template that will allow me to retain the original file number. I typically do not re-number my files because I want to keep a running count across shoots of how many images have come from a specific camera. I typically rename files (in LR) with original-date_job_original-file-number. I have not found a way in C1 to retain the original file number. Is there a way to do this that I am just not seeing?
Thanks,
George
Unfortunately, that’s not possible at the moment. You’d have to include the full original file name.
Phase One has extended C1’s tokens from version to version, though, and I think “Original File Number” would be an excellent addition. 🙂
Cheers,
-Sascha
Thanks for responding Sascha.
Gibt es den Text auch auf deutsch? Es ist schwierig genug, den komplizierten Vorgängen zu folgen. Dann auch noch auf englisch, ist mir kaum eine Hilfe.
Viele Grüße
Eva
Hi Eva,
Unfortunately we haven’t got a German version of the blog. We will look into the possibilities of changing that.
All the best,
Gitte
Moin Eva,
ich arbeite an einer deutschen Übersetzung und häng die dann – with Gitte’s approval – in meinen Blog. Ich hoffe, ich bin bis Donnerstag oder so damit durch.
Cheers,
-Sascha
Hi Sascha,
Sounds like a great idea to have the post in German on your blog.
All the best,
Gitte
Okay, deutsche Version ist online:
http://www.nggalai.com/blog/capture-one-pro-unterwegs-zeit-sparen-mit-sitzungen/
Fragen, Kommentare, Anmerkungen etc. gerne hier oder in meinem Blog. 🙂
Cheers,
-Sascha
DAaankeeee!!
Das wird mein Lieblings-Blog.
Beste Grüße
Eva