So you’re heading out to shoot a panoramic series of images, knowing that Capture One’s latest development can stitch them all together into one seamless photograph when you import them, right?

Well, while Capture One’s new Panoramic Stitch is an impressive tool, there are a few things you can do to help get the very best results and most of them are actually at the point of capture. Keeping that in mind, we’re going to detail a few tips and tricks to get the most out of your stitched image, and how to choose the right projection setting for your chosen subject.
The process of capturing a sequence of images can be as simple as panning across a single row of 2 shots to blend together into one larger view, through to catching multi-row, 360º “tiny planets” with all the gear that’s needed to do that accurately.
Equipment
The first thing to say is you don’t necessarily need any additional equipment to get a good stitch in Capture One. It’s been tested and proven on a full range of scenarios from hand-held panoramic sequences, drones and phone cameras, to calibrated panoramic heads with full-frame medium format camera systems installed – and it does a good job in most cases.
However, you do need to ensure that your tripod, and camera, are level and can be turned without altering that angle. If your tripod doesn’t have a bubble/spirit level built-in (ideally one on the legs and one on the top of your mounting base), you can grab one online for a few dollars from most stores.
To get started on the right track, you’ll have either a ball-head or a geared head with the ability to lock and unlock panning movement independently of all other axis. This is to ensure that your motion is restricted to only one plane unless you choose to shoot a multi-row series.
In essence, that’s all we need to get started – that, and a solid baseplate (or L-bracket, more on that later) to allow you to keep the camera stable – and then, you’re pretty much ready to shoot, apart from one small thing…
The Parallax Effect
What all stitching software, often, battles against is something known as “parallax” – that is, the way that objects appear to move in relation to each other as the camera turns and looks around (kind of like when you want to look behind an object, you look to the left or right of it). The problem with Parallax is that it positions subjects and items in different relative positions from one shot to the next. So as you turn, the objects in the frame move, so any stitching tool then struggles to blend the images together (after all, things have moved around from one image to the next).
The reason for this is that your baseplate position, by default, will be under the sensor plane of your camera. Essentially, as you turn the camera to capture each frame, the lens is rotating around the sensor (or film) – allowing items to appear to move in the recorded image. The fix for this is to shift the “nodal point” of the camera forward, to near the front of the lens, so that the sensor/film is now rotating around the lens. This stops those objects from moving around as you rotate from left to right, but the problem is your baseplate attaches under the camera body.
And this is what a “nodal rail” is for. Essentially, an elongated baseplate, that allows us to position the camera body back off the edge of the tripod and have it rotate around the lens itself, the front of which now stays in the same position.
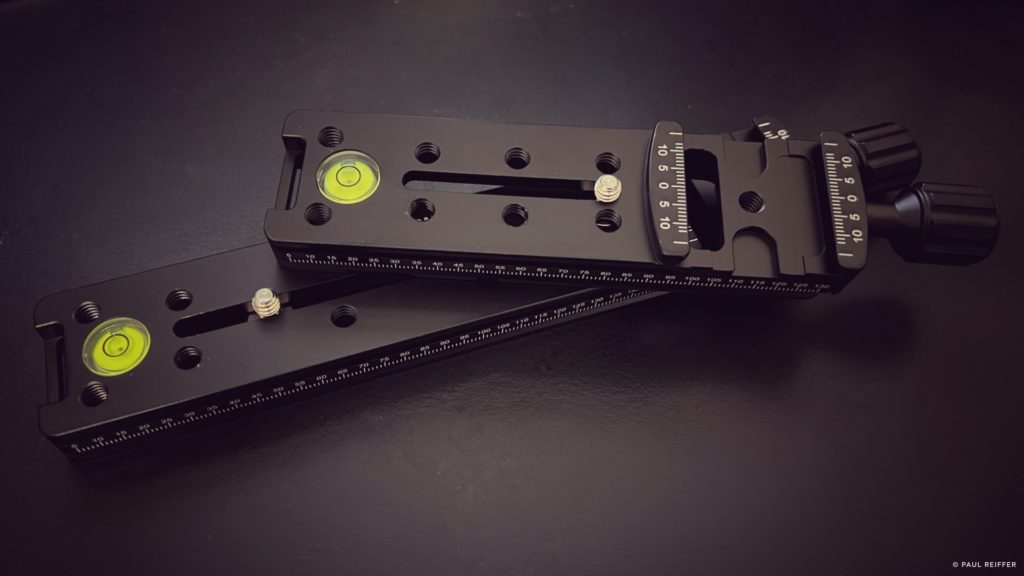
It’ll take some trial and error to find the exact position, but if you’re shooting complex scenes, this movement can make the essential difference between a perfect stitch up-front and having to find and “fix” a lot of things in post processing after.
Shooting Style
When shooting a series of panoramic images, you need to lock down as many settings as you can – and that means employing manual mode. You can’t expect software to join three or four images together if they have completely different apertures, shutter speeds, depths of field and ISO ratings, so we need to shoot consistently.
Set your camera to the middle brightness of your chosen scene – especially if shooting during golden hour. Not the brightest side, not the darkest side, just the middle – but know your camera well enough to be able to make a call on how bright to meter the exposure.
Lock in your triangle – shutter/aperture/ISO and start shooting at the darkest side of the scene, ultimately following the light as it dims. You’ll want to include a 40-50% overlap from one frame to the next and keep an eye on the horizon to ensure it’s level throughout. Be wary of moving objects (maybe even take notes if you capture them to review after everything’s been stitched) as they can be problematic.
And then click away.
Most panoramic images will remain under 180 degrees of total view – any more than that, and we have no choice other than to accept distortion – but feel free to play with as much of the scene as you need. It’s always better to overlap a little more, and take a few more frames, than you think you’ll need as you won’t be able to go back to re-shoot in exactly the same scenario again.
Vertical and Multi-Row
Of course, this all works for a single row of images, shot horizontally each time – but it can lead to a very long, thin, panoramic image that has very small amounts of headroom and foreground.
For a more pleasing aspect ratio, consider mounting your camera vertically (using that L bracket I mentioned) to take taller “slices” with each frame, allowing for a taller output when they’re all put together with more to look at overall.
And if that’s not enough, consider shooting “multi-row.” There are tools out there that connect to your nodal rail (or nodal rails with a sidebar built in) to accurately manage shooting multiple rows, but it can equally be achieved with a level tripod and geared/measured ball-head:
You’ll shoot one row level, one row looking up (with the same 40-50% overlap but this time on the horizontal side) and another row looking down (again, with 40-50% overlap to the level row). Of course, if you’re following the light that’s fading or growing, this is where a dedicated, staged, sidebar can help and it will allow you to shoot multi-rows, accurately, but one vertical slice at a time for better blending – but even without one, it’s still possible to stitch the results together to form a giant image.
Processing
On initial import, there are a few things to get right.
Apply your lens corrections – including sharpness and light falloff recovery. If your lens vignettes at the edges, the stitch will appear “bumpy” as it tries to blend from light (middle) frames to dark (edge) frames in the final shot. The same applies when considering sharpness at the edges of your lens.
Once corrected, select all the relevant images, and choose the Stitch to Panorama tool from the right-mouse-button menu.
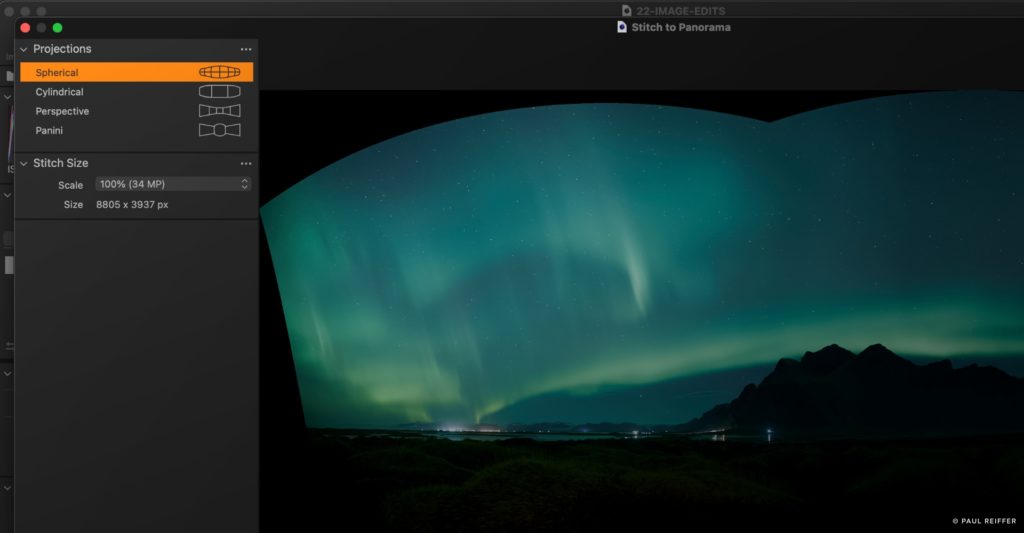
You’ll be presented with Capture One’s stitch window, with the following choices of projection settings – which are based on what, and how, you shot the sequence of images you’re using:
Projection Types:
Spherical
If you’ve shot a multi-row sequence of images with a huge field of view, this is most likely the only projection that will deliver the result you expect. Allow for the fact you’ll possibly need to crop some areas out once complete, as the edges will be rounded, but it’s the go-to for ultra-wide (and tall) vistas. This projection can deliver slightly curved horizontal and vertical elements as a result of the stitch, so you may need to re-process the output to achieve architecturally perfect results where such lines exist.
Cylindrical
If you’ve shot an ultra-wide series of source images in a single row, the cylindrical projection will deliver that entire view while keeping vertical elements straight. If the camera was kept level, it’s unlikely you’ll see any curvature on the horizon, but do keep an eye on this just in case.
Perspective
Imagine you shot your view with a 10mm lens, instead of the 50mm one that you really used. Essentially, this projection stitches your source images together in a way that represents the view as if a single wide-angle lens had taken it instead. It’s not recommended for ultra-wide vistas (as the distortion at the corners can be huge) but for views of <120º or so, it can deliver a natural result with straight lines in all directions. (Just be ready to crop a lot in the middle of each edge).
Panini
If you’re shooting into the distance with converging lines and/or a vanishing point, Panini is like combining the Cylindrical and Perspective projections together. The result is that those lines will stay true to reality and straight while at the same time not pulling too far at the edges of the frame, bypassing the need to crop out so much.
Therefore, the best thing to do with most images is try each projection out in turn and decide what’s most suitable for that shot, on that day, in the way that you took it.
Output Size
Once you’ve settled on a projection type, consider how large you want your output to be. While it’s tempting to use the largest possible resolution, consider a multi-row scene of 100MP images (5 on each row):
Even with a 40% overlap, that’s going to deliver an image approximately 540MP of stitched output, which may slow down your computer while processing the final adjustments.
Try to keep your outputs to under 600MP for most systems, bearing in mind the absolute maximum Capture One will deliver is 715MP (up to max. 65,000px wide or tall).

Get Shooting
Do you need extra equipment to be able to shoot awesome panoramic images? Of course not! Capture One can help even a basic camera, handheld, to achieve a great result.
However, will your final image benefit from properly finding the rotation point of your camera and lens, mounting it correctly on a stable tripod with a nodal rail and capturing each frame carefully with a suitable overlap?
100% yes – each and every time.
Paul Reiffer
Paul Reiffer is an award-winning photographer and landscape artist. Specialising in grand vistas, electrifying cityscapes and iconic views; his images have been published all around the world in well-known books, newspapers and magazines as well as supporting global travel and hospitality brands to reach and excite their audiences.
His technical expertise is regularly called upon for editorial features, and through his luxury workshop programme as well as online channels, he’s carved out a unique style of teaching that is now appreciated by thousands worldwide. Shooting with ultra-high-resolution Phase One cameras, his limited edition fine art prints are designed to wow customers and designers when placed into bespoke spaces, while his work is used commercially by clients ranging from National Geographic, British Airways, Marriott and many more.