
One thing that I keep getting asked is, “Why would I switch over to Capture One Pro 8 from what I’m currently using? What does it do better than what I already use?” It seems as though a lot of people do not know that different programs process raw files differently. If this was news to you, then this article is for you!
I was missing out
It’s only in the last few years that I’ve been using Capture One. Before that time, I was oblivious to the benefits. As I started working in the commercial world, photographers seemed to use Capture One, for tethering and processing. I started using Capture One and was surprised at how colors rendered. I couldn’t believe what I was missing out on all of those years before. I initially thought that it would be an undertaking to learn a new program and that the benefits couldn’t be worth it. Still in denial, I thought whatever the difference might be, I could surely make up for it within Photoshop.
Worth the effort
I was completely wrong. Not only could I not make up for it, I couldn’t get anywhere near what Capture One was getting me in regards to how it processed colors. The reality is that it processes them so much more realistically than the current (and most popular) choice for processing RAW files. In fact, going back to the raw converter I was using before makes me realize just how much of an uphill battle it was trying to achieve beautiful color tones in my images. I was doing myself a complete disservice.
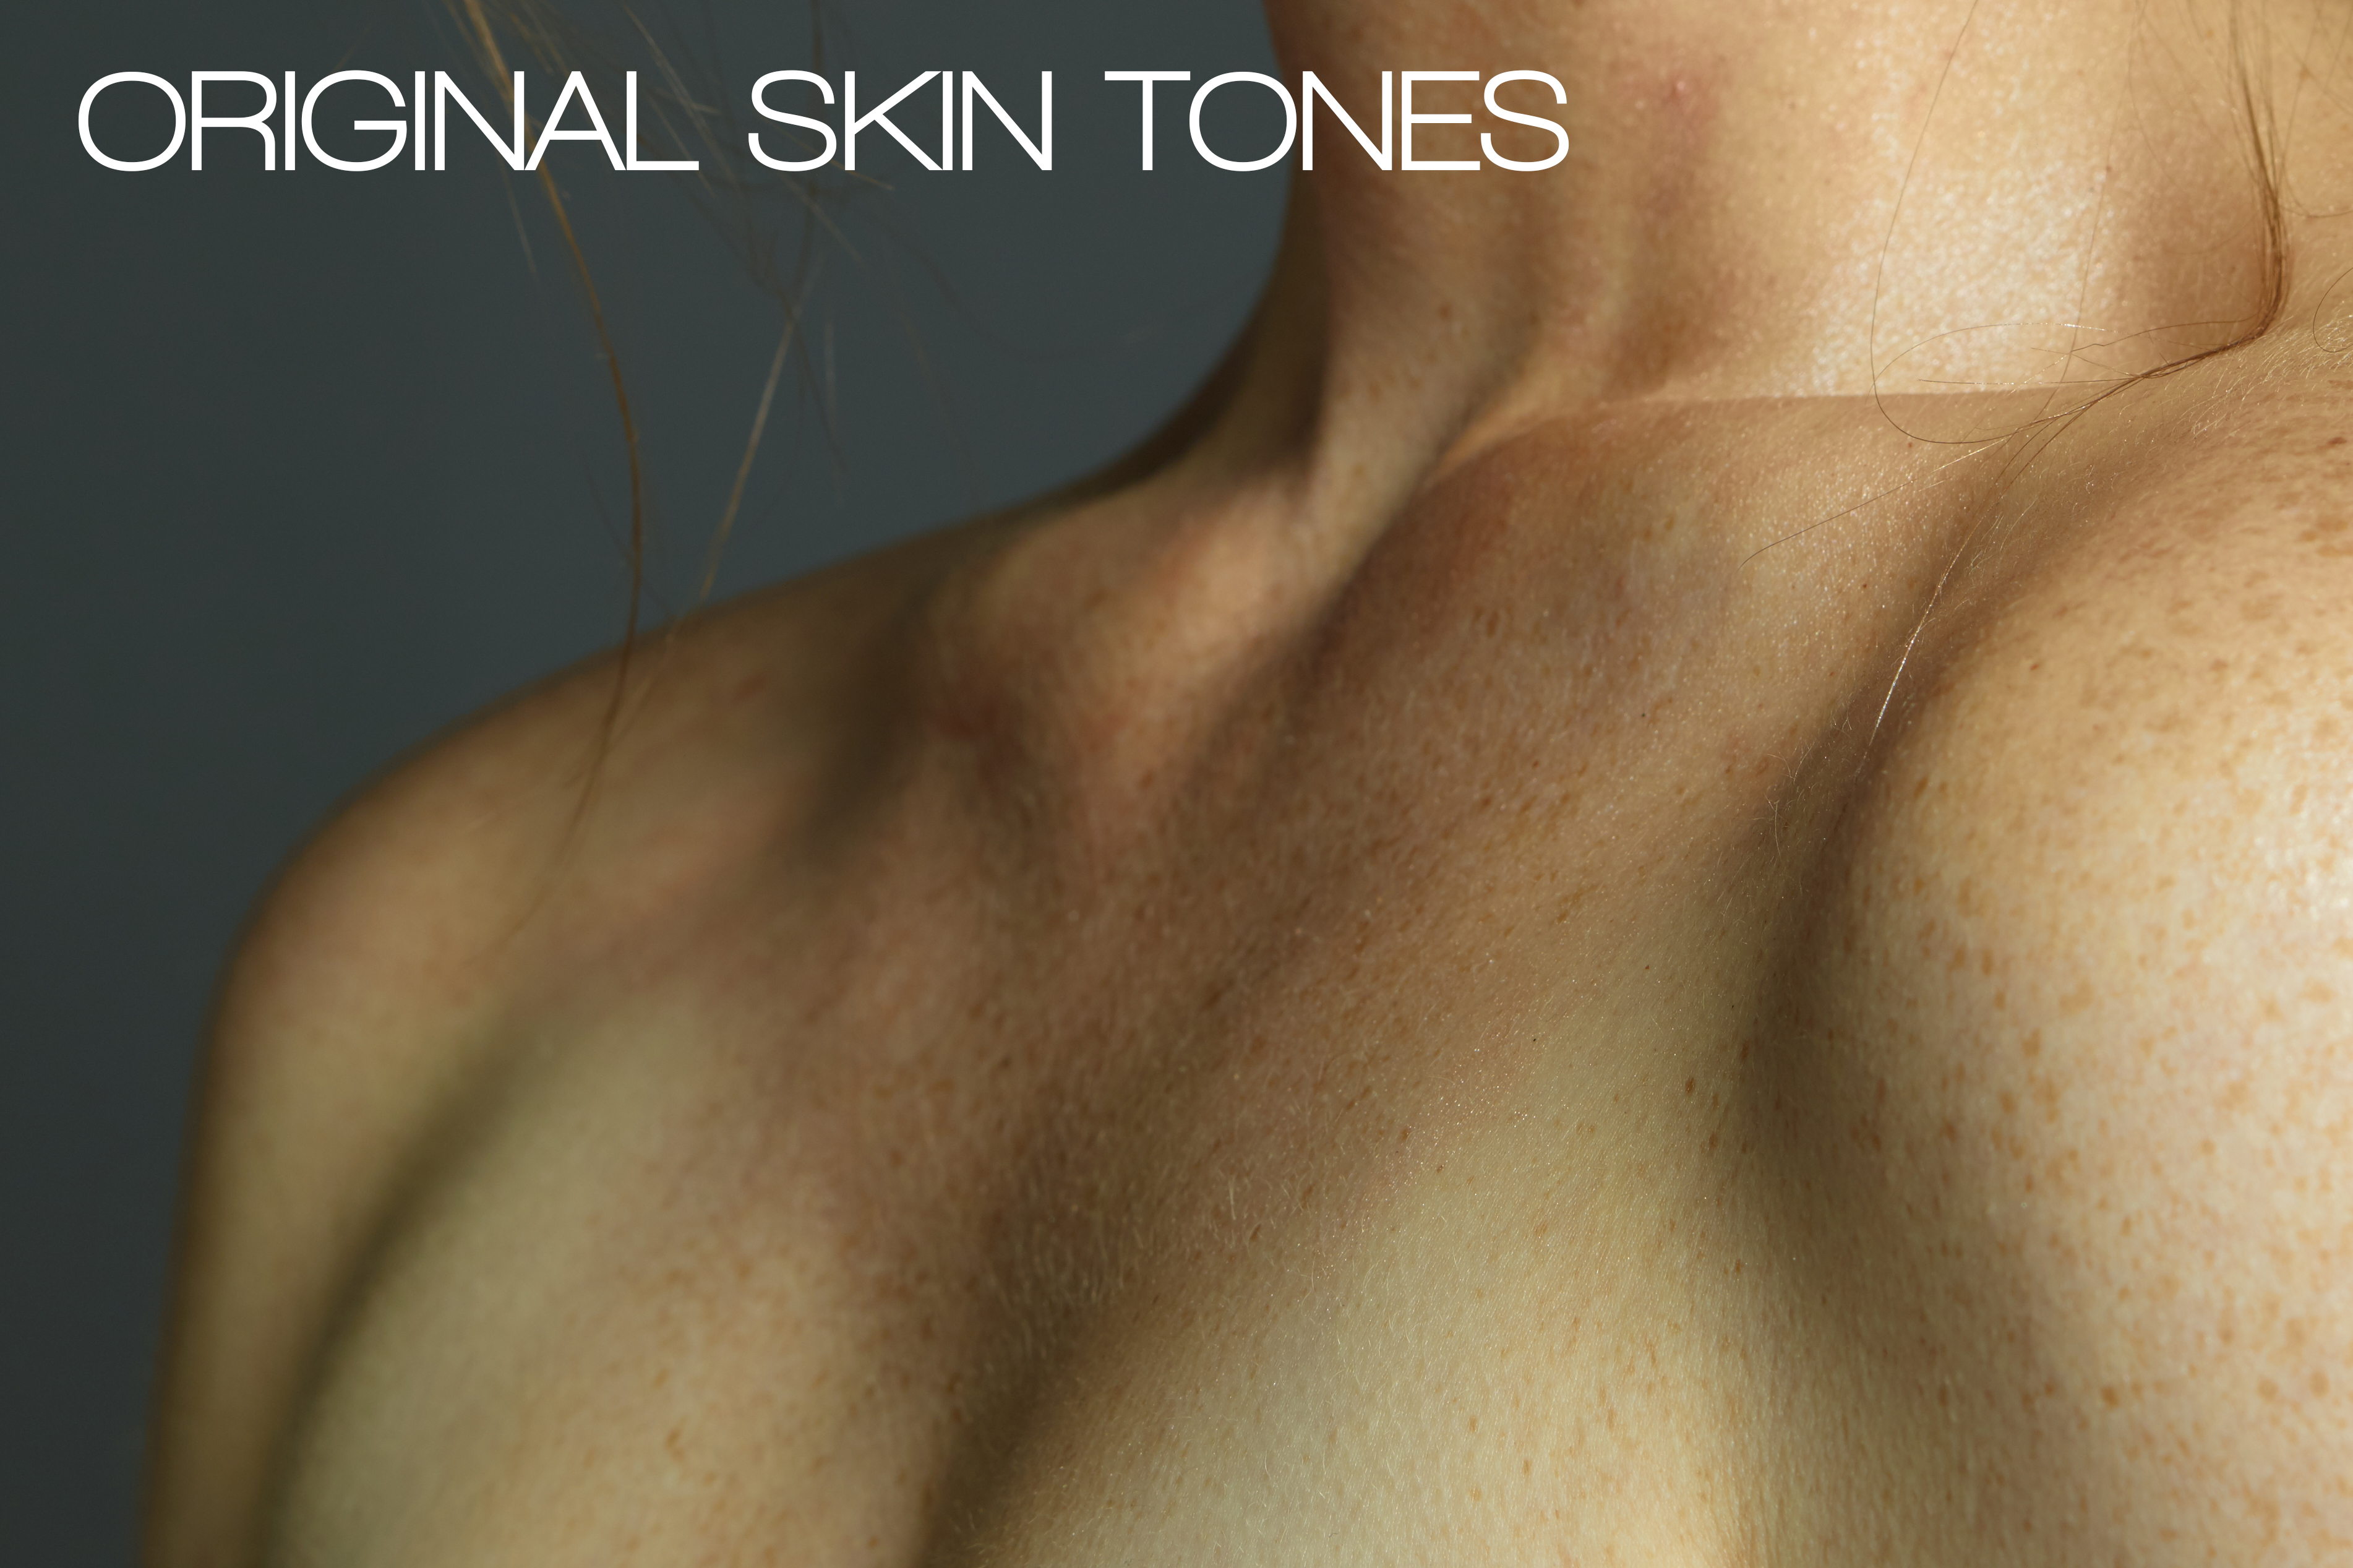
Let me show you first hand. Photographer and friend, Michael Woloszynowicz, has kindly allowed us to use his images to showcase the difference.
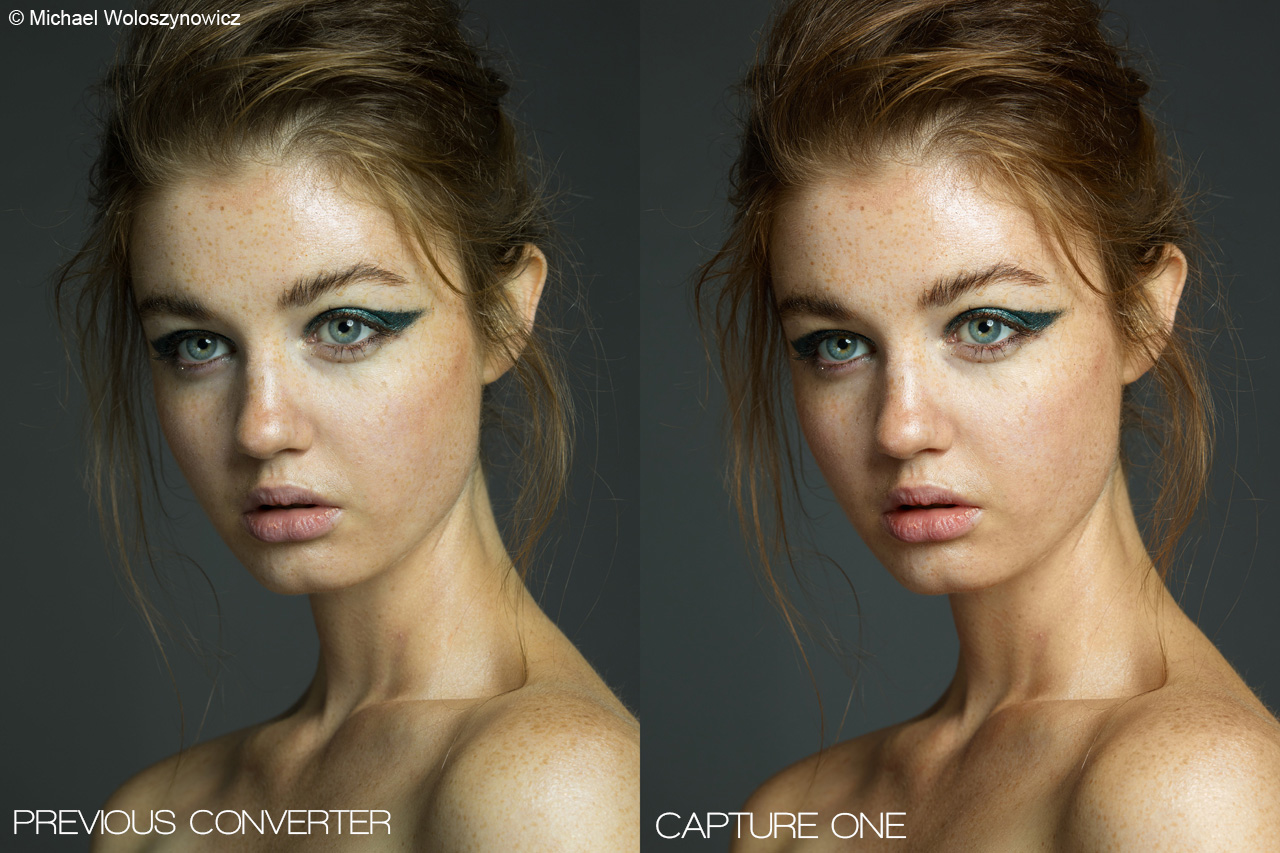
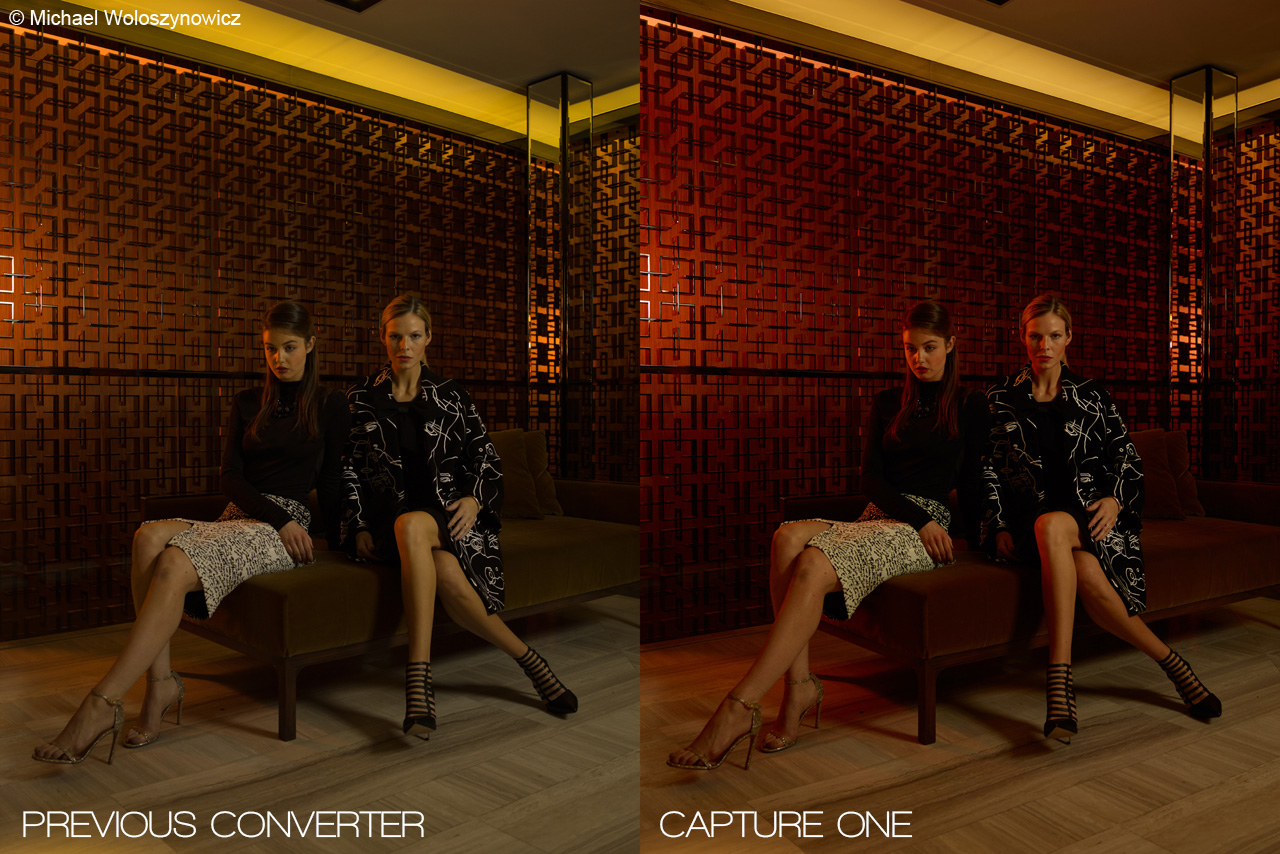
The two images seen here are imported as is without any settings. As you can see, the image on the left was processed in my previous raw converter of choice and it comes up muted and falls short while the Capture One processing algorithms show us how vibrant and pleasing the tones of the image are. This is before any sort of customization whatsoever. Depending on the image, the discrepancy varies much more…..sometimes, shockingly so. For instance, here is another example shown below.
When I get asked how I got my colors a certain way, the answer is unmistakably that I just started with a base from Capture One. Then when I apply further color grading, it becomes apparent why a good base is imperative. When I show them the difference, they tend to have the same reaction I did when I found out.
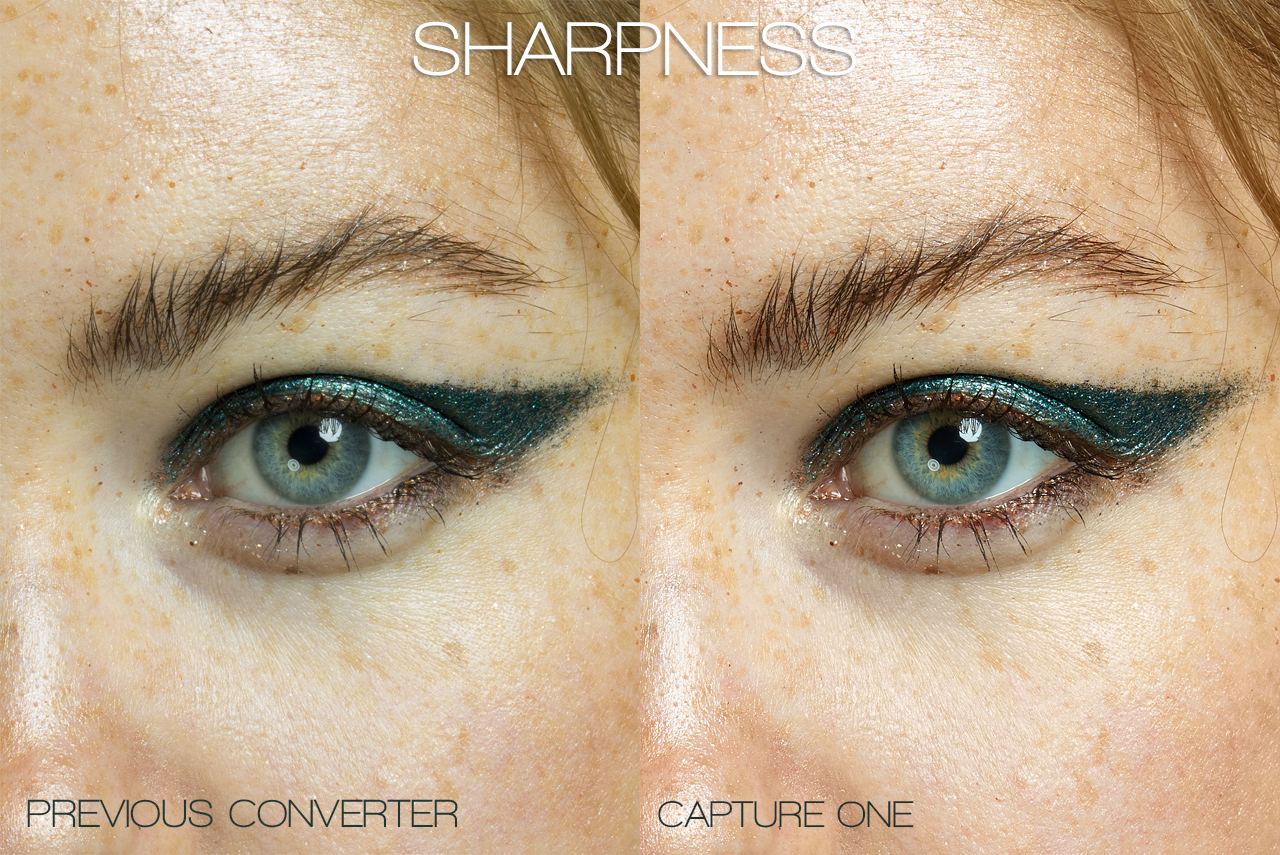
The other difference is how it handles sharpness and clarity through the image. You can clearly see how much sharper the base file is with Capture One within the image. You can even see a difference with the contrast. The brilliant clarity resolves much more detail than what I would get before.
The game-changing tool
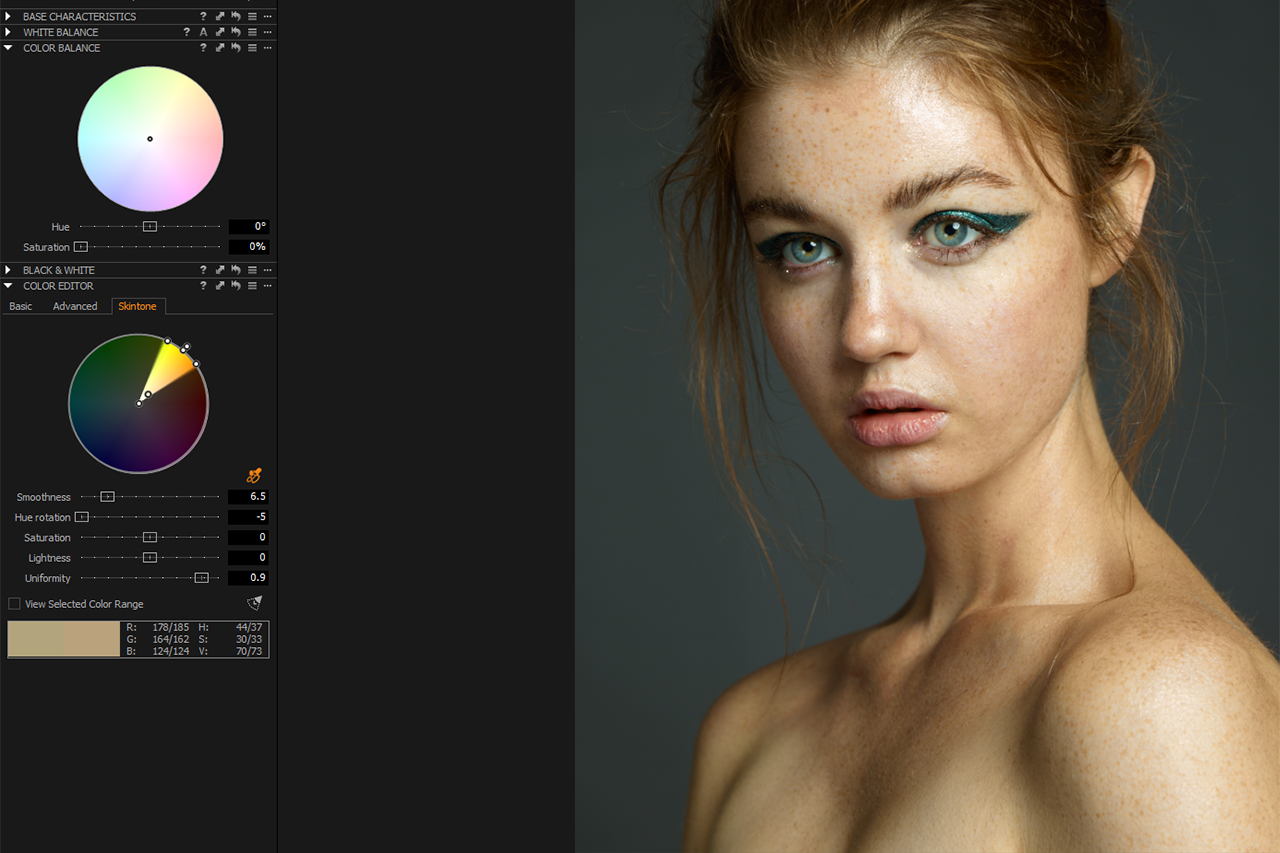
The game-changing tool in Capture One Pro 8 is the color editor. The color editor allows you to correct offending skin tones that need to be corrected. The eyedropper tool on the bottom right of the wheel allows you to select a very specific skin tone and tweak exactly how it will be modified.
For instance, you can pick a green tint and move it to a red tint, which would blend in closer to the skin range of the image. The smoothness slider allows you to pick whether or not you want just the color you picked, or any neighboring colors to be modified at a lower capacity. The hue rotation slider gives you the ability to move the offending tone closer to its neighboring colors. In this example, a green tone is moved to reflect a beige tone. The saturation and lightness tab adjusts exactly what they say.
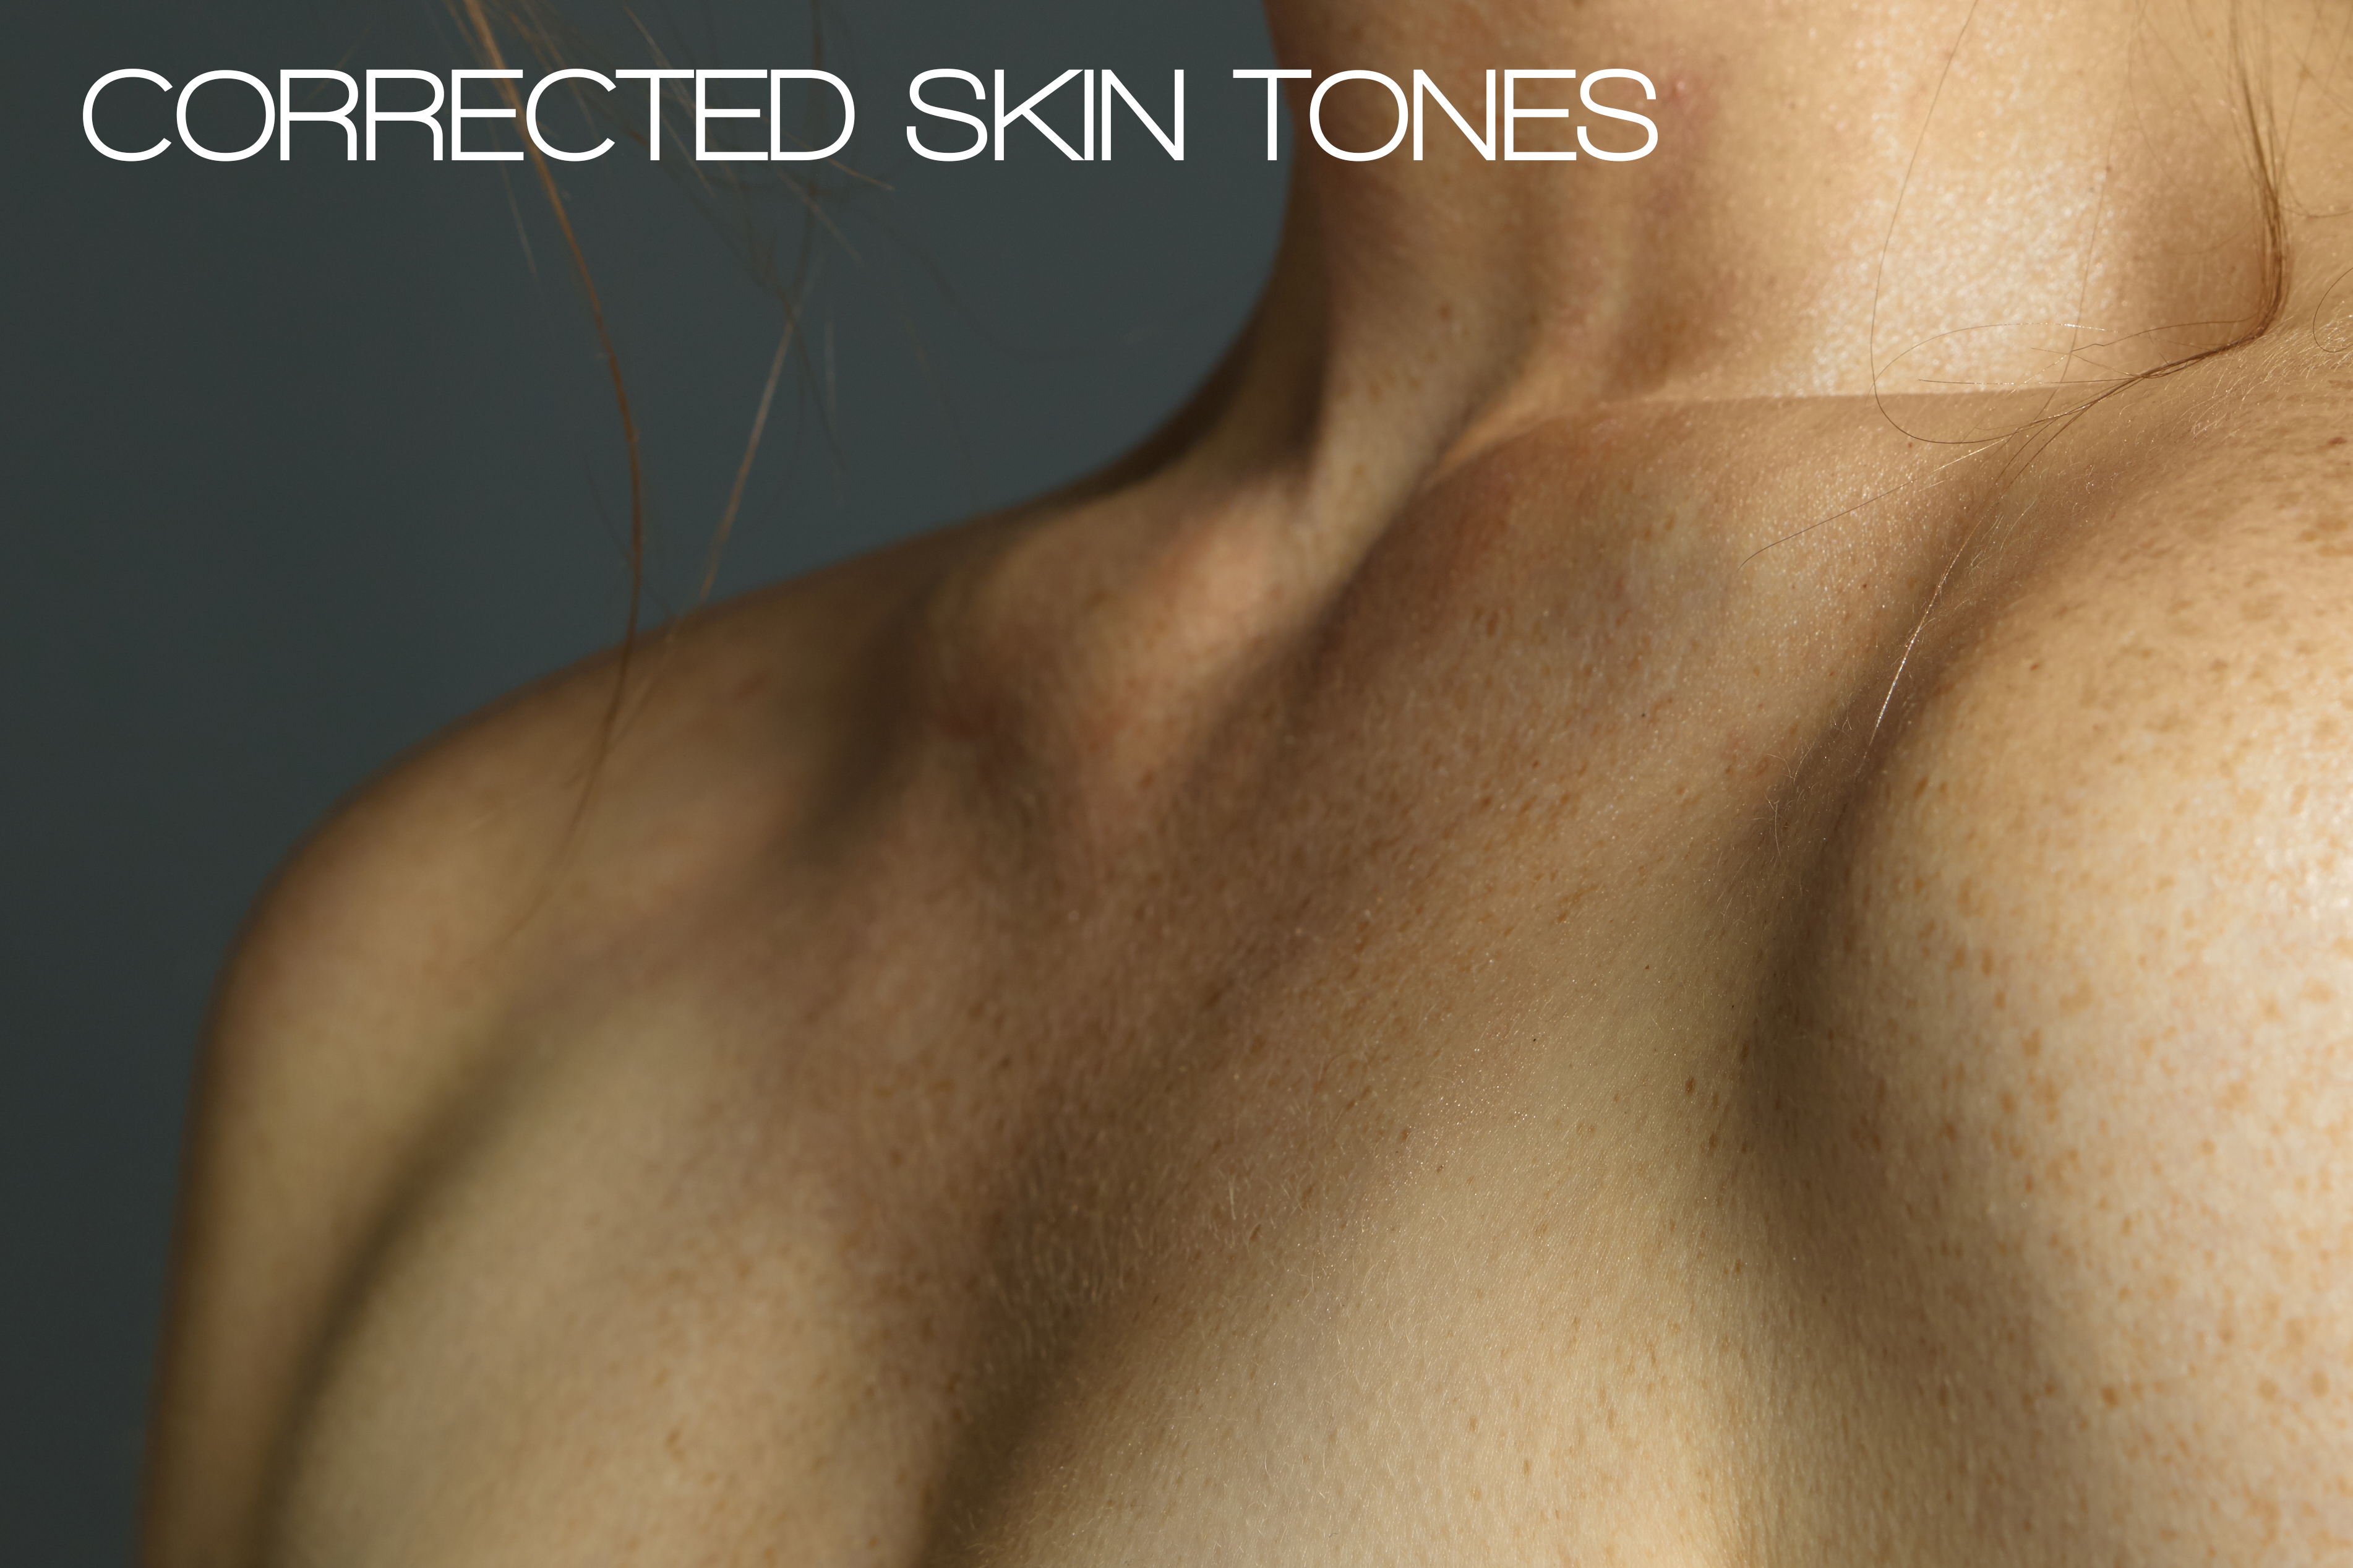
The uniformity slider is my favorite
This slider brings all the tones in the selected range closer to one similar tone. So if you have an issue where an image is rendering 5 varying tints of the same color, you can bring them all together without affecting texture, luminosity, or vibrancy. It really saves time in your retouching workflow once you begin working on it. Before, I would spend a much longer time color correcting skin tones in Photoshop. This delicate attention before-hand saves me time and gets me a far more accurate result.
Again, for example, with the settings shown in the image above, here is a before and after of what the edit accomplished.
Before:
After:
Ultimately, the way Capture One Pro 8 handles the fidelity of colors is far better than anything I have seen thus far. It is further complimented by the ability to specifically control each color in the image with purpose built tools. The sharpness and clarity that pair with the color control is a perfect match. This total control is really something that should excite anyone that cares about their images.
Best regards,
Pratik Naik
Solstice Retouch
Want to learn more about Pratik’s work? Sign up for the upcoming webinar, where Pratik will take us through his Capture One to Photoshop workflow.

Pratik Naik
Pratik is a commercial and editorial high-end retoucher with a passion for pixels. His obsession with retouching is a passion and profession. Being able to harness the potential of RAW files and see it through to fruition gives him a lot of joy. This joy comes from the ability to work with photographers from all walks of life, to come up with something that is a collaborative effort. They entrust him with their RAW files, and he massages them into what they envision.


Thank you for this article!
Let me start off by saying that I too love the colors I get from Capture One. But for truth’s sake I want to add a few bits about the “currently most popular RAW converter”.
First, yes the out of the box setting (camera profile) is not very pleasing and the samples show it. BUT for most cameras you get a whole range of additional profiles of which many can be very good.
Secondly, and that’s another part many miss, those additional profiles emulate the given camera’s own color rendering – extremely close. So if colors are still off, it’s more the camera manufacturer’s fault than the RAW converter’s.
I find for instance Nikon’s rendering of skin tones pretty bad, especially in mixed light. The “popular RAW converter’s” profiles show exactly that.
Olympus colors on the other hand I find very pleasing and again the profiles emulate just that.
As I said, C1’s color rendition is most always great – right out of the box and at least that is a huge plus!
Thanks Pratik.
When you first open an image in Capture One you are taken aback by its presence.
I would love to see someone publish a workflow tutorial, from culling to edit, on how to successfully implement C1 for weddings. I still use LR only because it ease but I want to make the transition as soon as possible.
Adrian Weinbrecht made a great 3-part workflow tutorial for C1 v7. While it’s not wedding content, it was still the best C1 tutorial I’ve ever seen as it dealt with real content from capture to hand-off. The first part is here: https://blog.captureone.com/data-love-by-adrian-weinbrecht/
Thanks Brett, I’ll take a look at it.
I think one of the biggest problem is trying to transport my current workflow which is based the way LR works into C1. I am so used to the way LR works that I expect to C1 work the same way. Which, I think, is the wrong thinking.
That is why I have been trying to find wedding photographers that use solely C1 for the wedding workflow and see how they do it. (Specially one that used to use LR.)
Thanks, I’ll check those tutorials out.
Ok, I will look for a Wedding Photography to partner up with me on a webinar. How does that sound?
David
Thanks David, that would be awesome and very helpful.
I would agree with David Medina — it seems a daunting task/learning curve to go from the LR workflow to the C1 workflow — even for all the benefits. So yes, a workflow tutorial, if it does not already exist, would be a great and welcome addition to adopting C1 in my workflow.
I agree that the workflows of LR and Capture One are very different and it can be difficult to adjust.
But once you start to get the hang of it, you realize that Capture One is MUCH more intuitive and natural. You are more un-learning Lightroom and its convoluted structure.
Capture One, Aperture and many others have similar workflow, whereas Lightroom is trying to do everything and usually nothing very well. I mean they crammed VIDEO EDITING in there too. Ummm no thanks.
Chiming in here as a previous user of Aperture 3. I agree, Capture One was such an easy transition. Lightroom is super convoluted! I never understood how people could finish sets quickly with it. Ease and Lightroom were never synonymous in my mind.
I agree with David and Andrew. I’m a LR user only because of speed (and a smarter gradient tool). In every other aspect C1 is superior starting just from raw conversion and camera profiles. So I think a marketing plus for Phase One would be to create and publicize a tutorial series targeted to LR users, to demonstrate theme both the end quality and how we can speed up the workflow.
Hi Carlo,
Thanks for the suggestion and I will consider it very carefully.
The advice is good earlier on in the comments about trying to compare too heavily. Capture One and Lightroom do have somewhat different workflows (LR modular Capture One not, for example)
I did stage a webinar about using Capture One and Lightroom together, if you wish to Catalog in one and process in the other. Of course a complete Capture One workflow will always be faster than a hybrid, but I appreciate you might want to combine both.
But thanks again and we shall consider it!
David
To quote Pratik’s friend Michael Woloszynowicz “…abandon your comparisons to Lightroom and treat it as a new application.”
The learning curve isn’t as intimidating as the GUI appears; it’s actually very intuitive.
Michael also has a great video on how to get started: https://www.youtube.com/watch?v=m6KqYfjVt50
Completely agree Steve.
My goal is not to compare but to see how a wedding photographer has implemented a C1 workflow successfully. If it is someone that used to use LR and converted to C1 even better as he understand the mindset change required.
The main hurdles I am trying to overcome are:
(1) most tutorials are aimed at commercial or portrait photographer. As a wedding photographers we handle thousands of images just from one wedding. We need to “normalize” them quickly to send proofs to our clients.
So in a way I may need to set up: one for normalizing images that take advantage of presets and recipes, require minimum of tools, quickly applying one set of adjustments to many images, and finally that I can renumber and export images filtered by keywords. And a second set up where I refine and finish images for album use. Most of those images go into Photoshop so exporting them as TIFF would be fine.
(2) LR seems simpler to use and less daunting. I am sure that getting comfortable with C1 as I am currently with LR is just a matter of getting use to it.
(3) In LR I use Develop Preset quite a lot to save time. Not as effect but to apply basic adjustments but to quickly deal with common problems.
(4) I need to better understand the copy and paste more as it is a feature that save time.
(5) Keywording, filtering, sorting, etc are areas I need to understand better in order to cull my images faster. Maybe the right option for culling could be using Photomechanic and C1 strictly for edits.
Hope that helps.
I will admit that the library, keywording and DAM in Lightroom is much better than Capture One.
If that is crucial for your work than LR might be a better choice. Also, I do like the way LR does B&W images in both tools and output.
But pretty much everything else you need to do, you can do in Capture One and usually better.
And BTW, presets are called “styles” in Capture One. Same concept. You cannot buy VSCO or whatever trendy film presets for Capture One, because users typically don’t want to use that stuff when they see the color and quality they get.
If you really want the vintage look or whatever, it’s super easy to create styles that are similar.
I switched to Capture One 8 from LR and it was not a huge learning curve at all. In many ways the workflow is very similar to LR.
As a Raw converter CO8 has superior profiles for pretty much any camera and lenses including difficult profiles like Fuji and Leica. LR only does well with Canon’s. Editing color is powerful and precise. Also isolating specific areas for editing via layers is the killer feature IMO.
The only drawback for some will be the lack of 3rd party color presets. Many LR users have become totally dependent on 3rd party presets.
I think it’s actually a “great feature” that in Capture One you don’t have to rely on VSCO filters just to get the color halfway decent.
The film look and vintage presets are a fad anyway and it is thankfully going out of style.
Look at how Instagram has matured. Did you really wanna see any more purple-tinted Holga simulations of what your friends are eating? God no, because it became the “autotune” of visual arts. 9 times out of 10 it is used to make up for lack of skill or creativity.
Sorry, just had to get that off my chest. Really rubs me the wrong way when I see someone with a D800 or 5D Mark III and great lenses put all these filters on their photos to try and make their pictures look like they were shot in 1970 with a broken plastic lens.
ENOUGH. Let film rest in peace for god sakes!
I stand on the other end of the spectrum. I imagine the photos you’re talking about being grotesque light leaks and cheesy filter. Those are completely passé anyway.
I feel that photos paired with great VSCO or VSCO’esque filters let you digitally achieve quality shots. It is more of an extra layer to the artistic flare of the photo. Granted, don’t botch up an entire set with unnecessary amounts of abnormal color shifts and such, but I think there is more credit due to that side of post processing.
I found an excellent webinar from the Luminous Landscape in which David Grover participates. Although the it is for C1 7 it has helped me immensely learning C1.
I already started using it for some sessions and not only the raw conversion is better but the culling process is now faster and more efficient thanks to the customizable workspaces.
As a matter of fact, I had to go back to LR today to finish editing a wedding I had started there and I can see how much better it is in C1.
There still certain things I am still learning but in general I can say I am extremely happy that I switched to C1.
One thing I need to find out is an efficient way to do key wording. On every wedding I use the same keywords. In LR you create a keyword set for weddings that you can re-use over on each wedding catalog. How can I do that in C1 so i don’t have to enter the keywords everytime?
Thanks
Nice post, and I do agree that C1 is the best raw convertor for a lot of things. BUT…as someone who mainly photographs artwork I have to disagree that Capture One is geared towards “realistic” or “accurate” color. It’s not, especially if you are using a 35mm format dslr. Try shooting a Color Checker next time and take a look at the blue and yellow patches and you’ll see exactly what I mean. Pleasing color for portraits and landscape? Definitely. Accurate color? Not even close.