
NOTE: This article discusses an outdated version of Capture One. To learn more about our latest version, click here.
In Sessions 101 we looked at an overview of the Session concept. In this post we’ll take Sessions to the next level.
While it solves a very simplistic workflow in its basic out-the-box form, the modern high volume shoot needs a bit more management. Fortunately, Sessions are super expandable when things get bigger. There’s a couple of good reasons for pushing beyond the standard Session – especially when dealing with serious volume.
Shooting 100’s of GB’s of files to a single directory is a big mistake. The words of wisdom here are “expectation management”. Although not technically wrong, and although it does work, performance and stability will start to fall off after a couple of hundred 60Mpix files. It’s common sense not only to keep your viewing and load times speedy (and client happy) but also to organise a bit for sanity.
So, don’t dump 5 days worth of pictures in one place and expect zero problems; Being a bit more modular will also help you if something were to (and it does occasionally) go wrong with a back-up, or to do a reprocess on image X for the client.
The revolution will be organized
By leveraging the proper organisation tools, you don’t need to move any files. Moving files out of a capture sequence to selects is, in my mind, a big mistake. Personally, I avoid the idea like the plague. I much prefer to keep chronology and timeline in the shot folders for proper review. To extract the keepers, I use other methods. Note there is a heavy slant here on “I”. You can of course do what you like if this doesn’t jive with how you like to work.
Ok, sounds reasonable. How do I do that?
First, we need to rewind back to the Session and the default Capture folder within it. From a new session, select the Capture folder in the “sessions folders” area at the top of the Library (this is a shortcut to the currently assigned Capture folder), then right click > show in library. This will open the library’s system folders to show you the current location of the current Capture folder in the file system.
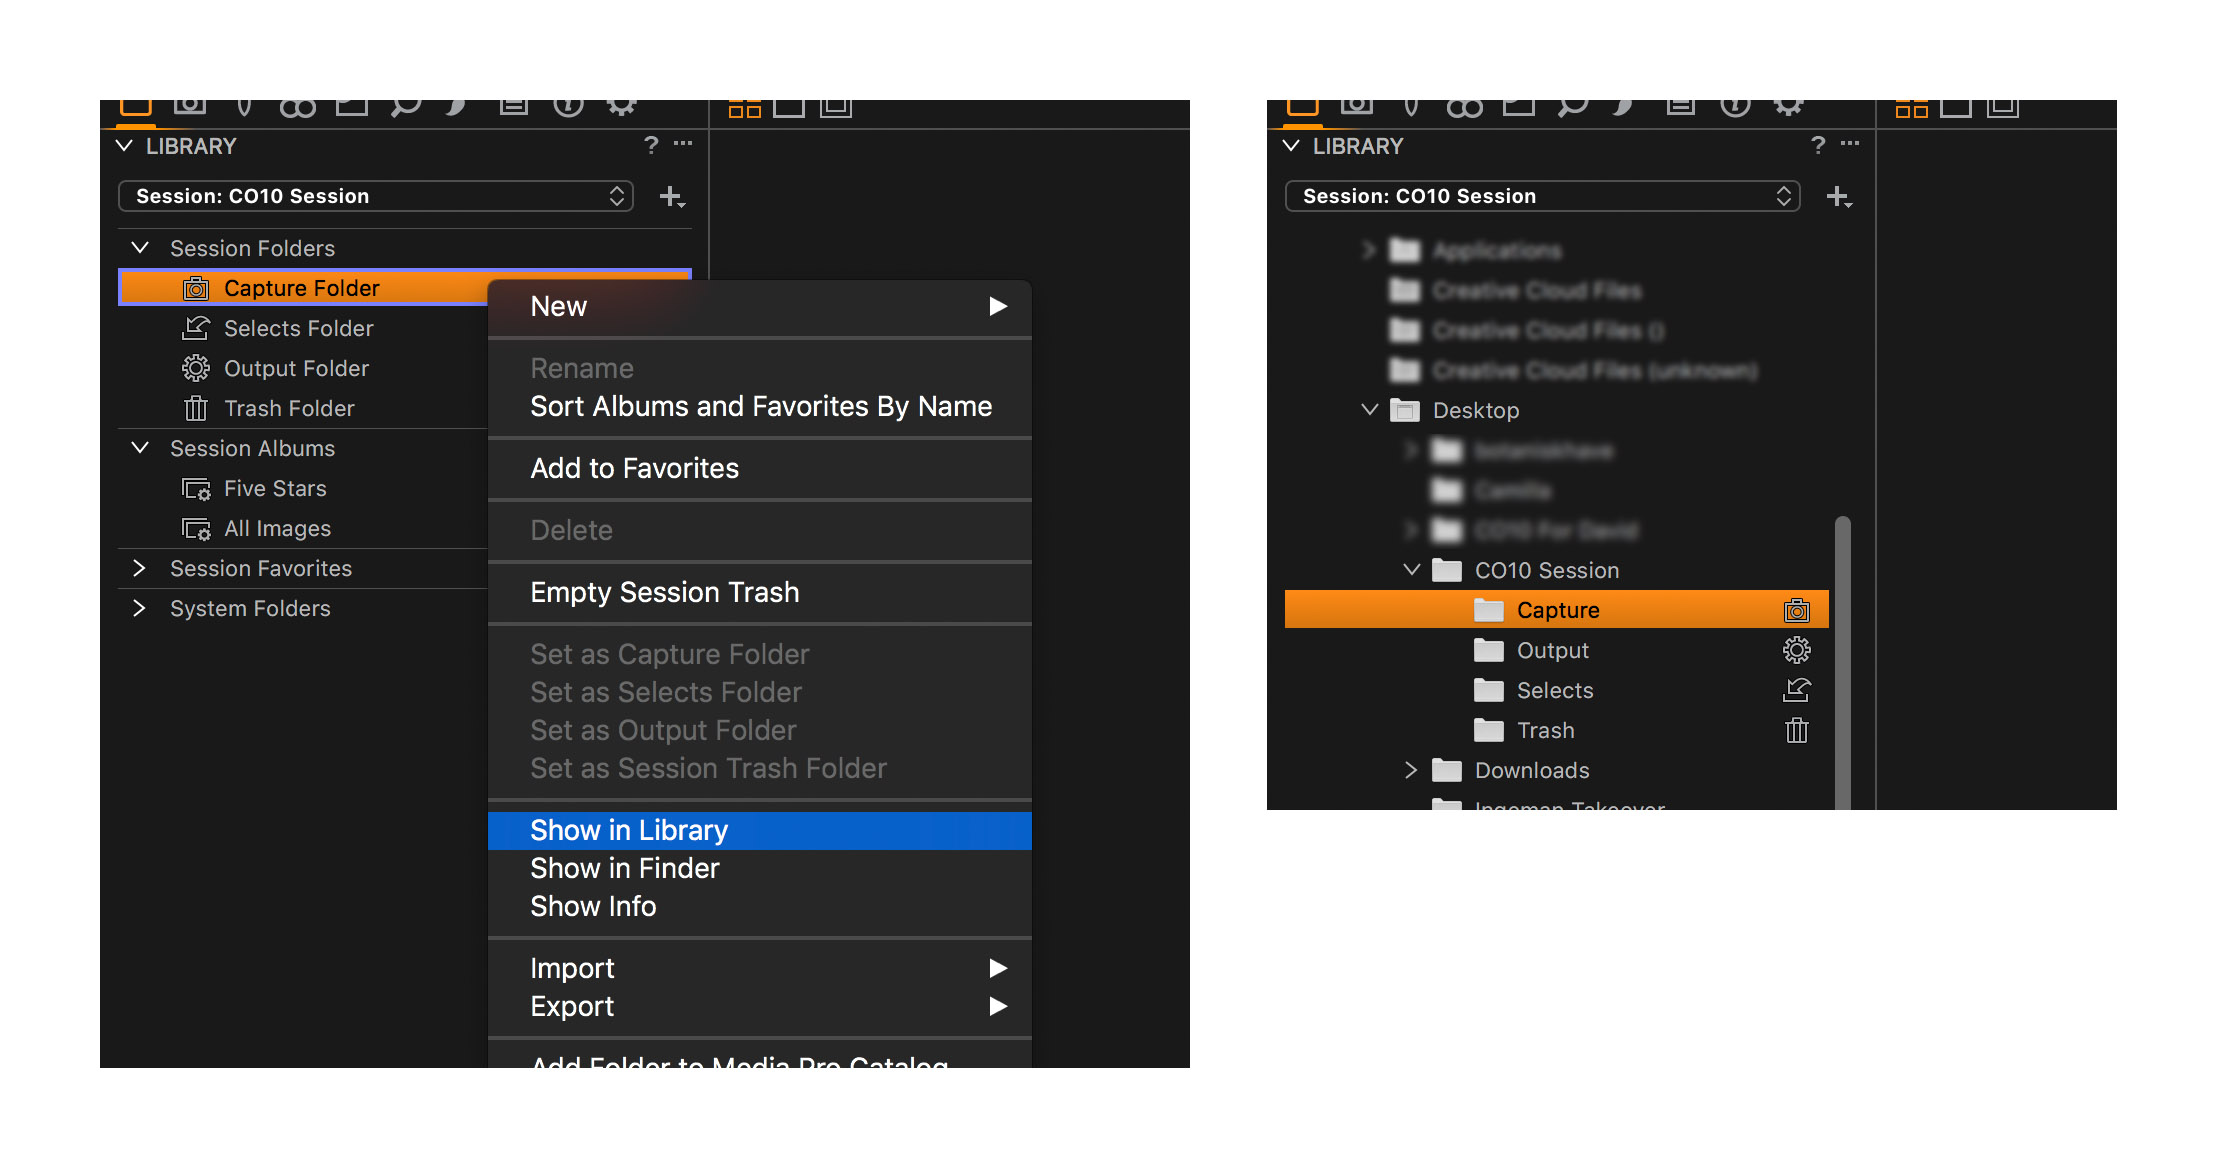
Now you can do this bit how ever you like (and believe me I’ve seen users do this just about every way possible) but I suggest sub-foldering “Capture” to hold all the shot folders. Some people put folders in the session folder (in the same directory as “Captures”), but I find this counter intuitive to the concepts discussed in Sessions 101. By organising inside Capture, I know any and all RAW captures will be inside Capture (a sort of logical drill down) and not end up in some random Capture 2 or untitled folder in the session.
Right click on the Capture folder in the system view and choose “new inside”. This will allow you to make a new folder inside Capture. Typically, you get a pop up asking if you want to add the previous Capture folder to favourites. You can ignore this for now.

The idea of subfoldering the Capture folder into shot folders is to look for natural breaks in the day. This might be product ID, model changes clothes, every hour, or any divider you can think of that helps with breaking up the volume of images. Not only does it help you organise, it reduces system resource pressure on images per directory.
Naming of these folders is thus a bit dependent on the above, but something descriptive (like “Shot 1”) or logical (like date) – or a combination of the two – is good.
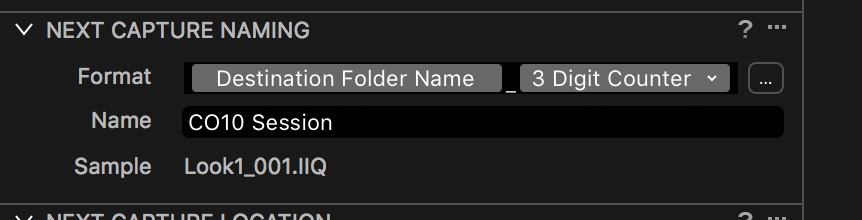
If you are shooting product, maybe the SKU or product code for the item is also pretty sane. The reasoning here is in the pipeline of production we can then leverage the Next Capture naming tool. This uses the Token concept, and with the correct tokens in place, you can extract the name of the current Capture folder up to the “Capture Name”. This sets up the naming based on the folder name as they land in it. If you change Capture folders, the name follows with it. This creates a wonderful sense of automatic order and organisational relationship for assets and parent directory – and also means reduced input and user error when setting up collections.
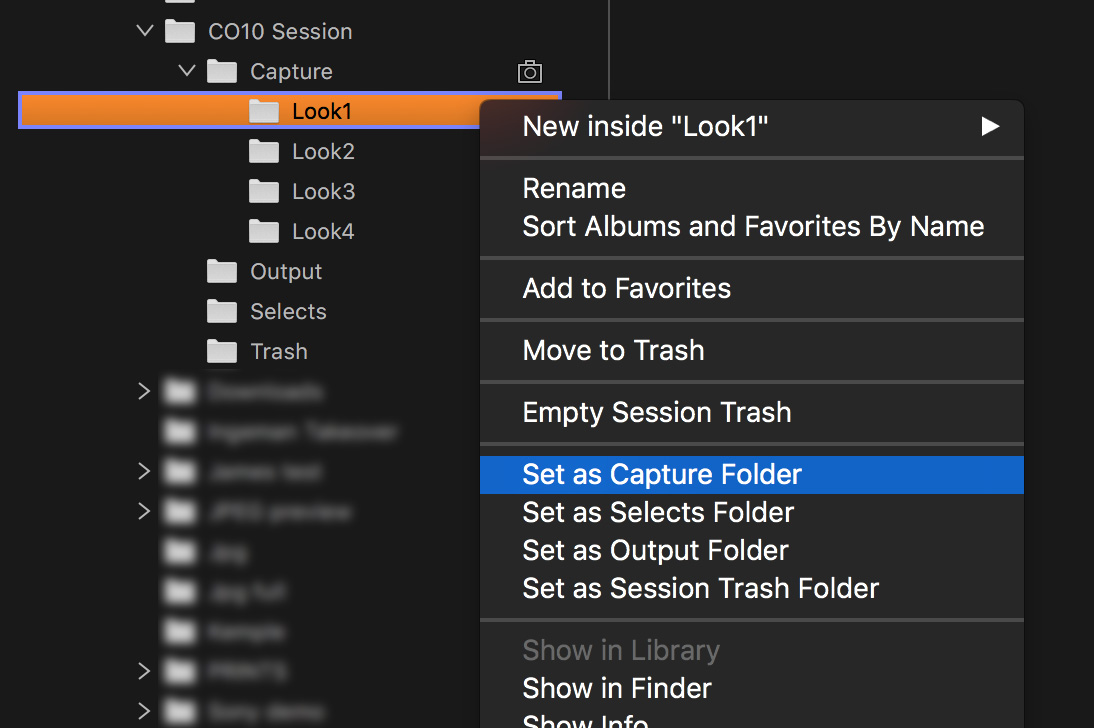
Once you have set this up, try to create a new folder, select it and again right click “set as Capture”. You should now see the Camera icon move to this new folder, indicating the current Capture folder has moved. This is now the new “Capture folder” – note this is distinctly different from the folder called “Capture”! Repeat this process to make multiple “Capture” folders and you can quickly start to build up an organized shoot as the content changes through the day. If you float the next Capture naming tool out, you can see the name update as you change folders.
Now you are properly on your way to a professional session user’s workflow.
Next up we will look at how to leverage higher level session concepts for thing like organising and culling: Favorites, Albums and Smart albums. This bit can take a chunk of the work out of the traditional workflow of moving to selects.
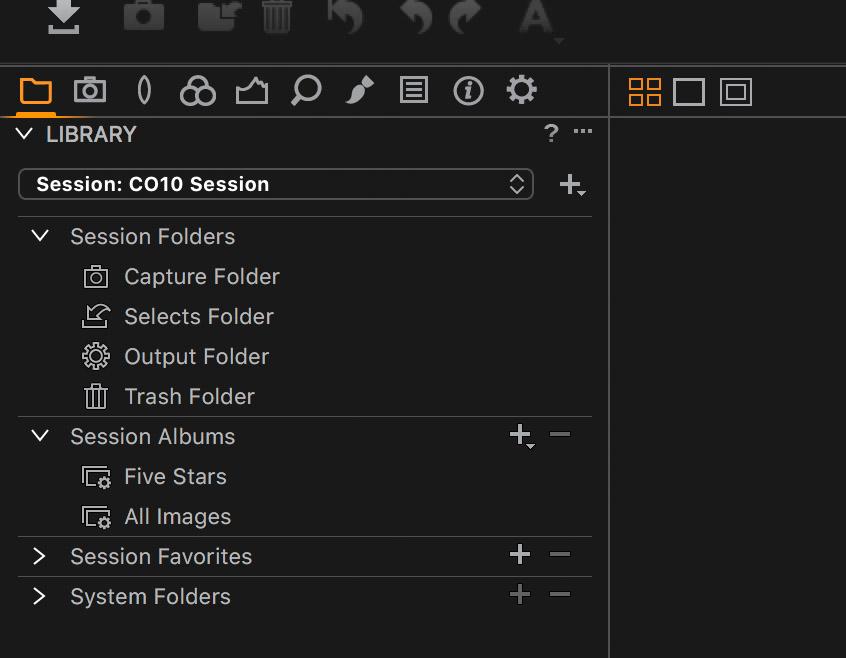
The Favorite
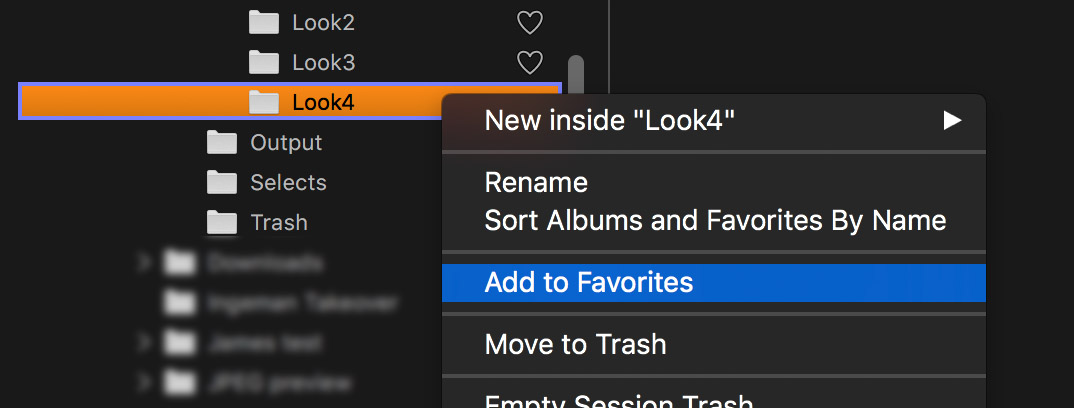
This is a marker in library (small heart icon) and you can use it on folders. It has three uses:
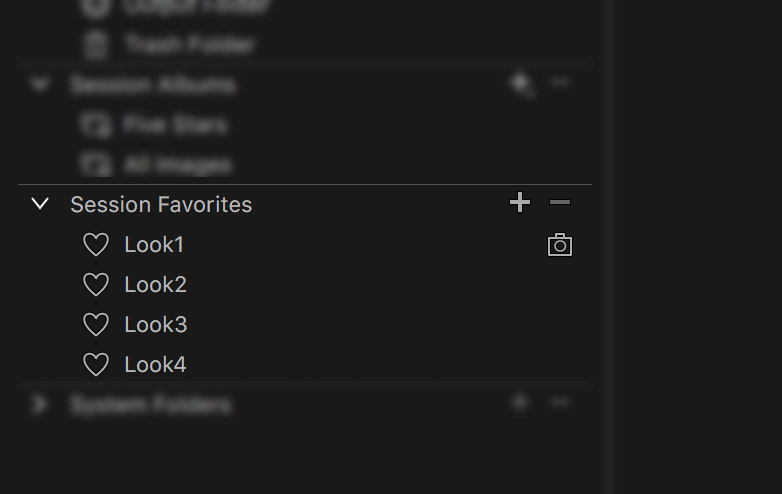
One: it makes a small heart on the folder in the library. The folder is then represented in Favorites area and clicking on it is effectively now a shortcut to the actual folder. This is for the most part purely UI for organisation and allows you to view the folders in the session as a flat list (which helps keep the UI tidy with deep folder structures or lots of Capture folders). You can also set Favorites as Capture/Selects/Output/Trash like it’s the actual folder, without having to find it in system.
Two: it indexes the content of that folder in the session database file, making it faster to load and opens up the contents for search. This is useful for Smart albums. Adding more folders to Favorites means more folders to search across.
Three: Folders marked as favorites (and their relative position to the session) are remembered when making custom templates.
Back to search, in chapter one we talked about how the Catalog worked; To view and index files in the Catalog, you have to import – then the catalog can search them. In sessions we use the Favorite concept as a tag to tell the session to “include this folder” in the index. You can also remove the folder from the Favorites list to exclude the contents from search. Once indexed, the smart albums can be used.
To make a folder a favorite, select it in the Library and right click -> Add to Favorites.
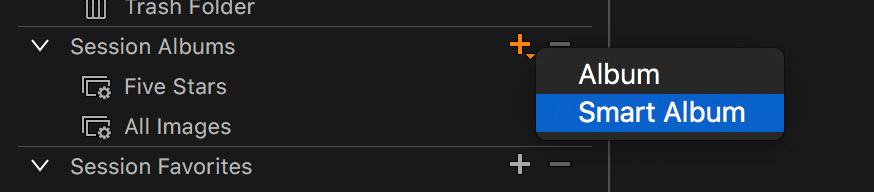
Smart Albums
Albums and Smart Albums are concepts that both require a bit of a disconnect from the physical ideas of files and folders we have dealt with so far. They are in effect “virtual” folders – meaning they can hold and show you an image but it’s just a reference to the actual file which is somewhere else. For albums, the main use case is something like “my best images” as you can drag in your picks from several folders to show you a collection of your awesome. However, the Smart Album is altogether… smarter. Obviously.
Smart Albums are to pictures what junk email filters are to Outlook. You specify rules for it, and if it finds images in the favorites that match, it will show it in the Smart Album. Remove the qualifying criteria from the image, and the image will from the smart album. This is especially cool for rating and culling.
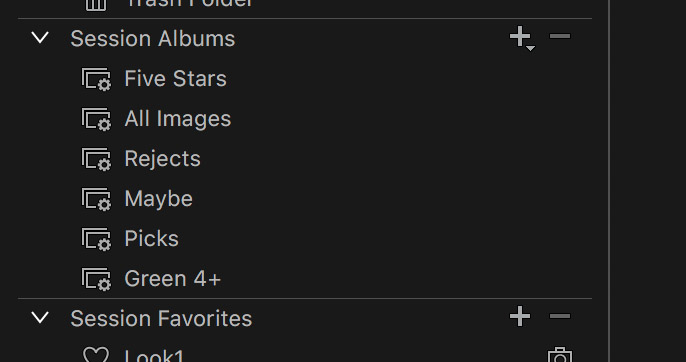
To make a Smart Album, find the Session Albums section in the Library tool and click “+” then -> Smart Album. Name it “Rejects”, then choose the preset for “red”. Press Done to save. In the old days of Capture One 3, one used the “traffic light” logic of tagging images (much like Lightroom’s flagging method) with a red cross for “reject”, yellow question mark for “maybe” and green tick for “pick”. I still do this today (or at least something close to it) by using colour tags.
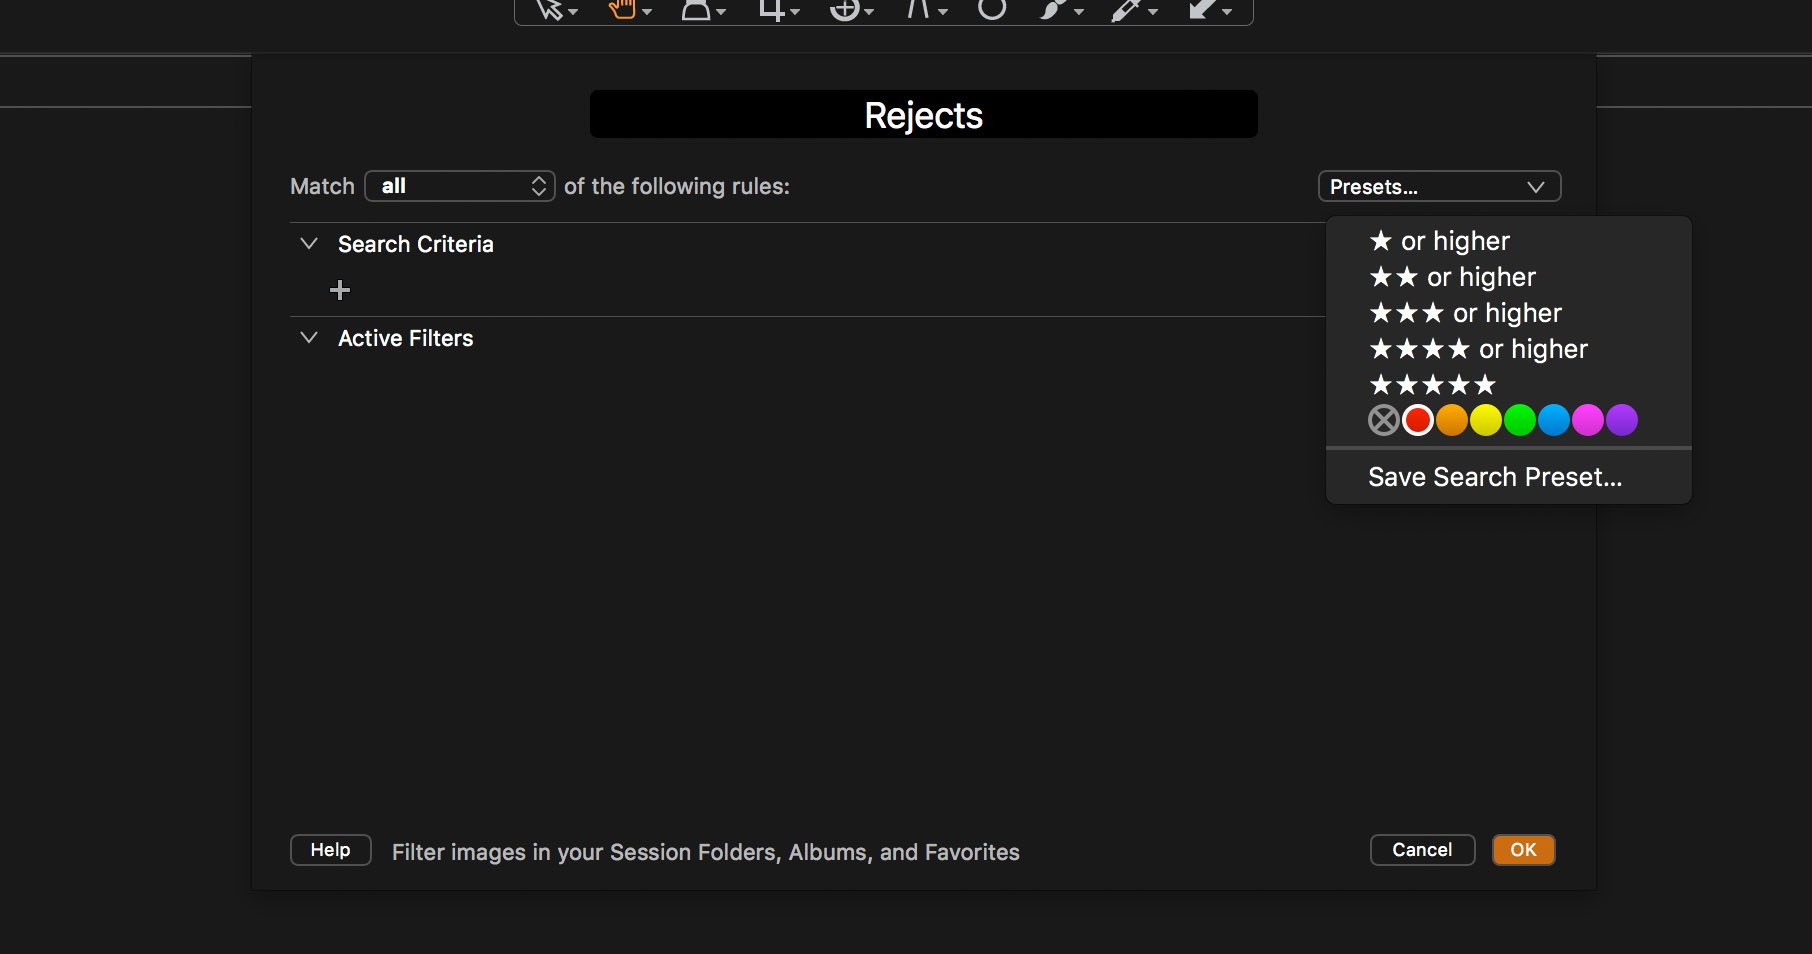
For every Session, I repeat this process 4 times to make four Smart albums. One to show me images with a red (rejects) tag, one for yellow (maybe) tags and one for green (picks). Lastly, I make an additional Smart album that I call Green4+ (which shows me green AND 4 or more stars). How all this comes together we will review in the final Sessions post later this week.
Supposing I do this kind of thing a lot. Can I make set up quicker? The last tip for today is templates.
Templating a template
As we discuss in 101, a session is a (very basic) template. Making something a little more useful for bigger shoots is a good time saver. Custom templates is possible in Capture One 8 and later.
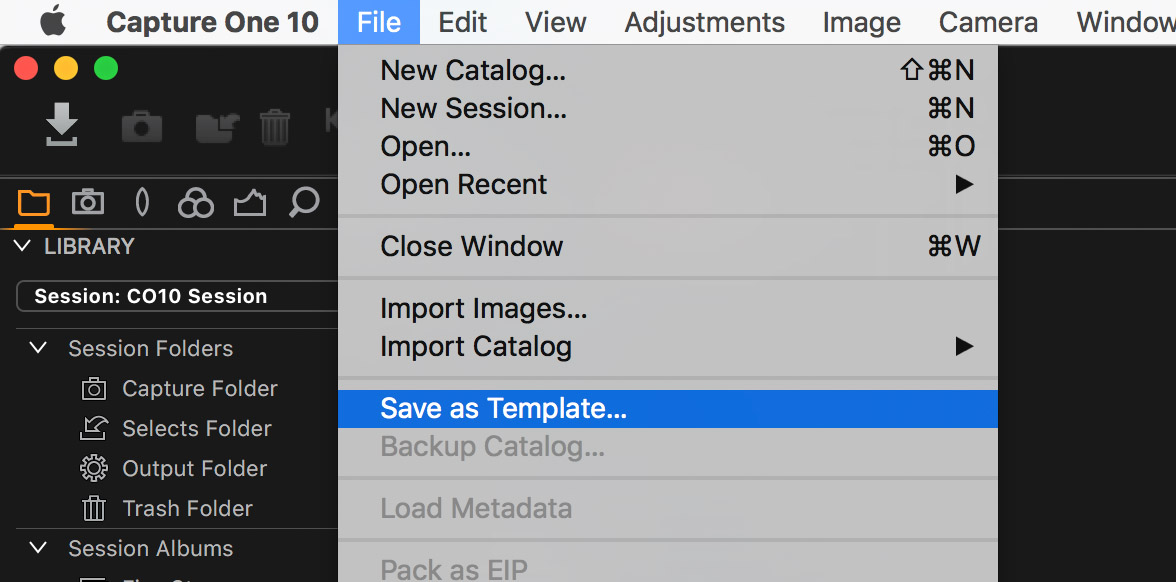
A custom template primarily remembers 3 things in the template. Folders which were favorited, albums/smart albums, and the Next Capture naming set up. Once you have set up everything (as above), go File > Save as template.
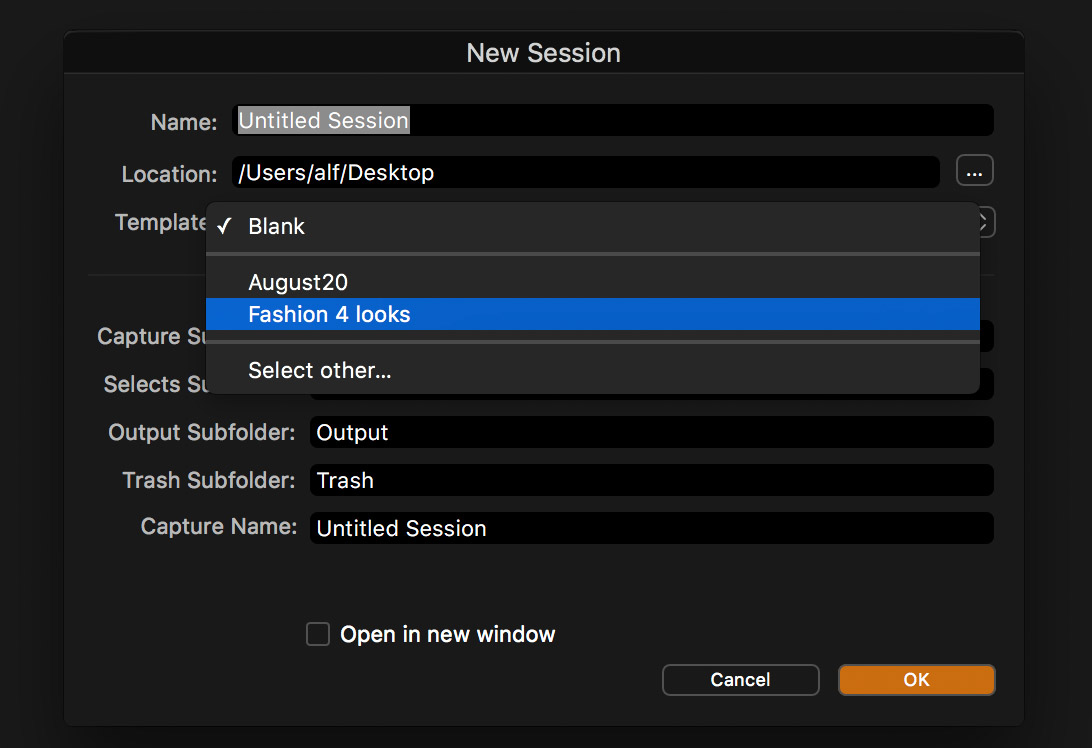
Next time you make a new Session (File>New Session) from the dialog, you can choose a Template from your custom list. A new session (with new name) will be made with all the shoot folders and albums. This considerably reduces time configuring your workflow for the shoot!
This is in a good point to end on a bit of advice. It’s not an inconsiderable amount of work to get to this “ready to shoot” stage. What I have described so far is a typical amount of prep for any big shoot and when it gets to pre-light most operators or technical producers will build collections in advance so time spent noodling around in software during the high pressure shooting phase on the day is reduced. So – be ready, and make the shot folders ahead of time if you can. Anything you can do to reduce fiddling around with naming and folders when under pressure will help you immeasurably when its hammer time and seven agency bods are looking at you wondering why the shoot stopped. That’s not a good feeling.
Sessions 103: Expert Knowledge
In the third and last post of the Sessions series, we’ll discuss how to bring the Capture One Pro workflow together on set. More specifically, we’ll cover how to cull in the Pro Session workflow. Read it here.
James Johnson
James is Software Product Manager at Phase One.


Am I missing something, or are Sessions not available for those using the Sony Express version of Capture One?
No, not missing anything. It’s a feature of the “Pro” level app.
I keep NEFs in geographical folders as I locate photos easily this way (China, Malaysia, Indonesia, …). Since moving from Capture NX2 I also output a JPEG as this gives me a preview of edits on the browser, and Photo Mechanic 5 (Capture One does not change JPEGs embedded in NEFs). My question is how to export cosessionDB files the right way when I incrementally add NEFs to my geographical folders from within the Capture One sessions library. I see that the Settings folders created in each geographical place folder gets added to. I want to keep a record of raw edits but would rather not work with sidecar files. Is this possible and am I doing it the right way?
cosessionDB strange name does it mean anything?
Why not : Client_Date_Number
That’s where CapOne’s editing information is kept
cosessionDB is the file extension
It is shown or hidden depending on OS preferences
The file name matches the session name
‘cosessionDB’ is used as a shorthand description of the file independent of the filename itself. It is like writing ‘exe’ or ‘bat’ file or etc
Can you change the default names used is sessions, ie “master” for “output”.
Thank you
Yes, when you create a session (file>new session) you can set up the names for the default folders in the resulting dialog window.
Sorry, but the very white grey is unreadable for me. It is verry foggy.
It is a low contrast format intended to be more restful for the eyes.
Personally, I love and adore black text on dove gray background because it is leap years ahead of the former effort : white background with dove gray text (yes, low contrast but not in a good way!)
Once set up, what folders are labeled as Favorites in the final template?
Only the ones you add yourself to the standard session structure.
Thanks, will you be putting up a file for the workspace/session?
Hi James!
I am still oon COP 9.2.1. One question:
I can have multiple folders below the capture folder but just ONE (!) can be the “active” capture folder via SET AS CAPTURE FOLDER, right?
Peter
Hi Peter,
Yes, this is the same for all versions of Capture One 9 or otherwise – only one folder can be destination.
Hello, I am wondering that is this content still working with CO11?
Hi Jang,
Yes, the workflow should be fully compatible with Capture One 11 as well.
Alex
Hi there!
I’m a bit mixed up here. What’s the difference between creating a smart album and using filters? Is your smart album for the client’s choice not the same as ticking 4 stars and green tag in the filters tab?
Thanks!
Hi Edyta,
Not quite. A Smart Album will filter across all images in your Session (Capture, Selects, any Favorites you have added) while the Filter Tool will only filter on the Album you’re currently looking at. So if you, for example, are dividing your shoot into four Capture Folders, a Smart Album will show images from all four Folders that match the criteria. Using the Filter Tool would only filter the selected Capture Folder (and you can only have one folder selected at a time). I hope I explained it in a clear way!
– Alex
this is a great article, thank you! However i also am looking for a workflow for how to use sub-folders within the Capture folder when i’m NOT shooting tethered, but rather out in the field dumping cards to a hard drive all day, and then come home to import the whole bunch to Capture One. I’ve generally organized my travel hard drive by card, and i’d prefer to keep the folder structure that way and just have Capture one honor it. But i can’t figure out how to do this. Any ideas?
Hi Natalie,
The easiest way is to create those subfolders either in the Library Tool or outside of Capture One, for example using Finder or Explorer. Then make sure to add those folders as Favorites, making sure your session will index the content.
Another option is to use a Catalog and import your images referenced, keeping the folder structure on your harddrive.
Alex
alexander, thank you so much your reply! This is very helpful…
another thing that confuses me (as compared to Lightroom) is the trash folder, in that as soon as you X an image, it is phsycially moved it to a new folder on the hard drive. Can this be turned off, so that ‘trash’ is just a designation in CO? Like you, i’m not a fan of having the files flying around to different folders while i’m doing an edit, I’d rather they all stay put in folder and just be flagged as trash until i’m ready to manually delete or move. Also another thing i’m struggling with is that when i’m editing a large shoot and, let’s say, I’m looking at four images at at time as a ‘set’ trying to churn through a huge number of images, if i X one of them, it disappears, and then each subsequent set only has 3 (and then 2, 1, none… as i keep deleting) and i have to go back to the thumbnail bar, reselect 4 and start over. Ugh. Is there a way to tell it it ‘keep 4’ in the set always? Or is there a way to tell it to still show the deleted file in the set, just gray it out? (the way lightroom does if you have all the flags visible). I understand a workaround is to just flag my trash items with a “1”, “5”, “red” etc and then delete them all at the end, but that’s less intuitive — and I guess i’m also looking for something similar to Lightroom’s IU where (when i’m looking at a set of images or a page of thumbnails) deleted file will be visibly grayed out and/or color tagged images have large color border around them…. so it’s super obvious what has been cut or flagged When i’m sorting through a shoot with 4000 files at end of day i need to move faster, not stop stop to scrutinize the tiny little boxes and stars under each image to see what’s what. Do you have any suggestions for me? thank you !!
Good idea about the subfolders…that’s what I always do. But how do you use the filter search over all subfolders? I did not find out any way to show images in subfolders at all. Which I can’t imagine C1 would do such nonsense. Where is it hidden?
Hi Valentino,
Make sure to add your subfolders as Session Favorites. That way they will be indexed in the Session database, and can be filtered across using ‘All Images’ or other Smart Albums or your choice.
– Alex
How do I name a library after I created one already without a name?
Hi Kurt,
If by Library you mean Session, then you can simply close Capture One, locate your .sessiondb file inside the main Session folder and rename that. Then double click that file, and the renamed Session will open. Also make sure to rename your main Session folder to match to make organization easy.
– Alex
The process of making new sub-folders in the capture folder is super, super buggy!!
I right click on the “Capture” folder in the file tree and select New>Folder and click OK and make a new sub-folder. I then realise that I made a mistake in the name and want to rename the sub folder I just made. I right click the sub-folder and click “Rename”, and then change the name of the sub-folder, a dialogue box comes up to ask if I’m sure I want to rename and I click “Yes”. The sub folder in the tree doesn’t rename it stays the same name as before. I try the new name again going through the aforementioned steps and a dialogue box comes up saying the naming failed because the file already exists even though it’s not showing up as being renamed.
But, if I collapse the “Capture” folder in the file tree and then re right click it then the new name will show in the sub folder.
Exactly the same thing happens when you try to delete a sub-folder. Is this a bad joke or am I missing something here?
Barry
Hi Barry,
Check that you’re using the latest version of Capture One. If it’s still an issue, contact our support at http://www.phaseone.com/support
– Alex
I have a few questions regarding the following paragraphs at the beginning of the article.
Shooting 100’s of GB’s of files to a single directory is a big mistake. The words of wisdom here are “expectation management”. Although not technically wrong, and although it does work, performance and stability will start to fall off after a couple of hundred 60Mpix files. It’s common sense not only to keep your viewing and load times speedy (and client happy) but also to organise a bit for sanity.
So, don’t dump 5 days worth of pictures in one place and expect zero problems; Being a bit more modular will also help you if something were to (and it does occasionally) go wrong with a back-up, or to do a reprocess on image X for the client.
Specifically, “Shooting 100’s of GB’s of files to a single directory is a big mistake”. Directory refers to what? Session size? Or folder organization within a single session?
The article states “Although not technically wrong, and although it does work, performance and stability will start to fall off after a couple of hundred 60Mpix files.” So, is this referring to the size of the session or the organization within the session. We are currently working with in a session (well organized), but quite large at over 200GBs. Will this cause problems with “performance and stability”?
Rob